

Key Points
- Change the default sound output device in Windows 11 using Quick Settings, Windows Settings, Sound Control Panel, or PowerShell.
- Set a permanent default output device in Windows Settings under System > Sound to ensure it takes precedence over other connected audio devices.
- Configure per-app audio routing in Windows 11 through Volume Mixer to set separate output and input devices for each application.
- All default audio configurations apply per user and are not enforced system-wide.
- Use PowerShell and endpoint management tools to automate default device configuration across multiple endpoints.
Modern computers can accommodate multiple sound devices; however, simultaneously using these devices can lead to confusing and messy audio routing. Setting a default device lets the system prioritize audio routing to your preferred device when it’s available.
If you need to set the default sound output device Windows 11 uses for playback or communications, the fastest method is through Windows 11 audio settings:
Press Win + I → Go to System > Sound → Under Output, select your preferred device → Set it as default.
To make sound output management easier, we’ll show you how to set your default sound output device in Windows 11.
Ways to change the default sound device in Windows 11
Windows 11 automatically assigns a default sound output device when there are multiple audio devices connected to a system. If not configured properly, the system may automatically route audio to an undesired device.
You can manage the default sound output device Windows 11 selects using Quick Settings, full Windows 11 audio settings, the Windows 11 sound control panel, or PowerShell automation.
For instance, you can route all audio to one device or make app-specific configurations to hear music through speakers and calls through headphones.
If you’re asking yourself, “How do I change my default sound device?”, you’re in the right place. Read on to learn simple steps that fit any use case. However, before proceeding, ensure that you meet the basic requirements below.
📌 Prerequisites:
- A device running any Windows 11 edition
- At least two (2) connected and detected audio devices
📌 Recommended deployment strategies:
| Click to Choose a Method | 💻 Best for Individual Users | 💻💻💻 Best for Enterprises |
| Method 1: Change the default sound device via quick settings | ✓ | |
| Method 2: Set the default sound device via Windows 11 Settings | ✓ | |
| Method 3: Configure using the legacy sound control panel | ✓ | |
| Method 4: Leverage PowerShell to automatically set the default output device | ✓ | ✓ |
💡 Note: All methods in the table above instantly change a machine’s default output device setting, but their scope is limited per user. (Refer to ⚠️ Things to look out for.)
🎥 Watch the four methods: How to Set the Default Sound Output Device in Windows 11.
Method 1: Change the default sound device using the Quick Settings panel
The easiest way to change your sound output device is by navigating Quick Settings, as this method is accessible via the taskbar. With one click, you can pick the default output device you want globally for your current user account.
📌 Use Cases: This method is ideal for everyday users who want to quickly change their audio output preference in one go.
- Press Win + A to pull up the Quick Settings panel.
- Click the Select a sound output button beside the volume slider.
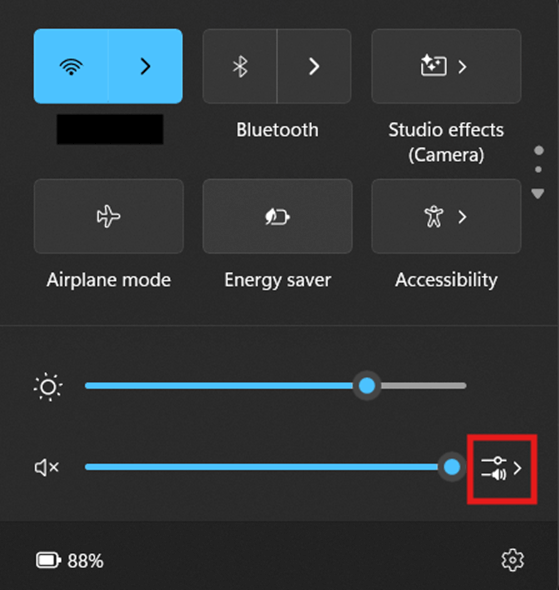
- Select the audio output device that you want to set as the default.
- For example, we’ll choose speakers over headphones.
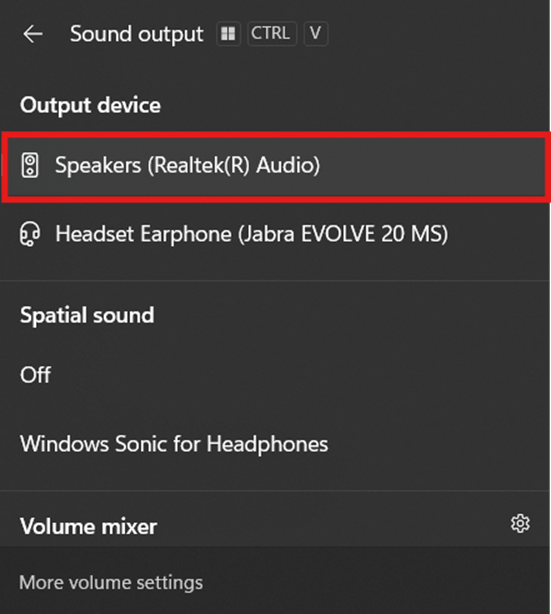
- Once done, press anywhere outside the Sound Output panel to close it.
Method 2: Set the default sound device via Windows 11 audio settings
If you need more granular control when picking your default sound device, you’d want to set it via Windows Settings. Through this, you can choose a permanent default device, allowing it to take precedence over other audio devices.
📌 Use Cases: Windows Settings allows users to pick a permanent output default device for audio and communication purposes. Aside from that, this method also enables users to set their audio device preferences per device.
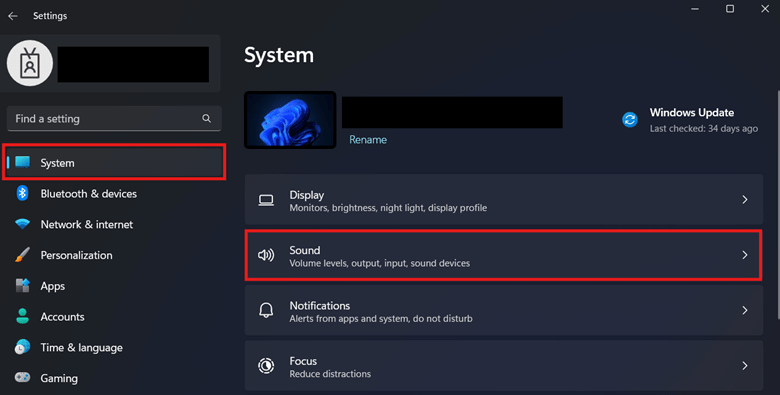
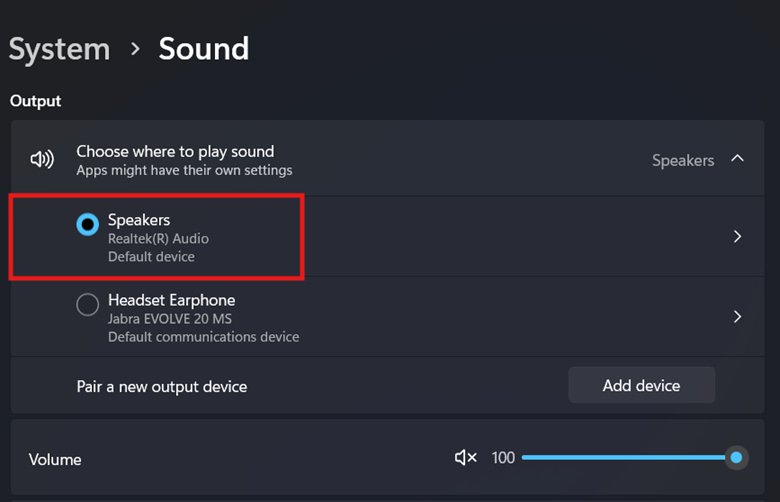
- Press Win + I to open Windows Settings.
- Inside Windows Settings, select System and then Sound.
- Under Output, click the chevron symbol (v) to expand Choose where to play sound.
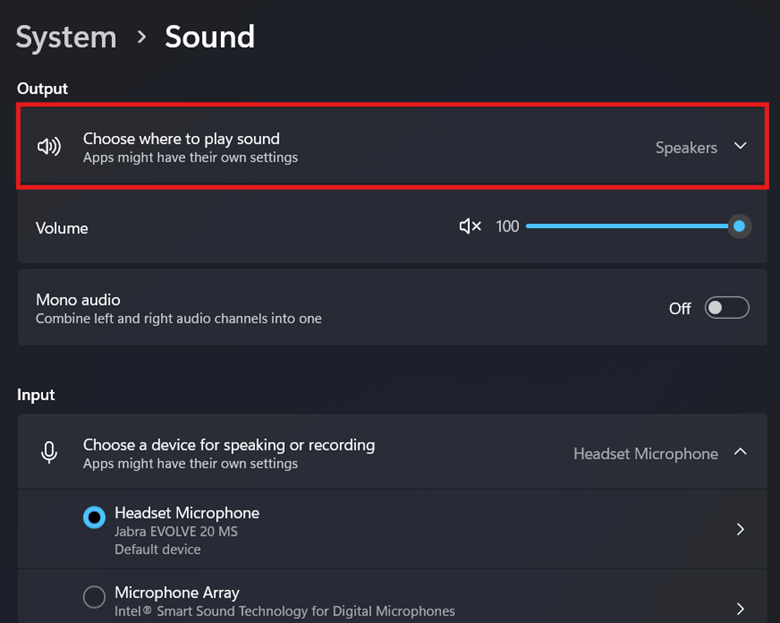
- Select your preferred default audio device by selecting the radio button beside it.
- For example, we’ll choose our test device’s speakers as the default audio device.
💡 Tip: To configure device-specific settings, scroll down to Advanced in the sound settings and select All sound devices.
Method 3: Configure using the Legacy Sound Control Panel
The Legacy Sound Control Panel offers more depth by providing access to all connected devices, including hidden output and input devices. Additionally, this is the best method for managing outdated devices and legacy audio drivers.
📌 Use Cases: This is suitable for users who wants to precisely configure the default output audio devices in their system. Additionally, the Legacy Sound Control Panel offers advanced configuration options while offering compatibility with older devices.
- Press Win + R, type mmsys.cpl, and press Enter.
- Select the Playback tab and select your preferred sound output device.
- In this example, we’ll be choosing the test device’s speaker.
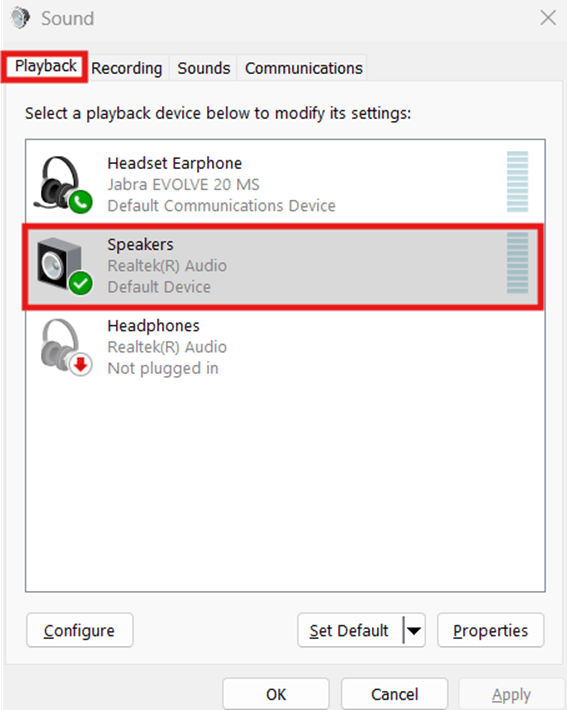
- Once you have highlighted your preferred output device, click Set Default.
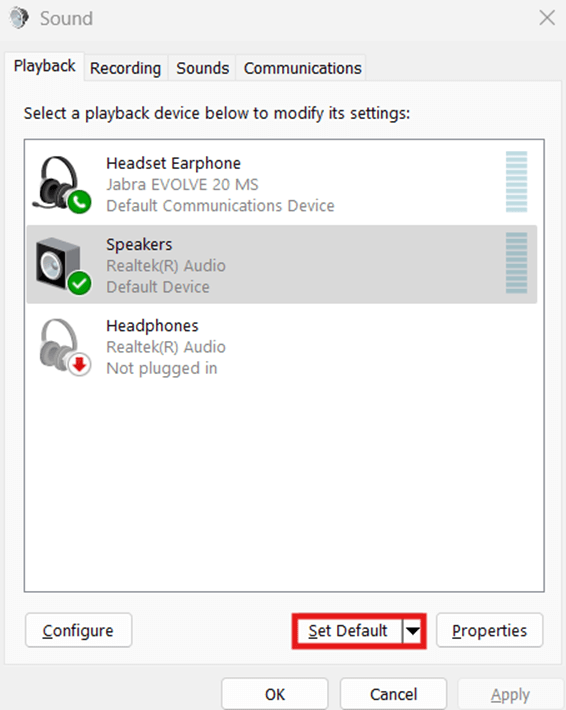
- Optionally, use the drop-down menu beside Set Default to set the device as the system’s default playback or communications device.

- Once you’re done, press Apply and then OK.
Method 4: Leverage PowerShell to automatically set the default output device
Administrators can leverage PowerShell to automate the configuration of default output devices in Windows 11. While the GUI methods above are ideal for personal configurations, PowerShell allows administrators to deploy consistent default output device settings for multiple endpoints.
⚠️ Warning: This method requires the usage of third-party modules that aren’t developed or maintained by Microsoft. (Refer to ⚠️ Things to look out for.)
📌 Use Cases: Advanced users can use PowerShell to set a Windows 11 device’s default sound output device using scripts. This eliminates the need to manually configure GUI settings per existing user account in an environment.
📌 Additional Prerequisites:
- Installation of third-party AudioDeviceCmdlets
- PowerShellGet
- Administrative privileges
- System backup
- Open an elevated PowerShell prompt.
- You can check if you have it pre-installed by inputting the following command:
Get-ModulePowerShellGet -ListAvailable
- If no PowerShellGet version appears, proceed to install PowerShellGet.
- If your PowerShellGet version is below 2.0, it’s advisable to update it to the latest version.
- Input the following command to import the AudioDeviceCmdlets in PowerShell:
Install-Module -Name AudioDeviceCmdlets
- If prompted, type and enter Y to confirm the installation.
- Enter the following command to list all available sound output devices in the system:
Get-AudioDevice -List
- Enter the following command to set a default audio output device:
Set-AudioDevice -Name "Speakers (Realtek(R) Audio)"
- To avoid errors, input the proper Name of your target sound output device as listed by the Get-AudioDevice -List command.
- In the example above, our target device is named “Speakers (Realtek(R) Audio).”
- Exit the PowerShell prompt and verify if the changes you want are reflected.
In enterprise environments, consider deploying PowerShell scripts through endpoint management platforms (such as Intune or RMM tools) when standardizing the default sound output device Windows 11 endpoints use.
⚠️ Things to look out for
| Risks | Potential Consequences | Reversals |
| Apps can override configurations. | Sometimes, applications may retain their own audio output preferences after configuration. | Fully restart the target application to reflect the intended default audio device change. |
| Leveraging external cmdlets in PowerShell | PowerShell can run non-native cmdlets provided that the user properly exports them. However, it’s important to remember that these external cmdlets aren’t documented by Microsoft—one misconfiguration can lead to broken functionality of audio devices. | Before proceeding, it’s important to create a system image manually or by using an image backup software for easy rollback. By having a system image, you’ll have a snapshot of your entire settings in case a full system recovery is needed. |
| Per-user configuration | Since all the methods in this guide apply per user, it cannot be enforced on a system level. That said, end users can simply reconfigure their default sound audio device through the GUI. | To enforce this, open gpedit.msc, go to User Configuration > Administrative Templates > Control Panel, then enable the Prohibit access to Control Panel and PC settings policy. This prevents user access to the Settings app and Control Panel. Additionally, administrators can go to Computer Configuration > Windows Settings > Security Settings > Software Restriction Policies to create a policy that restricts the launching of mmsys.cpl. |
Considerations when setting a default sound output device in Windows 11
End users and administrators can make use of multiple ways to control a system’s default sound output device. By picking a default device, users can properly route their audio in a way that supplements their specific workflow needs.
Below are additional considerations to help users fine-tune and maximize Windows 11’s audio management capabilities:
Per-app audio output
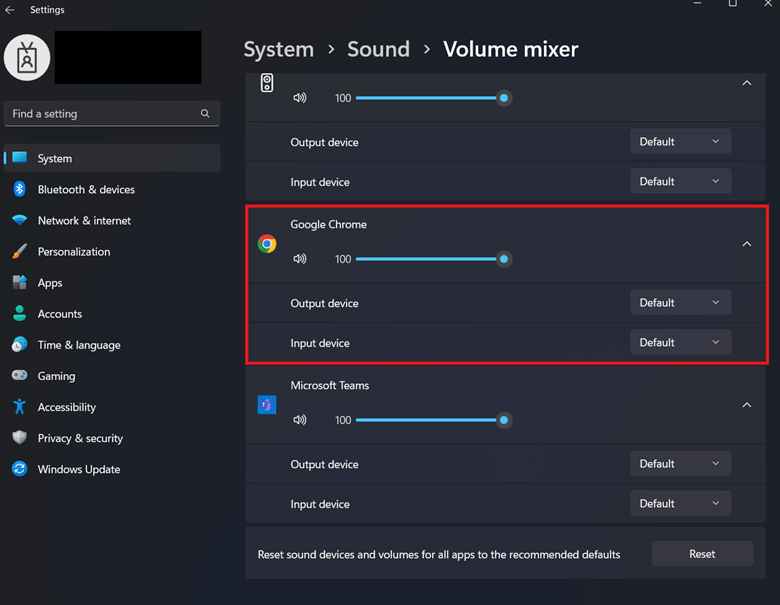
Aside from globally assigning a default output device per user, Windows 11 also supports configuring app-specific default output devices. To do this, go to Windows Settings > System > Sound > Volume mixer. Inside the Volume mixer, press the drop-down menu beside the target application and manually set its default output and input device.
Communication vs. playback devices
In GUI settings, Windows 11 allows users to pick a separate default playback and communications device. A playback device is an output device that’s used for general audio purposes, such as media, games, and system sounds. On the other hand, a communications device is an output device utilized by apps like Microsoft Teams or Zoom.
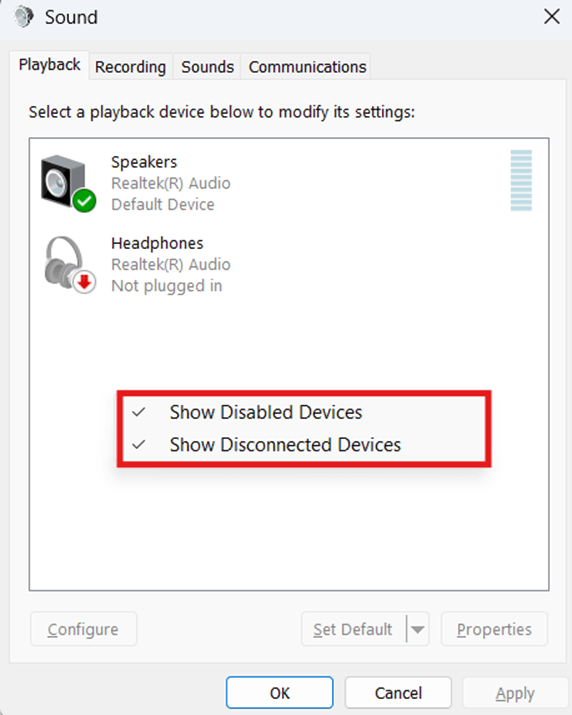
Disconnected devices
Windows only sets an audio device as the default if it’s connected and recognized by the system. However, you can still view disabled and disconnected devices by opening mmsys.cpl, select the Playback tab, right-click inside the Select a playback device below to modify its settings field. This shows a context menu containing options to show disabled and disconnected devices.
Best Practices for Managing Default Sound Devices in Windows 11
In multi-device environments, improperly configured audio routing can create recurring support tickets and inconsistent user experiences. Establishing clear configuration standards for the default sound output device Windows 11 systems use helps reduce troubleshooting overhead and improves endpoint consistency.
- Standardize audio device naming conventions across managed endpoints to avoid scripting and deployment errors.
- Document baseline configurations for the default sound output device Windows 11 devices should use in different user roles.
- Limit user access to Windows 11 audio settings where consistent routing is required, like kiosks and/or shared devices.
- Validate changes after major Windows feature updates.
- Use per-app routing in Windows 11 audio settings instead of global changes when only specific workloads require alternate output devices.
Set a default sound output device in Windows 11 for a stable audio setup
Without setting a default sound device, Windows 11 can keep changing the system’s default sound device every time a new device connects. This results in confusing audio management that routes playback or communication outputs to undesired sound devices.
For better audio management, users should set a default sound device via Quick Panel, Windows Settings, or Sound Control Panel. Administrators, on the other hand, can automate or deploy default sound device settings across an organization using third-party PowerShell cmdlets.
Related topics:


