

Key Points
- The Windows 10 Start screen is a customizable part of a user’s workspace, allowing them to navigate their device more easily. However, in managed environments, IT administrators can opt to set a default Start layout for users to provide a consistent user experience.
- You can configure a default Start Menu layout in Windows 10 using an exported XML file.
- You can export the XML file via PowerShell using the command: Export-StartLayout -Path $env:UserProfile\Desktop\my_start_layout.xml
- Using the Local Group Policy Editor or Registry Editor, you can configure the default Start menu layout for all users. The Local Group Policy Editor also lets you set a default layout for specific users only.
- Users will not be able to edit the Start menu layout once it is set via Group Policy Editor or Registry Editor.
The Windows 10 Start screen has several configurable options, including whether it is full-screen, and the apps and tiles that are shown (including their positioning). Setting a default layout across devices allows for a consistent user experience in public, enterprise, and education settings. This tutorial demonstrates how to set a default Start layout for users in Windows 10 by exporting and importing a Start menu layout using an XML file.
For a visual guide, watch How to Set a Default Start Layout for Users in Windows 10.
Understanding the Windows Start menu layout
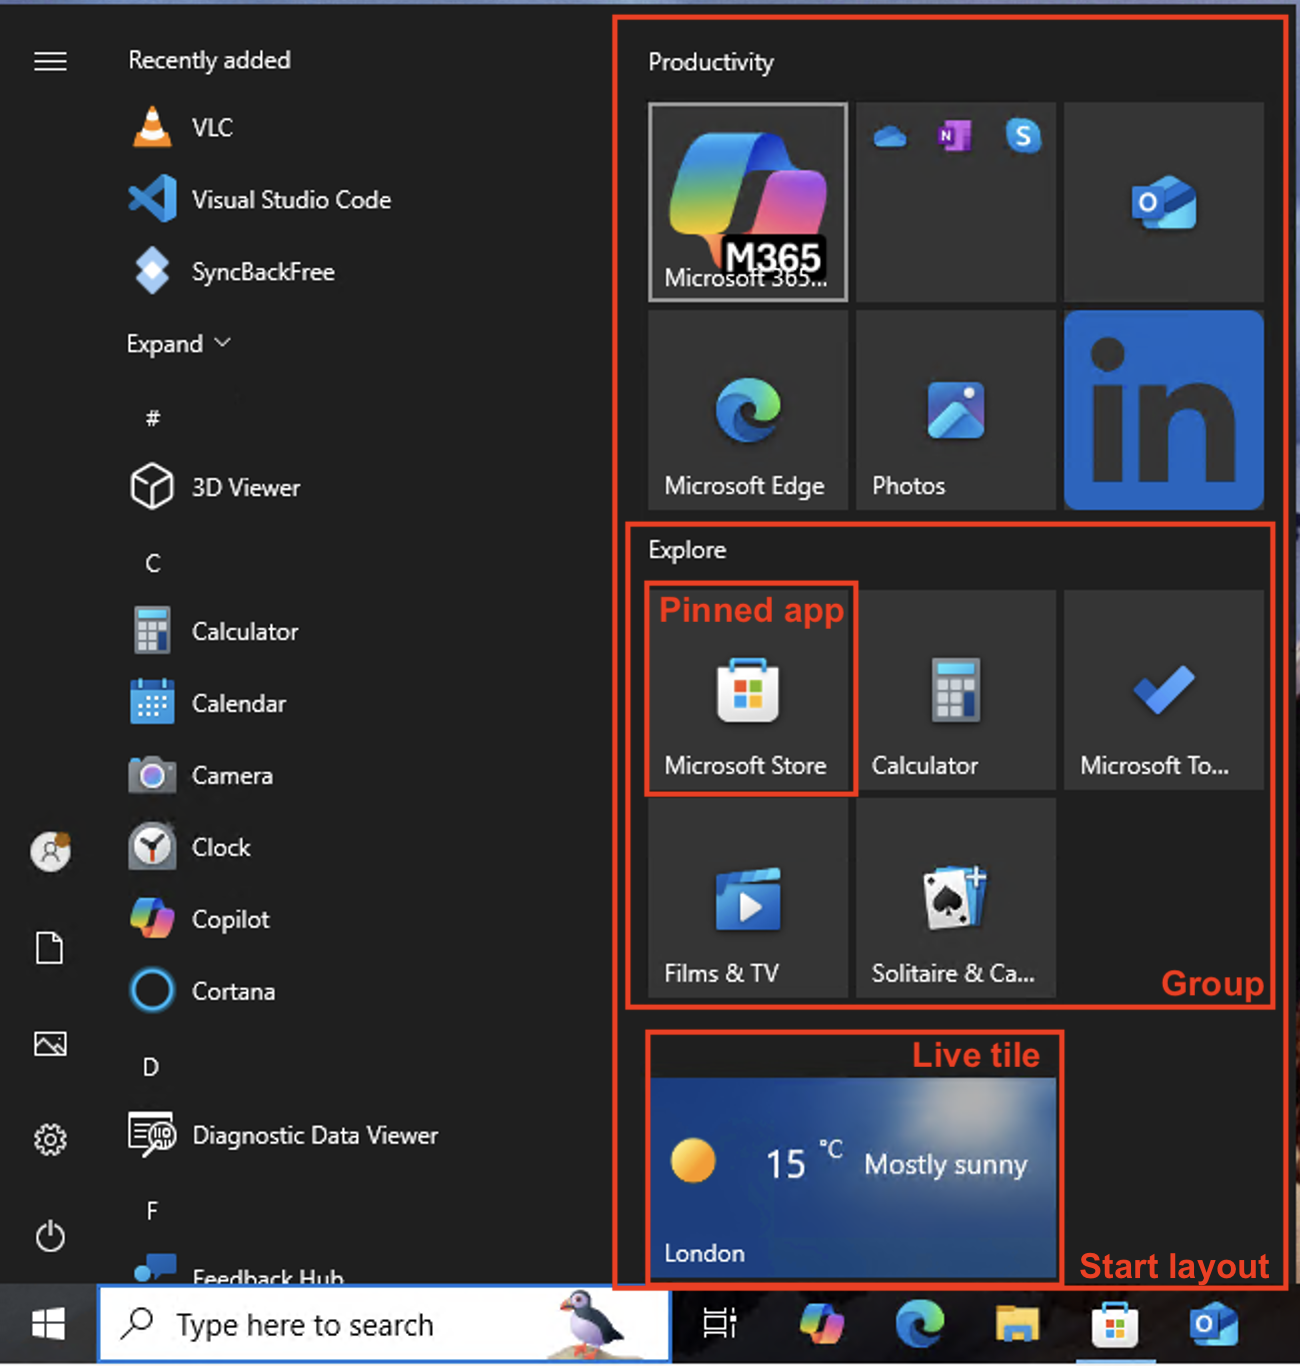
The Windows 10 start menu consists of several elements:
- Whether it is displayed as a menu or full-screen
- The configurable Start layout, including pinned apps, groups, and live tiles/folders
- Recently added applications
- Most used and other applications
- Suggested apps
- The currently logged-in user profile
- Links to folders like Documents and Pictures
- Settings
- Power/Shutdown menu (Restart, Log off, Switch user, etc.)
By default, the Windows Start layout area is configurable by the user so that they can tailor it to their own needs. However, in some cases it is preferable to set a default layout, (e.g. in an education or enterprise environment where you want to make sure productivity tools are easy to find for novice users). In public situations like kiosks or interactive product demos, it may be necessary to restrict what apps users can see to discourage tampering.
Setting a default layout will prevent the user from customizing the Start menu themselves, though they will still be able to alter its size.
💡 NOTE: Some elements in the default layout won’t be affected even when a default layout is set. These are usually system UI elements, such as Settings and Power, and dynamic elements. Dynamic elements are user-specific elements, such as Recently added apps, Most used apps, and Suggested apps.
Configure endpoints and customize user experience with ease.
💡 Discover the cross-platform capabilities of NinjaOne Remote®
Exporting a custom Start menu layout
Customizing your Start menu layout
To set a default Start menu layout, you first need to customize your Start menu. There are several ways to customize your layout, including:
- Pinning and arranging apps, groups, and live tiles/folders as you want them shown to other users who will have the template applied to their Windows 10 PCs.
- Opening the Settings app and navigating to Personalization > Start to select what app will be shown on the Start list and whether the default Start menu will be shown in full screen.
Exporting the XML file
Once you have configured the appearance of your Start menu you can export the layout as an XML file. To do this:
- Right-click on the Start button and open Windows PowerShell
- Execute the command Export-StartLayout -Path $env:UserProfile\Desktop\my_start_layout.xml into the Run dialog and press the Enter key.
- An XML file containing the current Start menu layout will be exported (💡 TIP: You can inspect the file by opening it in Notepad)
- Move the exported layout file to a location that is accessible to all users (for example, your C:\ drive or a shared network location)

💡 TIP: If you need to update your layout, it is advisable to edit your Start menu and then re-export it rather than attempting to edit the XML file, which could lead to errors.
Note that the layout XML file will need to remain in the same location. All users who will use the layout will need permission to read the XML file so that it can be read each time they log in.
How to configure the default Start menu layout for all users using the Local Group Policy Editor
Once you have exported a Windows Start menu layout, you can import it using the Local Group Policy Editor on Windows 10 Pro, Education, and Enterprise editions (⚠️ IMPORTANT: Local Group Policy is not available in Windows 10 Home).
To set the Start layout for all users on the current Windows 10 device:
- Right-click on the Start button and select Run
- Input the command gpedit.msc and press OK to open the Local Group Policy Editor
- Navigate to Computer Configuration\Administrative Templates\Start Menu and Taskbar

- Locate the Start Layout setting and double-click on it
- Configure the setting:
- To disable the default Start layout from being applied, select the Not configured option and press OK to apply the change
- To apply a Start menu layout, select Enabled and then enter the path to the exported Start layout XML file (as detailed above), then click OK to apply the change. Enabling this policy will lock the users from rearranging, unpinning, and further modifying the Start layout.

Disabling the default start layout will return control of the appearance of the Start menu to each user.
You will need to restart your Windows 10 device for the change to be applied.
Applying the default Start layout to specific users or groups using Local Group Policy
You can create a link to a custom Local Group Policy Editor MMC (Microsoft management console) that targets specific users or groups to selectively apply the Start Layout Local Group Policy. When doing this, configure the setting located at User Configuration\Administrative Templates\Start Menu and Taskbar instead of the one located in Computer Configuration.
If you are deploying to a Windows Active Directory Domain, you can use Group Policy in Active Directory to deploy a default Start menu layout to multiple domain-connected Windows 10 devices.
Setting the default Start menu layout for all users using the Windows Registry Editor
You can also set this on a Windows 10 device using the Registry Editor:
- Right-click on the Start button and click Run
- Enter the command regedit.exe and press OK
- In the Windows registry Editor, navigate to the key Computer\HKEY_LOCAL_MACHINE\SOFTWARE\Policies\Microsoft\Windows\Explorer
- If the Explorer key doesn’t exist at Computer\HKEY_LOCAL_MACHINE\SOFTWARE\Policies\Microsoft\Windows, select the Windows key and then select Edit > New > Key from the toolbar, and rename the new key Explorer
- If the LockedStartlayout registry value doesn’t exist at this location, select Edit > New > DWORD (32-bit) Value from the toolbar and name the new value LockedStartLayout
- If the StartLayoutFile registry value doesn’t exist at this location, select Edit > New > Expandable String Value from the toolbar and name the new value StartLayoutFile
- Set the value of LockedStartLayout to 1 in order to enable enforcement of the layout
- Set the value of StartLayoutFile to the path to your exported layout XML file
- Reboot your PC to apply the change

How to unset the default Start menu layout for all users using the Registry Editor
To remove the default Start menu layout in Windows 10 and return control of the start menu appearance to users, follow the steps to set the layout above, but instead delete the LockedStartLayout and StartLayoutFile registry values. Reboot your PC to apply the change.
Troubleshooting default Start menu layout issues
There are a few things to check if your Start menu layout is not applied after a user logs in:
- Check that the path to the exported layout XML file is correct
- Check that the user has permissions to read the file
- Re-export the layout XML file if you have attempted to modify it manually
- Ensure the correct users are targeted if using Local Group Policy to apply the layout to specific users or groups
Resolve tickets across your IT environments without delays or access isues.
Deploying Windows Start menu configuration to multiple devices
NinjaOne remote monitoring and management works hand-in-hand with your Windows Domain, and can also remotely configure Windows devices not connected to a domain. This allows you to deploy Group Policy and Local Group Policy for management tasks including managing the default Start menu layout in Windows 10.
Policies for Apple, Android, and Linux devices can also be deployed using the same NinjaOne unified web interface, which also provides remote monitoring and remote access for preemptive remediation of user issues.
Streamline your user workspace by setting a default Start Layout
Whether you’re managing a small fleet of devices or a large organization, managing the Start menu layout can improve usability, productivity, and security. The methods above detail efficient and effective methods to set a default layout across users in a managed environment.


 and SCIM")


