

Notepad’s spell check and autocorrect features offer inline corrections, which are helpful for automatically spotting errors in note-taking and content drafting workflows. However, these can create unwanted modifications within code-based content, particularly in IT environments.
Standardizing the Notepad app’s behavior is imperative to match your environment’s workflow needs and requirements. In this guide, we’ll show you how to manage spell checker and autocorrect for Notepad, along with precautions and considerations for implementing the changes.
Manage both the spell checker and autocorrect features for Notepad
In some scenarios, the spell-checker and autocorrect features are useful, especially within workflows where spelling accuracy matters. However, they must be disabled in technical environments that leverage Notepad for editing code and scripts.
📌 Prerequisites: For a smooth configuration of these settings, ensure that you have the following:
- Windows 11 version 23H2 or later
- Notepad app access
Refer to additional (method-specific) prerequisites under each method.
💡 Recommended deployment strategies:
| Click to Choose a Method | 💻 Best for Individual Users | 💻💻💻 Best for Enterprises |
| Method 1: Enable or disable via Notepad settings | ✓ | |
| Method 2: Configure via Registry Editor | ✓ | |
| Method 3: Automate configuration using a PowerShell script | ✓ | ✓ |
| Method 4: Create a .reg File for quick configurations | ✓ | ✓ |
Method 1: Enable or disable via Notepad settings
Notepad’s built-in settings allow users to manage how the spell checker and autocorrect features behave. With just one click, users can easily choose the setting that best suits their needs.
📌 Use Cases: This method is ideal for end users who want to leverage GUI settings to quickly toggle the spell check and autocorrect features in Notepad.
- Press Win + S, type Notepad, and then press Enter.
- Inside Notepad, select the gear icon in the upper right corner.

- Scroll down until you find the Spelling sub-menu.
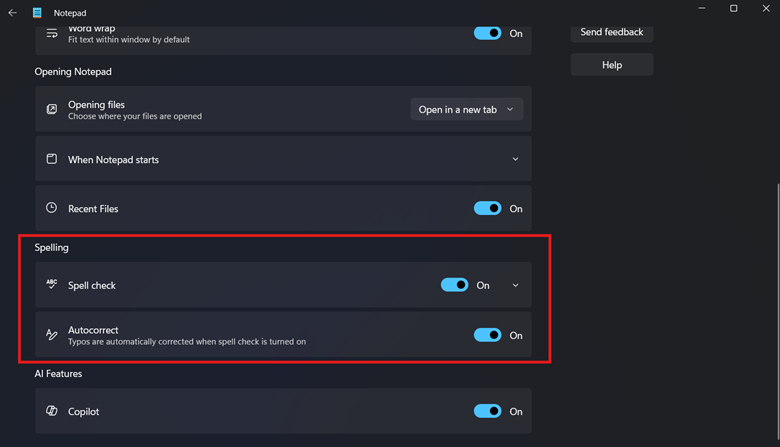
- Toggle the Spell check setting to match the behavior you want:

- On: This underlines unfamiliar words with a red squiggly line, signifying a possible spelling mistake.

- Off: This disables the underlining of possible spelling mistakes.

- Optionally, you can press the drop-down menu beside Spell check to customize the feature’s applicability for each plain text file type.

- Toggle the Autocorrect setting that reflects the behavior you prefer:
- On: Allows the system to automatically correct common spelling mistakes.
- Off: Prevents the system from automatically correcting spelling mistakes.
- Once you’re done, you can press the back button on the upper left side of the Settings panel.

💡 Remember: Changes to spell check and autocorrect settings automatically apply on a per-user basis.
Method 2: Configure via Registry Editor
Advanced users can leverage the Registry Editor to directly modify Notepad’s spell checker and autocorrect keys.
⚠️ Warning: Directly modifying the Registry Editor is risky; one simple mistake can break system functionality. Additionally, there are instances when the Notepad app doesn’t reflect the change applied via the Registry. [Refer to ⚠️ Things to look out for.]
📌 Use Cases: It’s ideal to leverage the Registry if you’re going to provision the spell check and autocorrect configurations for new user accounts. Additionally, this method is script-friendly and can be bundled into automation workflows, such as PowerShell scripting or .reg File deployment.
📌 Prerequisites: Windows Registry backup
- Press Win + R, type regedit, and press Enter
- Navigate to:
HKEY_CURRENT_USER\Software\Microsoft\Notepad
- Find SpellCheckEnabled and AutocorrectEnabled DWORD (32-bit) values.
- If the DWORD values don’t exist, right-click Notepad and select New > DWORD (32-bit) Value.

- Name the newly created value SpellCheckEnabled.
- Repeat the same process, but name the next value AutocorrectEnabled.
- Configure the Value data within both DWORD values to match the behavior you want:
- SpellCheckEnabled DWORD (32-bit) Value:
- 1 = This enables spell check in Notepad.
- 0 = This disables spell check in Notepad.
- AutocorrectEnabled DWORD (32-bit) Value:
- 1 = This enables autocorrect in Notepad.
- 0 = This disables autocorrect in Notepad.
- SpellCheckEnabled DWORD (32-bit) Value:
- Once you’re finished managing the registry keys, close the Registry Editor.
- Restart Notepad or your device to apply changes.
Method 3: Automate configuration using a PowerShell script
Although administrators can manually apply the Registry change outlined above for multiple endpoints, scaling this operation can be tedious and error-prone. PowerShell can help automate the deployment of your preferred Registry configuration while ensuring consistency across all target endpoints.
⚠️ Caution: When deploying PowerShell scripts, it’s advisable to first test the script on a local machine before proceeding. [Refer to ⚠️ Things to look out for.]
📌 Use Cases: Leveraging PowerShell helps administrators automatically manage Notepad’s spell checker and autocorrect features. This makes the Registry change repeatable and scalable for deployment.
📌 Prerequisites: Windows Registry backup
- Press Win + R, type PowerShell, and then press Enter.
- Enter the spell check and autocorrect behavior that matches your preference:
- To enable both spell check and autocorrect in Notepad:
New-Item -Path "HKCU:\Software\Microsoft\Notepad" -ForceSet-ItemProperty -Path "HKCU:\Software\Microsoft\Notepad" -Name "SpellCheckEnabled" -Value 1Set-ItemProperty -Path "HKCU:\Software\Microsoft\Notepad" -Name "AutocorrectEnabled" -Value 1
- To disable both spell check and autocorrect in Notepad:
Set-ItemProperty -Path "HKCU:\Software\Microsoft\Notepad" -Name "SpellCheckEnabled" -Value 0Set-ItemProperty -Path "HKCU:\Software\Microsoft\Notepad" -Name "AutocorrectEnabled" -Value 0
- Wait for the script to finish.

- Close the PowerShell prompt.
- Restart Notepad or your device to apply the changes.
Method 4: Create a .reg file for quick configurations
Alternatively, administrators can use a .reg file to automatically apply spell check and autocorrect settings for multiple endpoints with one click.
⚠️ Caution: When leveraging a .reg file for configuration deployments, it’s advisable to first test it on a local machine. [Refer to ⚠️ Things to look out for.]
📌 Use Cases: Leveraging a .reg file is ideal for deployment scenarios where you need to apply Registry settings quickly without scripting for an endpoint. Additionally, this method still works without internet or remote tools, making it ideal for air-tight systems.
📌 Prerequisites: Windows Registry backup
- Press Win + R, type Notepad, and press Enter.
- Input the Registry script that best reflects your expected outcome:
- Enable both spell check and autocorrect for Notepad:
Windows Registry Editor Version 5.00
[HKEY_CURRENT_USER\Software\Microsoft\Notepad]"SpellCheckEnabled"=dword:00000001"AutocorrectEnabled"=dword:00000001Disable spell check and autocorrect:
- Disable both spell check and autocorrect for Notepad:
Windows Registry Editor Version 5.00
[HKEY_CURRENT_USER\Software\Microsoft\Notepad]"SpellCheckEnabled"=dword:00000000"AutocorrectEnabled"=dword:00000000
- Once you’re done inputting the Registry script, press Ctrl + Shift + S.
- Name the file and add .reg as its extension.
- Press the drop-down beside Save as type, select All files, and press Save.
- Locate your newly created .reg file and verify if it applies the change you entered.
💡 Tip: If you have made the change for spell check and autocorrect via Registry Editor, you can export the Windows Registry key instead of creating a new .reg file.
⚠️ Things to look out for
| Risks | Potential Consequences | Reversals |
| Values set in the Registry don’t reflect through the app’s GUI. | As of Windows 11 version 23H2 and newer Notepad builds, changes made through the Registry, PowerShell, or .reg files don’t reliably reflect within the Notepad GUI. | Restart the Notepad app or your device to apply the changes. If that doesn’t work, it’s advisable to manage these features via Notepad settings instead. |
| Making Registry changes without a backup. | The Windows Registry contains settings used by the OS and installed applications. Misconfiguring these settings can break system functionality. | We advise backing up your Windows Registry before proceeding to ensure easy rollback. |
| Methods aren’t enforceable | The Registry change modifies the HKCU hive, applying the change per user. That means end-users can still reverse the change via Notepad settings. | You can leverage the PowerShell script as a logon script to ensure compliance upon startup. However, end-users can reverse this after signing in. |
| Not properly testing configurations before deployment. | Without ample testing, issues like registry key incompatibility and script misconfigurations can pass undetected. | Apply the changes you want on a local machine, and then verify if the configuration reflects the intended results. |
Considerations when configuring spell checker and autocorrect for Notepad
Per-user configuration
Currently, there’s no system-level Registry or Group Policy method for configuring spell check and autocorrect for the Notepad app. All methods outlined in this guide are applied on a per-user basis, which means there’s no way to deploy them for centralized enforcement. Nevertheless, administrators can still assign the change as a logon script for endpoints or deploy it per-user via PowerShell as a workaround.
App-specific settings
The methods in this guide only configure the spell check and autocorrect feature within the Notepad app. These settings don’t affect the typing behavior for other apps, such as Microsoft Word and Microsoft Edge.
Language support
Notepad’s spell check feature uses pre-installed Windows language packs, which support frequently used languages. However, not all languages have comprehensive spell check support in Notepad.
Improve plain text workflows by managing spell check and autocorrect in Notepad
You can manage both the spell checker and autocorrect features in Notepad to match your environment’s workflow requirements. Quick per-user configuration of these features can be done with a simple click via Notepad interface settings or manually by editing the corresponding registry keys.
Administrators can automate the implementation of these Notepad settings by leveraging PowerShell scripts or .reg files. While no central deployment method exists, logon scripts offer a practical way to apply consistent Notepad settings for all users in an environment.
Related topics:


