

Windows uses libraries, such as Documents, Pictures, Music, and Videos, to compile and organize content from different locations within the system. This offers a more unified view of files and folders for easy access. However, some users modify or delete these libraries, which can lead to disorganization and confusion. If you want to revert these changes, you’re in the right place.
Dive right in to learn how to restore default libraries in Windows 11 using File Explorer, the Registry Editor, PowerShell, and Command Prompt.
How to restore libraries to default in Windows 11
There are several different methods for restoring the default libraries in Windows 11, depending on your technical skills, permission level, and goals. See various approaches below:
📌 Prerequisites:
- Windows 11 OS
- Standard user permission (Administrator privileges might be necessary in managed environments)
💡Tip: Check out Things to look out for before proceeding.
📌 Recommended deployment strategies:
| Click to Choose a Method | 💻 Best for Individual Users | 💻💻💻 Best for Enterprises |
| Method 1: Restore default libraries via File Explorer | ✓ | |
| Method 2: Restore default libraries via Registry Editor | ✓ | |
| Method 3: Restore default libraries via PowerShell | ✓ | |
| Method 4: Restore default libraries via Command Prompt | ✓ |
Method 1: Restore default libraries via File Explorer
This method will reset the Libraries entry in File Explorer to include all four original libraries with their default view and configuration. It will also remove any user-added custom libraries from the Libraries section.
📌 Use Cases: Quick reset for missing or hidden libraries by end-users and beginners, and restoring the File Explorer view after unintentional customizations
Steps:
- Open File Explorer. Press Windows key + E.
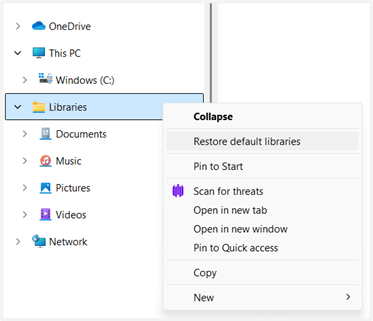
- In the navigation pane on the left side, right-click Libraries.
💡 Note: The Libraries option might be hidden. To make it visible, right-click a blank area on the navigation pane, then select Show libraries. - Select Show more options.
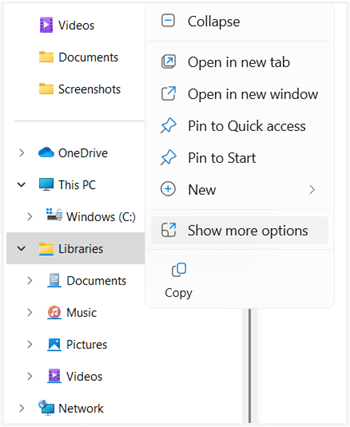
- Click Restore default libraries.
Method 2: Restore default libraries via Registry Editor
This method manually corrects and resets the folder path associated with a specific default library by editing its registry key, leaving custom libraries untouched. It also ensures Windows and applications refer to valid, default locations.
📌 Use Cases: Resetting libraries in systems with roaming profiles, fixing misconfigured folder redirection, and solving application errors related to missing folders
⚠️ Warning: Editing the registry can have unintended consequences. Proceed with caution and back up the registry before you make any changes.
Steps:
- Open the Registry Editor. Press Windows key + R, type “regedit,” and press Enter.
- On the left pane, follow this path: HKEY_CURRENT_USER\SOFTWARE\Microsoft\Windows\CurrentVersion\Explorer\User Shell Folders
- Double-click a default library entry and set the Value data as listed:
Library entry
Value data
My Music %USERPROFILE%\Music My Pictures %USERPROFILE%\Pictures My Videos %USERPROFILE%\Videos - Click OK.
- Close the Registry Editor.
- Restart your computer to apply the changes.
Method 3: Restore default libraries via PowerShell
This method programmatically recreates missing library definition files using PowerShell scripting. It ensures only missing libraries are recreated and won’t overwrite custom and existing ones.
📌 Use Cases: Remote system management, post-image setup scripting, and automating the recovery process
Steps:
- Open PowerShell. Press Windows key + R, type “powershell,” and press Enter.
- Copy and paste the command below before pressing Enter:
$libraries = @(“Documents”, “Music”, “Pictures”, “Videos”) foreach ($lib in $libraries) {
$libPath = “$env:APPDATA\Microsoft\Windows\Libraries\$lib.library-ms”
if (-not (Test-Path $libPath)) {
New-Item -Path $libPath -ItemType File -Force
}
}
- Close PowerShell.
- Restart your computer to apply the changes.
Method 4: Restore default libraries via Command Prompt
This method deletes all existing library definitions (including custom and corrupted library definitions) to trigger the automatic regeneration of the four default libraries on the next reboot.
📌 Use Cases: Troubleshooting corrupted and inaccessible libraries that resist standard restoration, deep system cleanup by IT support, and preparing clean user environments before onboarding
Steps:
- Open Command Prompt as an administrator. Press Windows key + R, type “cmd,” and press Enter.
- Copy and paste the following command before hitting Enter: del “%APPDATA%\Microsoft\Windows\Libraries\*.library-ms”
- Close Command Prompt.
- Restart your computer to apply the changes.
Verifying the restoration of default libraries
After following any of the methods listed above, you can verify the effectiveness of your actions with these steps.
- Open File Explorer. Press Windows key + E.
- Check the navigation pane on the left side to see if the four default libraries (Documents, Music, Pictures, and Videos) are present and accessible.
⚠️ Things to look out for
Risks | Potential Consequences | Reversals |
| Deletion of custom libraries |
|
|
| Registry Editor misconfiguration (e.g., modifying incorrect path, keys, values) |
|
|
| Loss of folder references in libraries |
|
|
What does restore default libraries do?
Restoring default libraries recreates the four built-in user libraries (Documents, Music, Pictures, and Videos) with their original configurations and locations. This action:
- Recreates missing library definitions
- Resets customizations
- Does not delete user data
- Re-enables hidden or disabled libraries
- Fixes broken or inaccessible libraries
This matters because it can help users who:
- Constantly encounter library misconfigurations on shared devices
- Incorrectly imported settings during profile recovery or migration
- Experienced altered library behavior due to policies or software in enterprise environments
Additional considerations when restoring default library definitions
Resetting libraries is a generally safe process, but there are a few factors that administrators and users must consider to avoid unintended consequences.
- User data is retained: Restoring default libraries does not erase or move any user files, but it may change how you access your files using the library feature.
- Deleted custom libraries must be manually recreated: Some methods will delete custom libraries. After resetting, you’ll have to recreate them manually.
- Back up your library configurations: If you have a complex library structure or curated library views, back up your libraries for easier restoration after the reset.
- Impact of Group Policies, folder redirection, and roaming user profiles: After resetting, these can cause libraries to point to network shares or invalid paths instead of local folders. Admins should verify group policy compliance before making changes and ensure redirected folders are accessible after the reset.
Troubleshooting common issues
Libraries do not appear in File Explorer after restoration
Libraries might be disabled or hidden in File Explorer. Right-click a blank space on the navigation pane and select Show libraries to see the restored libraries.
Restored libraries appear blank or incomplete
It may be that file indexing is still incomplete, or you moved some folders during the reset. Verify indexing status by searching for and opening Indexing Options in the Start menu. Ensure the folder you added is being indexed. Otherwise, you might have to manually re-add your folder locations.
File Explorer crashes or behaves erratically when accessing libraries
Third-party software conflicts may lead to library content not updating as expected and cause crashes. To isolate the issue, try temporarily disabling or uninstalling third-party tools that affect File Explorer. If the problem persists, run the sfc /scannow command in an elevated Command Prompt to scan and repair system files.
Libraries still don’t work after the reset
The user profile itself may be corrupted or subject to Group Policy restrictions. Try creating and logging into a new user profile to test its library feature. You can also check with your system administrator to verify any group policies controlling libraries.
Restoring order with libraries
Restoring the default libraries can resolve disorganization, missing folders, and broken links, so system administrators and end users can benefit from learning how to do it. However, they must choose the best method for their environment and goals to ensure predictable results. Always remember those important considerations and troubleshoot as needed to bring consistency, clarity, and control back to your Windows system.
Related topics:
- How to Add or Remove Gallery in File Explorer Navigation Pane in Windows 11
- How to Change Library Icon in Windows 10
- Change the Default Folder When Opening File Explorer in Windows 10
- How to Display the Full Path in the Title Bar of File Explorer in Windows 10
- How to Remove a Folder or Drive from a Library in Windows


