

Knowing what servers are used helps troubleshoot connectivity issues, confirm DNS settings, or verify whether your system is using DHCP (Dynamic Host Configuration Protocol)- assigned or manually configured servers.
Searching for “how to find what DNS server I am using” is understandable since DNS (Domain Name System) servers resolve domain names into IP addresses. In this article, we’ll explain the different ways you can find the DNS server used in Windows 11 and provide other helpful information.
Different methods to find out what DNS server is used
There are several ways to find the DNS server your device is using. You can use GUI (Graphical User Interface) methods, such as viewing the Settings or navigating the Network Connections page, for easy access. You can also use scripts via the Command Prompt and PowerShell.
📌 Prerequisites:
- Windows 11 (any edition)
- Disconnected VPN or virtual adapters
📌 Recommended deployment strategies:
| Click to Choose a Method | 💻 Best for Individual Users | 💻💻💻 Best for Enterprises |
| Method 1: View via Settings | ✓ | |
| Method 2: Use Command Prompt | ✓ | |
| Method 3: Check using PowerShell | ✓ | |
| Method 4: Via Network Connections | ✓ |
Method 1: View via Settings
The easiest and most straightforward method is to navigate the Settings to find what DNS servers are used. This method doesn’t require administrator privileges; you only need to click through the Settings.
📌 Use Case: This method is ideal for individual users looking for a quick, per-connection DNS review.
- Press the Windows key, type Settings, and tap Enter.
- Click Settings, then Network & internet.
- Press Properties (at the top under the active network connection), then scroll down until you find DNS server assignment.
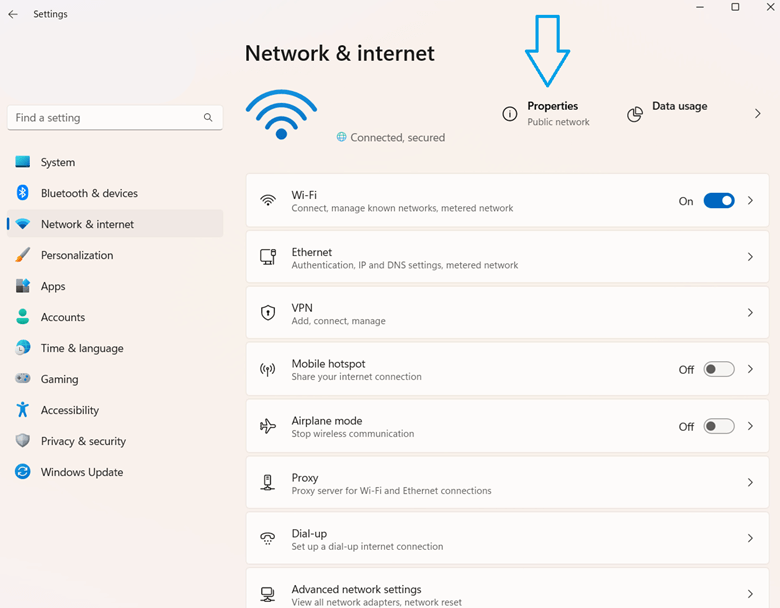
- Look at the listed IPv4 and IPv6 DNS addresses.
- Close Settings if you’re done.
Method 2: Use Command Prompt
Using the Command Prompt provides a list of the primary and secondary DNS addresses, including those for physical and virtual adapters.
📌 Use Case: IT administrators who want to know the primary and secondary DNS addresses for physical and virtual adapters for more effective network management and troubleshooting.
📌 Prerequisite: Administrator privileges
- Press the Windows key, then type CMD.
- Right-click Command Prompt and press Run as administrator.
- Copy-paste the command below into the command prompt, then press Enter:
ipconfig /all
- Scroll down and look for the DNS Servers entry under each network adapter section.
Method 3: Check using PowerShell
Using PowerShell to find the used DNS servers allows for more flexibility. This method lets you list DNS servers per adapter or only show active adapters.
📌 Use Case: Preferred method for scriptable diagnostics or report generation
📌 Prerequisite: Administrator privileges
- Open PowerShell by pressing the Win button, typing PowerShell, and clicking Enter.
- Copy and paste the script you need into the command prompt:
(a) To list DNS servers per adapter:
Get-DnsClientServerAddress | Where-Object {$_.ServerAddresses} | Select-Object InterfaceAlias, ServerAddresses
(b) To show only active adapters:
Get-DnsClient | Where-Object {$_.InterfaceOperationalStatus -eq "Up"} | ForEach-Object {
$dns = Get-DnsClientServerAddress -InterfaceIndex $_.InterfaceIndex
[PSCustomObject]@{
Adapter = $_.InterfaceAlias
DNS = $dns.ServerAddresses -join ", "
}
}
⚠️ Important: When deploying PowerShell scripts, test them first on a local machine before proceeding. (Refer to ⚠️ Things to look out for.)
Method 4: Via the Network Connections page
Like method one, browsing the Network Connections page is straightforward and ideal for individual users. The difference between the two methods is that the Network Connections page gives you more information about the DNS servers.
📌 Use Case: Individual users looking to manually or visually review adapter-specific settings.
- Open Network Connections by pressing Win + R, typing ncpa.cpl, and pressing Enter.
- Right-click the active network adapter, then press Status.
⚠️ Warning: Avoid tinkering with other settings as it could affect connectivity. (Read details in ⚠️ Things to look out for.)
- Click Details.
- Find the IPv4 DNS Server or IPv6 DNS Server entries.
💡 Note: The active network adapter will have signal bars next to it.
⚠️ Things to look out for when finding the DNS servers used
| Risks | Potential Consequences | Reversals |
| Scripting errors | Misconfigured or partial script input may break DNS resolutions or lead to network adapter-specific DNS issues. | As mentioned, it’s best to try the scripts on a local machine first. If issues arise after scripting, revert script actions or restart the network adapter immediately. |
| Edited settings | Avoid editing settings when browsing the Network Connections page, as changes could disrupt connectivity and affect certain network features. | If you unintentionally made any changes, restore automatic settings by following the guide below: Win + R > ncpa.cpl > [Active Adapter] > Properties > Internet Protocol Version 4 > Properties, then select Obtain DNS server address automatically. |
Important information regarding DNS servers
VPNs and virtual adapters
VPNs and virtual adapters could override system DNS settings to ensure privacy, security, and proper routing. Connecting to VPNs creates a virtual network adapter that becomes your device’s default network path.
As such, VPNs assign their own DNS servers to prevent DNS leaks, enable access to internal domains, and more. In a nutshell, VPNs override the system DNS to ensure all traffic follows the VPN’s secure path.
Encrypted DNS
DNS server may differ from what’s configured because DNS over HTTPS (DoH) encrypts DNS queries and sends them to HTTPS instead of traditional port 53, which hides DNS traffic from ISPs, attackers, and system administrators.
You can check if DoH is in use by opening Google Chrome and typing the following into the address bar:
chrome://settings/security
Afterward, look for and toggle Use secure DNS.
DHCP-assigned vs static
DHCP (Dynamic Host Configuration Protocol) automatically assigns network settings to devices, including IP address, subnet mask, gateway, and DNS server. If DHCP assigns the DNS, you can’t permanently change it on your device since it will continuously assign a new address.
You must manually override DNS on your device to break away from DHCP defaults. To do so, press Win + R, type and enter ncpa.cpl, right-click the active adapter, click Properties, then double-click Internet Protocol Version 4. Here, you can manually enter a custom DNS.
Multiple NICs
If your device has multiple network interfaces (NICs), it will decide which one to use by sending out DNS queries. Each NIC has a setting called “interface metric,” which tells the computer how costly it is to use that adapter. The lower the metric, the higher the priority.
Troubleshoot connectivity issues by checking what DNS servers are used
Finding what DNS servers are used helps you troubleshoot connectivity issues, confirm DNS settings, and more. It’s an essential piece of information for individual users and IT administrators alike.
There are numerous ways to check the DNS servers, but the easiest is by opening Settings > Network & internet > Properties, then scrolling down to DNS server assignment. Depending on your specific needs, there are methods suited for you. Nevertheless, figuring out what DNS servers are used can be helpful in the face of network connectivity issues.
Related topics:


