

When you’re on a Windows 10 desktop, pressing the Alt + F4 hotkey launches the Shut Down Windows dialog—and by default, it’s configured to power down your device. Depending on an environment’s use case, some would favor a quick restart, sleep, or sign-out instead of a full-on shutdown.
For instance, in a multi-user workplace, signing out enables the subsequent user to conveniently log in without powering on a device. In some environments where uptime is critical, such as creative studios and software development teams, putting devices to Sleep is often preferred as it allows devices to retain progress without reloading assets.
This guide shows you how to change the default Shut Down Windows dialog option, helping you customize the Windows Shut Down default hotkey’s behavior according to your needs. We also discuss how to automate this change through PowerShell scripts, offer insights when applying such a change to Enterprise settings, and provide troubleshooting tips for commonly encountered problems.
Changing the Windows shutdown hotkey’s default action behavior
Every time the Shut Down Windows dialog is used, it saves the last used option as the default action for next time. For example, when a user puts their device to Sleep using Alt + F4, Windows puts Sleep as the default Shut Down dialog option. This feature is useful on its own, as it offers better convenience by adapting to its user’s preferences.
However, system administrators can override this default Windows Shut Down dialog behavior and enforce a new default action according to an environment’s requirements. For a smooth modification experience, ensure that you are running any edition of Windows 10, have local administrator rights, and can access the Registry Editor and Group Policy Editor before proceeding.
How to change the default Shut Down dialog action via Registry Editor
NOTE: It’s important to keep in mind that changes made in the registry apply instantly, and mistakes can lead to unstable system performance. That said, we recommend backing up your Windows Registry before following the steps outlined below.
-
Launch the Registry Editor
- Open Run by pressing Win + R.
- Type regedit and then press Enter.
-
Navigate to the key containing the target registry value
- Go to: HKEY_CURRENT_USER\Software\Microsoft\Windows\CurrentVersion\Explorer\Advanced
-
Modify or create the Shut Down dialog action DWORD value
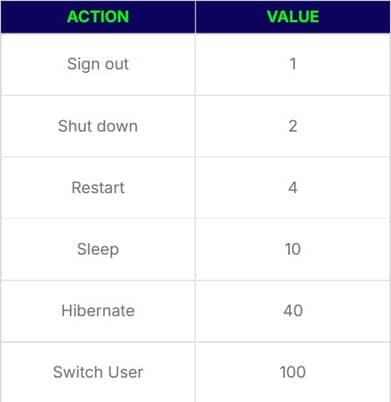
- Inside the Advanced registry key, find Start_PowerButtonAction.
- If there’s no DWORD value of the same name, right-click Advanced.
- On the pop-up menu, press New > DWORD (32-bit) value.
- Name the string value Start_PowerButtonAction.
- Double-click the value and change its value data according to your preference:
- NOTE: When changing the value data, tick the dot beside Hexadecimal.
- Inside the Advanced registry key, find Start_PowerButtonAction.
-
Verify the changes
- Hit Win + D to go to the Windows desktop.
- Press Alt + F4 to launch the Windows Shut Down dialog.
- Check if the appropriate action corresponds to the value data you set.
How to change the default Shut Down dialog action via Group Policy Editor
Modifying Group Policies is ideal for administrators who want to push a specific setting across multiple devices in an environment. Instead of painstakingly editing the registry keys on each device, the Group Policy Editor—paired with Group Policy Preferences and logon scripts— allows you to consistently enforce a new default Shut Down dialog action across all users.
IMPORTANT: Although the steps outlined below only apply to specific users, it’s still important to back up your Group Policy Objects (GPOs). Edits to Group Policies don’t have an undo button; having a backup ensures recovery from wrong changes. Additionally, the Local Group Policy Editor is only accessible on Windows 10 Pro, Enterprise, and Education edition devices.
-
Open your Local Group Policy Editor
- Press Win + R to launch the Run dialog box.
- Inside it, type
gpedit.msc, then hit Ctrl + Shift + Enter.
-
Find the Change Start Menu power button policy
- On the left-side pane, expand User Configuration > Administrative Templates.
- Press Start Menu and Taskbar, then find the Change Start Menu power button on the right-side pane.
-
Edit the policy value
- Double-click the Change Start Menu power button policy.
- On the pop-up window, change the policy value according to your preference:
- Press Enabled, then choose which action you want to set as default by picking from the drop-down box located below Options.
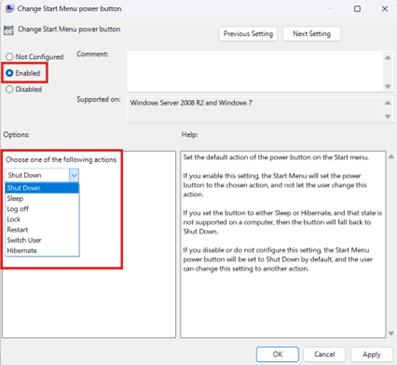
-
-
- Tick Not Configured to restore the Shut Down dialog to its default option.
-
-
Save and apply the Group Policy edit
- After choosing your preferred setting, press Apply and then OK.
- Close the Group Policy Editor.
How to automate this change using PowerShell
When pushing scripts within a large-scale setting, administrators have the option to automate this repetitive task using PowerShell. Remember, before deploying a script to an environment, test it on a single machine first. Moreover, incorrect PowerShell changes can lead to unexpected system behavior, so always create a restore point in case things don’t go as planned.
For script-based deployment, use the following PowerShell command: Set-ItemProperty -Path "HKCU:\Software\Microsoft\Windows\CurrentVersion\Explorer\Advanced" -Name "Start_PowerButtonAction" -Value 0xX.
In the example above, -Value 0xX indicates the hexadecimal value corresponding to your desired default action. For instance, changing this to -Value 0x4 will default the Windows Shut Down dialog to Restart. You can refer to the value table above to fit the command to your environment’s needs.
Considerations for Enterprise environments
Changing how the default Windows Shut Down dialog behaves is easy when done on a single device; however, things are different when you start implementing this change within an Active Directory or large-scale settings.
Within Enterprise environments, the mix of multiple users, shared devices, headless servers, and remote access setups makes things a tad bit complicated. Given those factors, here are the key points you need to know before rolling out any changes across an organization:
User-specific setting. Changing the default Windows Shut Down dialog option via Group Policy Editor only applies to each user, but you can implement this as a system-wide change through Group Policy Preferences.
Requires a Graphical User Interface (GUI). This change does not apply to headless systems, such as Windows Server Core, as this setting is a pop-up message meant to be displayed using traditional GUIs.
Helpful in Remote Desktop Services (RDS) environments. Modifying the default Shut Down dialog action to Sign out is ideal when working with RDS. This prevents accidental shutdowns that boot everyone off the server, maintaining productivity by eliminating potential downtime.
Common issues when changing Windows Shut Down’s default action
Value does not take effect
If the value you’ve set doesn’t immediately apply after changing, a quick restart will normally remediate the issue. However, if this doesn’t work, double-check the changes you made for typos or incorrect data type. For example, ensure that you’re using a valid value like 40 when changing the value data of Start_PowerButtonAction DWORD in the Registry Editor. Additionally, ensure that you pick Hexadecimal as your base.
When using the PowerShell command Set-ItemProperty -Path "HKCU:\Software\Microsoft\Windows\CurrentVersion\Explorer\Advanced" -Name "Start_PowerButtonAction" -Value 0xX, make sure to type the value you want using the proper hexadecimal format. To do this, change X at the end of the command to reflect the Shut Down dialog option you want; for example, setting this as -Value 0x1 will make the default Shut Down action as Sign Out.
Action not available (e.g., Hibernate missing)
If power states like Hibernate are missing from your Windows Shut Down dialog, you’ll have to check if they’re enabled via the Control Panel. To do this, press Win + R, type control, and then hit Enter.
Inside the Control Panel window, search on the upper-right side power button, then click Change what the power buttons do. Note: You’ll need administrative privileges to take the next step.
Select Change settings that are currently unavailable, and tick the box beside the shutdown setting you want to enable. Afterward, you can set that specific power state as the default Windows Shut Down dialog option.
Value resets unexpectedly
If you’re changing the value via Registry Editor, there are times when Group Policies take precedence over a registry edit you’ve made. To avoid this, check your Local Group Policy Editor to see if it clashes with the changes you’re trying to make in the registry.
It’s recommended that you navigate to the Change Start Menu power button policy and set it to Not Configured, allowing the registry edits to apply without being overwritten.
FAQs when customizing the default Shut Down dialog option
Is Alt+F4 used for shutdown?
Pressing Alt+F4 on the desktop will open the Windows Shut Down dialog box, which defaults to a shutdown, but this can be changed through the Registry Editor and Local Group Policy Editor.
How do you change the default window from shutdown to restart?
Changing the default option in the Shut Down dialog box to restart can be achieved by doing the following:
- Launch the Registry Editor.
- Navigate: HKEY_CURRENT_USER\Software\Microsoft\Windows\CurrentVersion\Explorer\Advanced.
- Locate and double-click Start_PowerButtonAction.
- Change its value data to 4, click OK, and close the Registry Editor.
Match the Windows Shut Down dialog’s default action to your workflow
The default action in the Alt + F4 shutdown dialog can be changed to match organizational needs, providing convenience for end users. Furthermore, administrators can leverage this change to lessen the occurrence of user error within their workspace, particularly within RDS environments, where a single accidental shutdown can potentially lead to massive downtime.
This guide outlines in great detail how you can change the default Windows Shut Down dialog box option using the Registry Editor or Local Group Policy Editor. We also discussed how to use PowerShell commands to implement this change on a system without having to navigate the registry or a GPO.


