

Windows 11’s Fluent Design System, transparency effects in particular, visually enhances UI, providing sleek and modern OS aesthetics. However, these effects consume more resources and can strain low-end machines, while some users simply prefer a plain UI.
Whether you’re optimizing for performance or just searching for ways to customize your device, you’re in the right place. Read on to discover ways to toggle transparency effects for Windows 11 devices, along with precautions, key considerations, and solutions to common issues.
Methods to toggle transparency effects in Windows 11
Enabling transparency effects allows users to choose between Acrylic, Mica, and Smoke materials, which require GPU acceleration to render. However, higher GPU usage taxes the CPU, ultimately reducing battery life and leaving low-end machines at a disadvantage.
📌 Prerequisite: Any Windows 11 device
📌 Recommended deployment strategies:
Click to Choose a Method | 💻 Best for Individual Users | 💻💻💻 Best for Enterprises |
| Method 1: How to enable or disable transparency effects via Settings | ✓ | |
| Method 2: Toggle transparency effects by modifying the Registry | ✓ | |
| Method 3: Automatically manage transparency effects via Command Prompt | ✓ | ✓ |
| Method 4: Configure transparency effects automatically via PowerShell | ✓ | ✓ |
🎥 Pull up the video and take in all four methods on screen — Different Ways to Enable or Disable Transparency Effects in Windows 11.
Method 1: How to enable or disable transparency effects via Settings
Windows Settings provide end users the ability to turn transparency effects on or off with one click.
📌 Use Case: Everyday users can leverage this method to enable or disable transparency effects for their own accounts.
Steps:
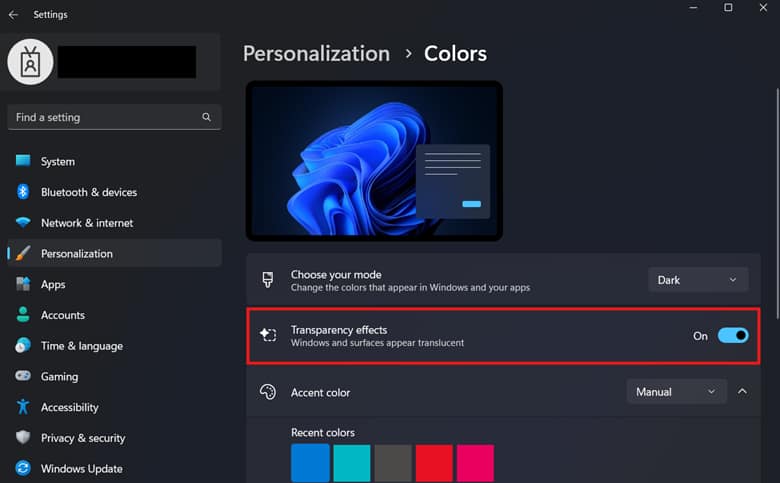
- Press Win + I to launch the Windows Settings app.
- Go to Personalization and then Colors.
- Alternatively, you can go to Accessibility and then Visual Settings.

- Alternatively, you can go to Accessibility and then Visual Settings.
- Find Transparency effects and toggle the switch beside it.
- On: Enables transparency effects for the current user.
- Off: Changes the UI to a plain, simpler look.
- Close Windows Settings.
💡 Note: The change applies instantly after toggling the switch.
Method 2: Toggle transparency effects by modifying the Registry
The Registry offers a direct way to modify the keys and values that affect transparency effects on Windows 11 devices.
⚠️ Warning: Misconfigurations in the Registry can lead to broken system functionality. (See ⚠️ Things to look out for.)
📌 Use Cases: Best for per-user configurations if the Settings app is inaccessible due to corrupted user profiles or app errors. This method also serves as a jump point for deploying transparency effects for non-domain accounts using scripts.
📌 Prerequisites:
- Registry Editor access
- Windows Registry backup
Steps:
- Press Win + R, type regedit, and press Enter.
- Navigate the following path: HKEY_CURRENT_USER\Software\Microsoft\Windows\CurrentVersion\Themes\Personalize
- Find and double-click Enable Transparency.
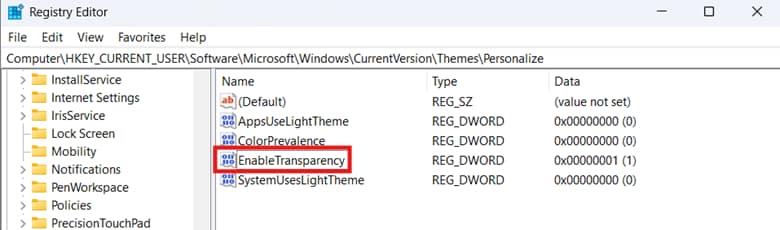
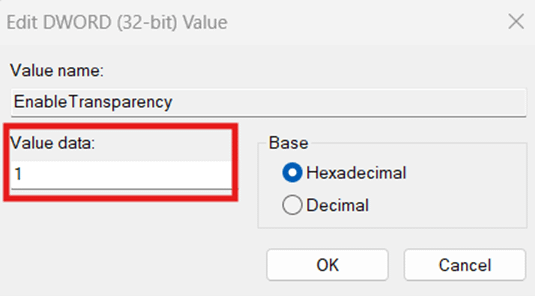
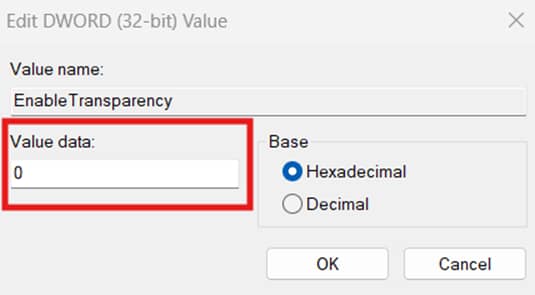
- Set the value data inside Enable Transparency to match your preference:
- 1: Enables transparency effects for the current user
- 0: Disables transparency effects for the current user
- 1: Enables transparency effects for the current user
- Click OK, close the Registry, and restart your device to apply the change.
Method 3: Automatically manage transparency effects via Command Prompt
Although there’s no command line that toggles transparency effects directly, administrators can still configure the Registry via Command Prompt.
📌 Use Cases: Leverage this method to automate the Registry process through the Command Prompt. Administrators can also use this method to deploy transparency effects settings for users through logon scripts or PsExec.
⚠️ Important: Always test a configuration locally before deploying it. (See ⚠️ Things to look out for.)
📌 Prerequisites:
- Command Prompt access
- Windows Registry backup
Steps:
- Press Win + R, type cmd, then press Enter.
- Enter the command that best suits the transparency effects setting you prefer:
- To enable transparency effects for the current user:
reg add “HKCU\Software\Microsoft\Windows\CurrentVersion\Themes\Personalize” /v EnableTransparency /t REG_DWORD /d 1 /f - To disable transparency effects for the current user:
reg add “HKCU\Software\Microsoft\Windows\CurrentVersion\Themes\Personalize” /v EnableTransparency /t REG_DWORD /d 0 /f
- To enable transparency effects for the current user:
- Restart your device to apply the change.
💡 Note: Syntax inaccuracy when scripting leads to errors. (See ⚠️ Things to look out for.)
Method 4: Configure transparency effects automatically via PowerShell
PowerShell can also be leveraged to manage the Registry value that controls transparency effects per user.
📌 Use Cases: PowerShell automates the manual process of editing the Registry, lessening errors and repetitiveness at scale. Additionally, this can also be deployed to non-domain endpoints as a logon script or with the help of a remote PowerShell tool.
📌 Prerequisites:
- PowerShell access
- Windows Registry backup
Steps:
- Press Win + R, type PowerShell, and press Enter.
- Enter the script that suits the transparency effects you prefer.
- To enable transparency effects:
Set-ItemProperty -Path “HKCU:\Software\Microsoft\Windows\CurrentVersion\Themes\Personalize” -Name EnableTransparency -Value 1 - To disable transparency effects:
Set-ItemProperty -Path “HKCU:\Software\Microsoft\Windows\CurrentVersion\Themes\Personalize” -Name EnableTransparency -Value 1
- To enable transparency effects:
- Reboot the device to apply the change.
⚠️ Things to look out for
Risks | Potential Consequences | Reversals |
| Misconfigurations in the Registry | Wrong modification of Registry values can result in system instability, affecting the overall usability of a device. | Always back up your Registry before making any changes to ensure easy recovery in case of misconfigurations. |
| Deploying configurations without local testing | Without ample local testing, misconfigurations can go unnoticed, creating bigger problems for an environment. | Test configurations on a local machine to spot and fix potential issues before deployment. |
| Transparency effects apply per user | Administrators can deploy transparency effects per-user using logon scripts, but end-users can reverse the change via Settings. | Open the Local Group Policy Editor, go to Computer Configuration > Administrative Templates > Control Panel, and configure Settings Page Visibility to prevent user access to transparency effects settings. |
| Syntax inaccuracy when leveraging scripts for configurations | PowerShell and Command Prompt scripts result in an error. | Verify a script’s syntax and logic before execution to prevent errors and misconfigurations. Alternatively, you can instead copy and paste the scripts outlined in this guide to avoid mistakes. |
Considerations about transparency effects in Windows 11
Turning transparency effects on or off will have a significant effect on endpoints, user experience, and the environment you’re managing. Below are a few key considerations you should remember when making such a change.
Performance implications
Transparency effects require the GPU to allocate more resources to render materials, increasing CPU strain and resulting in higher power consumption. Although this is negligible for modern machines, systems with minimum Windows 11 specs can take a significant performance hit. That said, disabling transparency effects in low-end machines can help with device responsiveness and higher battery life.
User Interface (UI) changes
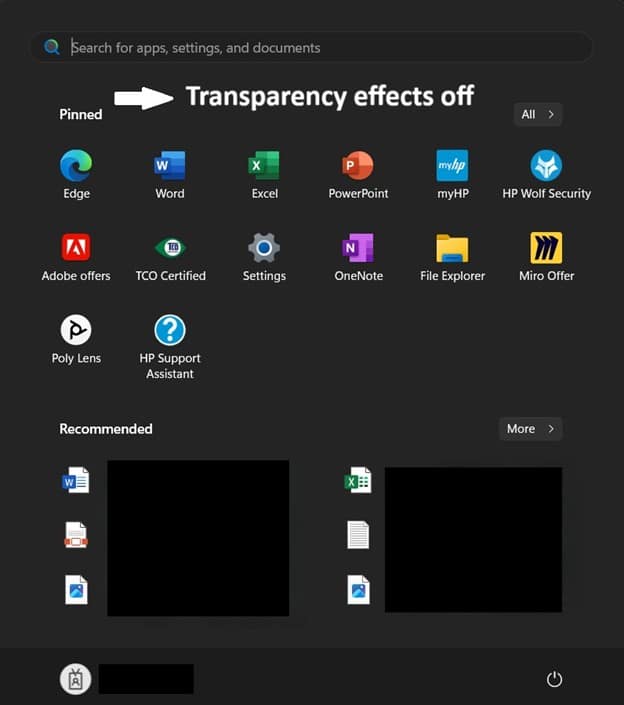
When enabled, Mica, Acrylic, and Smoke materials provide start menus, taskbars, title bars, and context menus with a see-through, glass-like appearance. On the other hand, turning transparency effects off replaces these UI elements with solid-colored backgrounds, which is ideal for simplicity.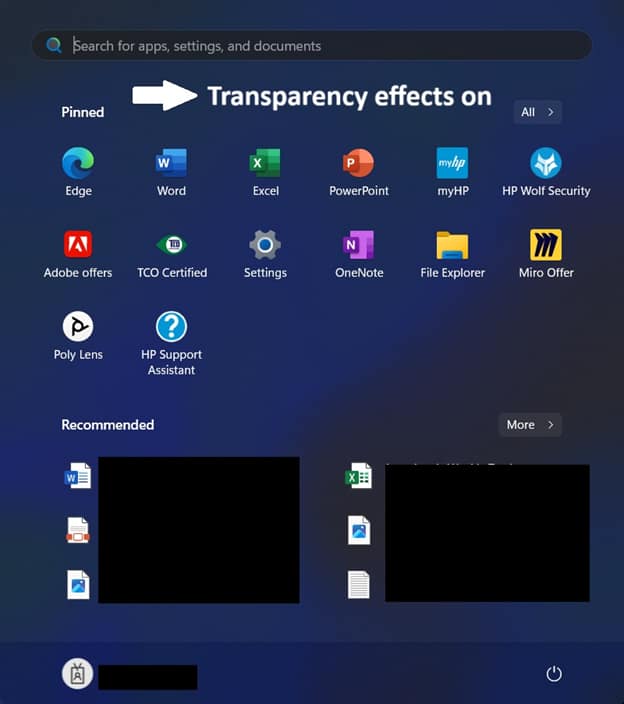
Organizational considerations
Before deploying transparency settings for users across environments, it’s important to verify whether the change aligns with your organization’s standards and user preferences. Additionally, test the configuration you’re deploying locally to verify the changes before deployment.
Troubleshooting common issues when managing transparency effects
Issue #1: The transparency effect is not working in Windows 11
Windows automatically disables transparency effects when in power-saving mode to conserve battery power. If this doesn’t fit your scenario, proceed to the steps below.
- Change the value data inside EnableTransparency again to 1 (On) or 0 (Off),
- Press OK and restart your device.
- If that doesn’t work, check if you’re tweaking the correct value and the proper Registry Path outlined in Method 2.
Issue #2: The transparency effects option is greyed out in Settings
There are multiple possible reasons why the transparency effects option is greyed out in Windows Settings.
Greyed-out settings can be caused by an unactivated copy of Windows 11, which can limit access to personalization settings.
To verify your Windows activation status:
- Go to Settings > System > Activation and see if the Activation state is Active.
- Corrupted system files can also be a culprit, and this can be fixed by opening Command Prompt and inputting sfc /scannow.
If the steps above don’t work, then personalization settings are most likely locked by administrators in your environment. Still, if you have Registry access, you can configure EnableTransparency to toggle your transparency effects.
Issue #3: Transparency effects impact performance in Windows 11
Transparency effects can significantly impact performance, especially for low-resource devices. However, if your device is still sluggish even after disabling transparency effects, consider turning off other visual effects via Settings. It’s also good practice to disable resource-hungry background processes to lower CPU usage and maintain performance stability.
Quick-Start Guide
NinjaOne platform offers several Windows management capabilities. The platform provides scripts and policies that allow you to manage various Windows settings.
For instance, there are scripts for:
- Setting desktop wallpaper script:
- Set wallpaper for all users or current user
- Option to replace wallpaper
- System-level control
- Set Your Lock Screen Wallpaper script:
- Set lock screen image
- Prevent user modifications
- Individual or system-wide
- Modifying start menu and system settings script:
- Toggle Windows Spotlight
- Show/hide widgets
- Manage start menu suggestions
- Enabling or disabling specific Windows features script:
- Enable/disable system features
- Control upgrades
- Manage network and security settings
NinjaOne helps you simplify Windows customization so your endpoints stay consistent and easy to manage.
Use transparency effects for quick Windows 11 UI customization
End users and administrators can toggle transparency effects to fit the UI according to preference or organizational policies. Additionally, managing this feature can help with performance optimization, particularly for those running low-resource Windows 11 devices.
For per-user configurations, modifying Windows Settings or editing user-specific Registry values gets the job done. However, if you require automated configurations for rapid deployment, the Command Prompt and PowerShell is the way to go.
Related topics:


