


Key points
Configuring the “Don’t Display Last Signed-in User on the Sign-in Screen” Setting
- Windows 11 displays the last signed-in user by default, showing the username and sometimes the email address on the sign-in screen. While this improves convenience, it can expose credentials in shared or public environments.
- The “Interactive logon: Don’t display last signed-in” policy allows administrators to hide the last signed-in username, protecting against credential exposure and brute-force attacks.
- You can enable or disable this policy using four methods:
- Configure via the Local Group Policy Editor
- Configure via Registry Editor
- PowerShell Script for Automation
- Leverage a .reg file for automation
- Prerequisites for this task include administrator privileges, access to the Local Group Policy Editor, and/or Registry Editor.
- Watch out for issues such as:
- GPO takes precedence over the Registry
- Modifying the “Interactive logon: Don’t display last signed-in” policy without elevated privileges
- Modifying the registry without a backup
- Deploying registry configurations without testing
Windows 11 shows the name and, in some cases, the email address of the last signed-in user on the lock screen. While convenient, having your credentials on display can be a security vulnerability within shared or public environments. Disabling the Interactive logon: Don’t display last signed-in policy protects credentials by requiring full authentication without showing usernames at sign-in.
For a visual breakdown of this topic, watch How to Enable or Disable Don’t Display Last Signed-in User on the Sign-in Screen in Windows 11.
Methods to manage the ‘Interactive logon: Don’t display last signed-in’ policy
Enabling this policy enforces full credential entry, reducing the risk of brute force attacks by requiring attackers to guess an account’s username and password. That said, preventing username enumeration can help reinforce security within enterprise environments.
However, not all scenarios call for this change, as it allows easy log-in for end-users when left unconfigured. This is particularly true for personal or home devices, where ease of access is typically prioritized over stricter security policies.
📌 Prerequisites:
- Administrator privileges
- Local Group Policy Editor access
- Registry Editor access
💡 Recommended deployment strategies:
Click to Choose a Method | 💻 Best for Individual Users | 💻💻💻 Best for Enterprises |
| Method 1: Configure via the Local Group Policy Editor | ✓ | ✓ |
| Method 2: Configure via Registry Editor | ✓ | |
| Method 3: PowerShell Script for Automation | ✓ | ✓ |
| Method 4: Leverage a .reg file for automation | ✓ |
(See ⚠️ Things to look out for.)
Method 1: Configure via the Local Group Policy Editor
The Local Group Policy Editor (LGPE) provides user-friendly access to policies by allowing users to clearly see the effects of a configuration. Additionally, it offers predefined parameters that are easy to apply, monitor, and reverse with one click. This eliminates invalid inputs and syntax errors when configuring a local machine.
📌 Use Cases: This method is ideal for multi-user devices due to its system-wide implementation, ensuring that each user enters their full credentials when logging in. Additionally, administrators can do this to test the policy on a local machine before deployment via the Group Policy Management Console (GPMC).
📌 Prerequisites:
- The target device must be running Windows 11 Pro, Enterprise, or Education editions.
- Access to the GPMC for enterprise-level deployment.
- Press Win + R, type gpedit.msc, and press Ctrl + Shift + Enter.
- Navigate the following path: Computer Configuration > Windows Settings > Security Settings > Local Policies > Security Options
- Find and double-click the Interactive logon: Don’t display last signed-in policy.
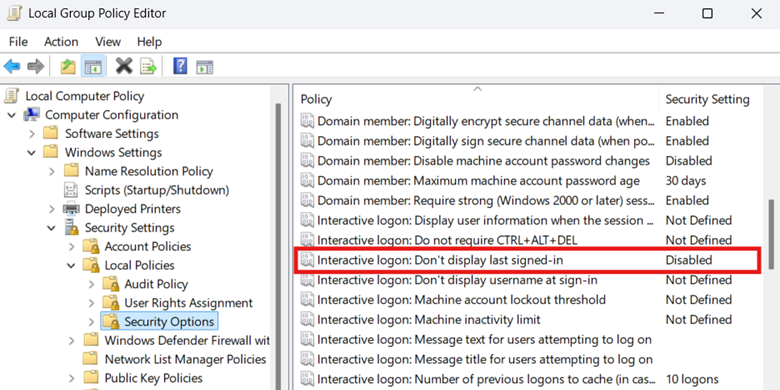
- Set the policy to decide whether or not usernames are shown on the sign-in screen:
- Enabled: Hides the username of the most recently signed-in user account.
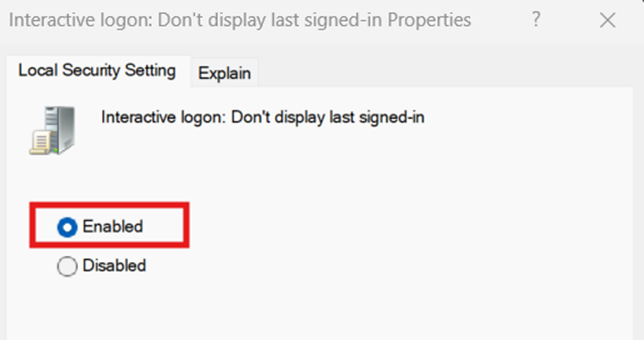
- Disabled: Displays the username of the most recently signed-in user account.

- Enabled: Hides the username of the most recently signed-in user account.
- Press Apply and then OK at the bottom of the policy’s window to apply the changes.
- Close the Local Group Policy Editor.
- Open an elevated PowerShell prompt and enter gpupdate /force.
Method 2: Configure ‘Interactive logon: Don’t display last signed-in’ via Registry Editor
The Interactive logon: Don’t display last signed-in policy in the Local Group Policy Editor modifies the dontdisplaylastusername value located in the Windows Registry. On systems where Group Policy is unavailable, like Windows 11 Home edition devices, administrators can manually configure the registry value instead.
⚠️ Warning: Unlike the Local Group Policy Editor, the Windows Registry doesn’t have built-in error protection, and changes you make are immediate. Misconfigurations at this level can break device functionality and cannot be reverted unless the configuration is manually reversed or recovered from a backup. [Refer to ⚠️ Things to look out for.]
📌 Use Cases: Use the Registry Editor to manage the username enumeration of the last signed-in accounts for non-domain machines. Administrators can also deploy this method by translating it into a PowerShell script or a .reg file.
📌 Prerequisites:
- Windows Registry backup
- Policies and System registry subkeys
- dontdisplaylastusername DWORD value
- Press Win + R, type regedit, and press Ctrl + Shift + Enter.
- Navigate the following path: HKEY_LOCAL_MACHINE\SOFTWARE\Microsoft\Windows\CurrentVersion\Policies\System
- Find and double-click the dontdisplaylastusername DWORD value.
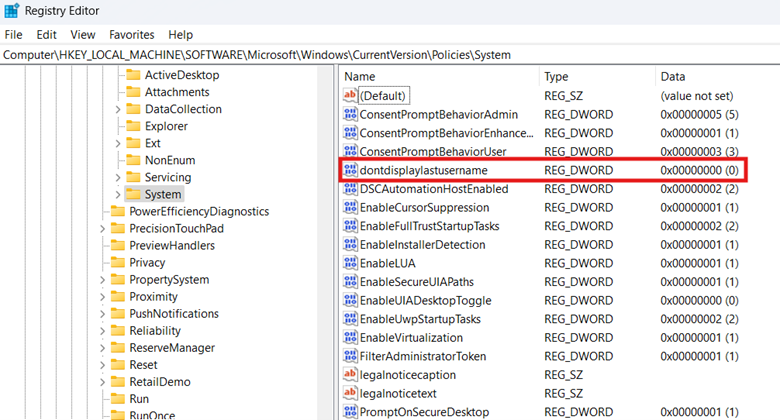
- Modify the value data of dontdisplaylastusername to match the username enumeration you prefer:
- 1 = Hides the username of the last signed-in account.
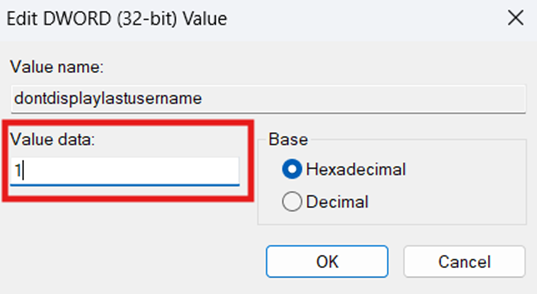
- 0 = Shows the username of the last signed-in account.
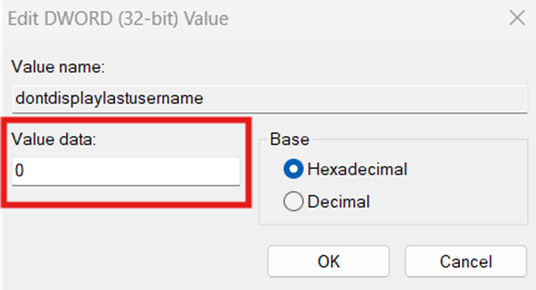
- 1 = Hides the username of the last signed-in account.
- Press OK and then close the Registry Editor.
- Restart your device to apply the changes.
Method 3: PowerShell script for Automation
Administrators can find it daunting to configure the Registry editor repeatedly for multiple machines, particularly when managing non-domain endpoints. A workaround for this is to leverage PowerShell to ensure setting consistency across all endpoints.
📌 Use Cases: Administrators can leverage PowerShell to automate the configuration of dontdisplaylastusername for a non-domain local machine. This method also automatically creates the proper subkeys and DWORD value once applied, eliminating the need for manual registry management.
📌 Prerequisites:
- Windows Registry backup
- Local machine testing before deployment [Refer to ⚠️ Things to look out for.]
- Press Win + R, type PowerShell, and then press Ctrl + Shift + Enter.
- Input the script that best reflects your preference:
- Input this command to hide the last signed-in username:
New-Item -Path “HKLM:\SOFTWARE\Microsoft\Windows\CurrentVersion\Policies\System” -Force | Out-Null
Set-ItemProperty -Path “HKLM:\SOFTWARE\Microsoft\Windows\CurrentVersion\Policies\System” -Name “dontdisplaylastusername” -Value 1 -Type DWord - Input this command to show the last signed-in username:
New-Item -Path “HKLM:\SOFTWARE\Microsoft\Windows\CurrentVersion\Policies\System” -Force | Out-Null
Set-ItemProperty -Path “HKLM:\SOFTWARE\Microsoft\Windows\CurrentVersion\Policies\System” -Name “dontdisplaylastusername” -Value 0 -Type DWord - Wait until the script is done.
- Close the PowerShell prompt.
💡 Tip: You can use a remote PowerShell tool to deploy the script remotely across an environment’s endpoint.
Method 4: Leverage a .reg file for automation
Alternatively, if you’re pushing one-off registry configurations for a local machine, you can use a registry file to automate the process. This allows for the automated management of dontdisplaylastusername in environments where scripting is restricted.
💡 Tip: If you have already done the Registry method, you can directly export the dontdisplaylastusername value to automatically create a .reg file.
📌 Use Cases: This method is ideal for both administrators and end-users who want to manage a local machine’s username enumeration without scripting. Additionally, this is suitable for small-scale enforcement across non-domain endpoints.
📌 Prerequisites:
- Windows Registry backup
- Local machine testing before deployment [Refer to ⚠️ Things to look out for.]
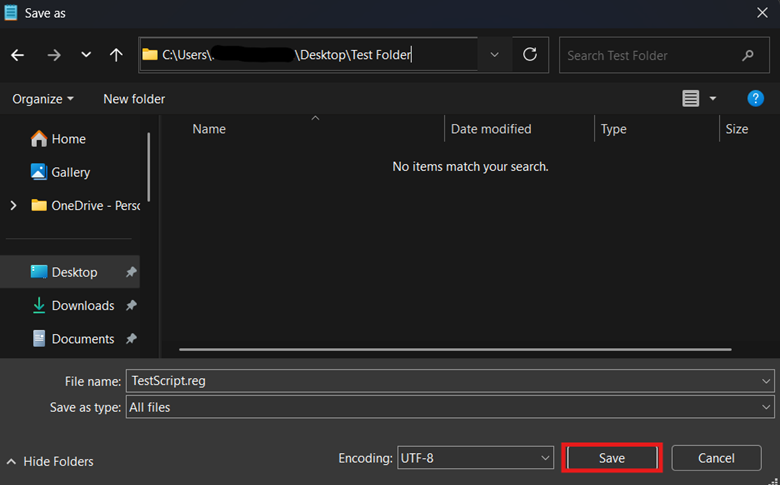
- Press Win + S, type Notepad, and click the Notepad app.
- Enter the registry data entry that best reflects the behavior you want:
- To hide the last signed-in username:
Windows Registry Editor Version 5.00 [HKEY_LOCAL_MACHINE\SOFTWARE\Microsoft\Windows\CurrentVersion\Policies\System]
“dontdisplaylastusername”=dword:00000001 - To show the last signed-in username:
Windows Registry Editor Version 5.00 [HKEY_LOCAL_MACHINE\SOFTWARE\Microsoft\Windows\CurrentVersion\Policies\System]
“dontdisplaylastusername”=dword:00000000
- To hide the last signed-in username:
- Press Ctrl + Shift + S, name the file with a .reg extension, and change the Save File Type to All files.

- Pick the path where the .reg file will save and then press Save.
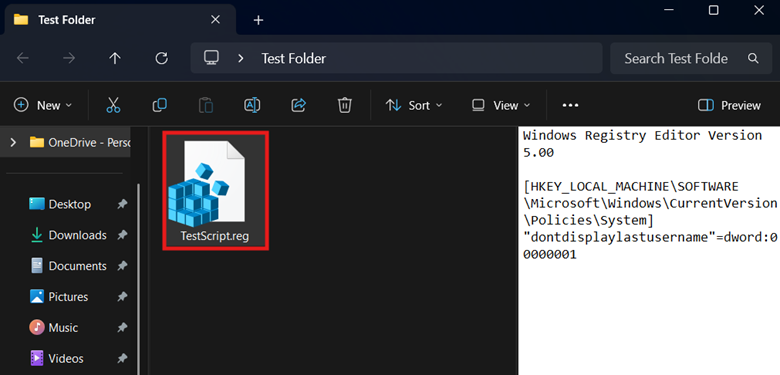
- Double-click the .reg file and verify if it reflects your preferred username enumeration change.
⚠️ Things to look out for
Risks | Potential Consequences | Reversals |
| GPO takes precedence over the Registry. | GPO overrides the Registry change you make on a domain-joined endpoint if it conflicts with an enforced policy. | Ensure that there’s no conflict between the Registry change and your organization’s Group Policy. |
| Modifying the Interactive logon: Don’t display last signed-in policy without elevated privileges | All the methods outlined in this guide apply on a device level. Without proper administrative access, applying these settings will result in errors or silent failure. | It’s important to ensure that you’re using an account with elevated permissions when enforcing system-wide changes. |
| Modifying the registry without a backup | Changes made within the Registry apply immediately, and a single mistake can lead to broken device functionality. Since the Registry doesn’t have a built-in undo function, misconfiguration reversals are difficult to execute. | It’s advisable to first create a Windows Registry backup before modifying registry values. |
| Deploying registry configurations without testing | Without testing, misconfigurations can pass through unnoticed, causing the configuration to silently fail or introduce a plethora of system-related errors. | Regardless of what deployment method you use, it’s crucial to test the changes on a local machine first. Doing so helps prevent the accidental deployment of misconfigurations across an environment. |
Considerations when managing ‘Interactive logon: Don’t display last signed-in’
Username enumeration behavior upon sign-in
Turning on this policy requires users to enter both their username and password upon sign-in. Additionally, this also hides linked Microsoft account email addresses, ensuring better credential protection within an organization.
Related policies
For better credential security, enable the Interactive logon: Don’t display username at sign-in within the Local Group Policy Editor. This ensures that all usernames are hidden during the sign-in process.
Kiosks or shared devices
If you’re managing a public or shared device, it’s strongly recommended to enable this policy to protect end users’ credentials.
Secure end-user credentials by hiding usernames on sign-in
Windows shows the last signed-in username by default to expedite the login process, but this can expose credentials within secure environments. That said, it’s recommended to hide the last user at sign-in to protect environments against unauthorized entries.
Administrators can manage this by modifying the Interactive logon: Don’t display last signed-in policy within the Local Group Policy Editor. For non-domain machines, the dontdisplaylastusername value can be set manually within the Registry Editor or automated using PowerShell or .reg files.
Related topics:


