

Windows 11’s Mouse Keys is an accessibility feature that lets you control the pointer using the number pad. With Mouse Keys, you can also speed up or slow down pointer movement by holding the Ctrl and Shift buttons. It’s a feature allowing users to improve pointer control.
However, some could get confused by Mouse Keys due to accidental speed changes and misclicked buttons.
In this article, we’ll explain the different methods for enabling or disabling Mouse Keys in Windows 11. We’ll also discuss FAQs and other useful information you’ll need before turning the feature on or off.
Different methods to turn on or off Windows 11’s Mouse Keys
You can turn on or off Windows 11’s Mouse Keys via Settings, Control Panel, or Registry Editor. Each method has different uses, difficulties, pros and cons, and requirements.
📌 Recommended deployment strategies:
| Click to Choose a Method | 💻 Best for Individual Users | 💻💻💻 Best for Enterprises |
| Method 1: Via Settings | ✓ | |
| Method 2: Navigating the Control Panel | ✓ | |
| Method 3: Using Registry Editor | ✓ |
To learn more about the steps, check out the guides below:
Method 1: Enable or disable via Settings
📌 Use Cases: Good for non-technical users and one-time configuration
- Press Win + I to open Settings.
- Click Accessibility on the left, scroll down to Interaction, then press Mouse.
- Turn on Mouse Keys and Hold the Ctrl key to speed up and the Shift key to slow down to enable or turn them off to disable.
- Check the other mouse key functions you want to enable.
While easy, note that this method is limited.
Method 2: Enable or disable by navigating the Control Panel
This method offers access to additional Mouse Key settings, allowing you to tinker with other options.
📌 Use Cases: Recommended for non-technical users
- Press the Win button or Start, type Control Panel, and press Enter.
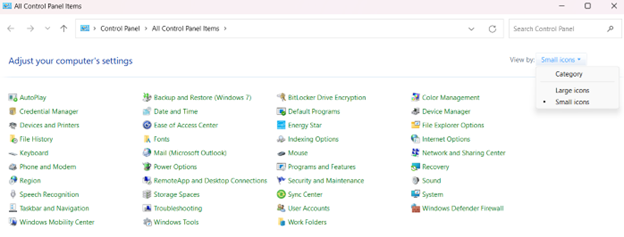
- Ensure the Control Panel is in icons view (see image below). If not, click Category next to View by: and select one of the two icon options.
- Press the Ease of Access Center icon.
- Hit the Make the mouse easier to use link (below Explore all settings). The links look similar, so make sure you click the right one.
- Tap the Set up Mouse Keys link under Control the mouse with the keyboard.
- Turn on Mouse Keys and configure additional settings of your choosing.
- Make sure you click on OK to apply the changes.
Method 3: Enable or disable using Registry Editor
📌 Use Cases: Enterprises looking to apply settings in devices where scripting is needed but GUI access is limited
- Press Win + R, type regedit, and press Enter to open the Registry Editor.
- Navigate to:
- HKEY_CURRENT_USER\Control Panel\Accessibility\MouseKeys
- Double-click Flags:
- Value:
- 126 = Disable Mouse Keys
- 127 = Enable Mouse Keys
- Value:
- Restart the computer so the changes take effect.
⚠️ Note: This method disables Mouse Keys altogether.
⚠️ Things to look out for when turning the Mouse Keys speed on or off
Here are some things to look out for when turning the Mouse Keys on or off using the methods above. The issues listed here are common problems you may encounter. Note that you won’t experience the issues below if you correctly follow the steps for each method.
Common Pitfalls
- Method two: Ensure you click the correct links since some of them tend to look similar (e.g., “Make the mouse easier to use,” “Make the keyboard easier to use).
- Method two: Make sure you click OK after making the changes. Skipping the confirmation could discard the changes made.
- Method three: Creating a new key is a crucial part of the method. Using anything other than String Value will cause the feature to be nonfunctional.
Technical Limitations
- Method one: You can’t automate or deploy the changes at a scale. The changes to the Mouse Keys feature are per-user and must be repeated for others.
Mouse Keys control in Windows 11
Once you’ve enabled Mouse Keys, you can use it by following the guide below. Note that the buttons refer to the ones on the number pad.
| Action | Button |
| Increase mouse pointer speed | Hold + Ctrl |
| Decrease mouse pointer speed | Hold + Shift |
| Mouse movement | |
| Up and to the left | 7 |
| Up | 8 |
| Up and to the right | 9 |
| Left | 4 |
| Right | 6 |
| Down and to the left | 1 |
| Down | 2 |
| Down and to the right | 3 |
| Selecting a button | |
| Select the left mouse button | / |
| Select both buttons | * |
| Select the right mouse button | – |
| Clicking items | |
| Click an item | 5 (with the left button selected) |
| Right-click an item | 5 (with the right button selected) |
| Double-click an item | + |
| Dragging items | |
| Drag an item | 0 |
| Drop an item | . |
Helpful information regarding Mouse Keys
Please consider the following information regarding Windows 11’s Mouse Keys before enabling or disabling the feature.
- Per-user setting: Since the Mouse Keys feature is in HKEY_CURRENT_USER, you must apply the setting individually or with PowerShell to work across different users.
- Mouse Keys dependent: You need to turn on Mouse Keys for the setting to work. Otherwise, the number pad will only function as intended.
- Group Policy: The feature does not have a native Group Policy setting, meaning you need a script or registry-based enforcement.
Improve mouse pointer control by enabling Windows 11’s Mouse Keys
Windows 11’s Mouse Keys is an accessibility feature that lets you control the pointer using the number pad. Control includes moving, clicking, dragging, and adjusting the speed. Mouse Keys improves consistency and usability for keyboard-based pointer control. Windows 11 offers both Settings and Control Panel navigation and registry-based options to enable the feature.


