

Key Points
The Clear TPM button in Windows Security can be enabled or disabled to prevent accidental TPM resets and data loss.
- Restrict access to the Clear TPM button using the Local Group Policy Editor under Computer Configuration > Administrative Templates > Windows Components > Windows Security > Device Security.
- Modify TPM visibility in the Windows Registry by editing or creating the HideClearTPM DWORD value at HKEY_LOCAL_MACHINE\SOFTWARE\Policies\Microsoft\TPM.
- Automate configuration across multiple endpoints using PowerShell commands to set the HideClearTPM registry value to 1 (hide) or 0 (show).
Audit TPM changes and events through Event Viewer under Application and Services > Microsoft > Windows > TPM > Operational for better security oversight.
A Trusted Platform Module (TPM) strengthens device security by storing encryption keys. It supports features such as BitLocker drive encryption, user authentication, and the Encrypting File System (EFS).
Improper configuration may allow users to clear the TPM through the Windows Security app. This action can cause BitLocker access failures, loss of biometric credentials, and data loss. Administrators should enforce consistent TPM management policies using administrative tools to prevent these issues.
This guide explains how to manage control Clear TPM access, outlines key implementation considerations, and provides answers to common questions.
Prefer video? Watch our guide: How to Enable or Disable Clear TPM button in Windows Security in Windows 11.
Different methods to configure the Clear TPM button
Before making any changes, ensure that your system meets the following prerequisites to ensure a smooth and successful application of the changes you want to make:
- Administrator privileges. You’ll need administrator rights to enforce who can access TPM settings, especially when applying this as a system-wide change using the Local Group Policy Editor or the Windows Registry.
- Windows edition. The Registry Editor is available across all editions of Windows 11. On the other hand, the Local Group Policy Editor is only accessible using Windows 11 Pro, Enterprise, and Education editions.
- TPM 2.0. For a smooth configuration process, ensure that TPM 2.0 is present and enabled in your system’s UEFI/BIOS firmware. To ensure you have the right version, press Win + R, type tpm.msc, and press Enter. The Specification Version under TPM Manufacturer Information should say 2.0.
- Configuration scope. The steps outlined in this guide are applied system-wide and are not automatically deployed across a domain or network environment.
Method 1: Disable the Clear TPM button via the Local Group Policy Editor
In domain-joined or enterprise environments, access to the TPM should be regulated. Averting end user access to clear the TPM can prevent accidental presses that can potentially compromise an endpoint’s security functions.
- Press Win + R, enter gpedit.msc in the dialog box, and press Ctrl + Shift + Enter.
- This launches the Local Group Policy Editor as an administrator.
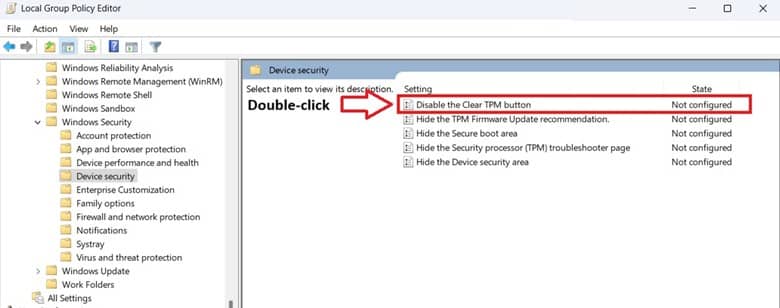
- Inside the Local Group Policy Editor, navigate the following path: Computer Configuration > Administrative Templates > Windows Components > Windows Security > Device Security.
- On the right pane, find and double-click Disable the Clear TPM button.
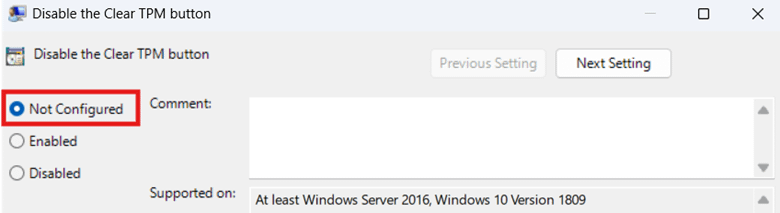
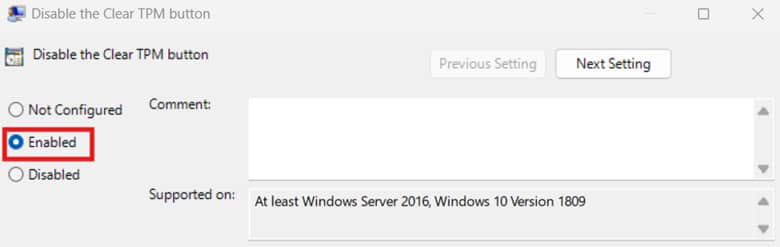
- Set the policy according to your preferred accessibility:
- Select Not Configured: Sets the policy to its default and shows the Clear TPM button.
- Select Enabled: Sets the policy to hide the Clear TPM button.
- Select Not Configured: Sets the policy to its default and shows the Clear TPM button.
- After setting the policy, press Apply, then OK, which is located below the window.
- Restart the system to apply the changes.
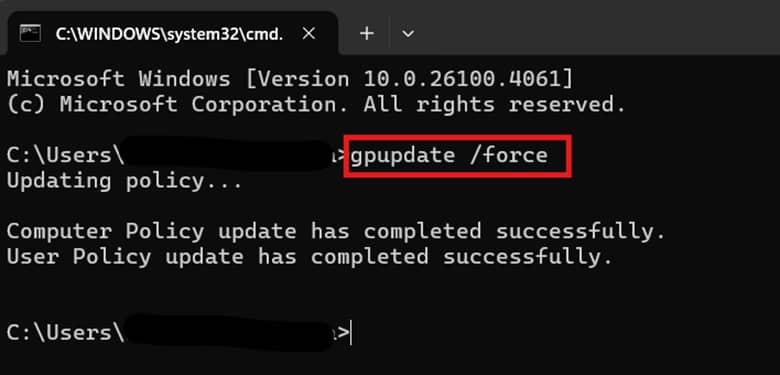
- Alternatively, you can open a Command Prompt and enter gpupdate /force.
- Alternatively, you can open a Command Prompt and enter gpupdate /force.
🥷 Quick tip: Although this method only applies to a local machine when done using the Local Group Policy Editor (gpedit.msc), this can be deployed centrally as part of a Group Policy Object in Active Directory by using the Group Policy Management Console (GPMC).
Method 2: Configure Clear TPM accessibility via Registry Editor
When making this configuration for Windows 11 Home machines or environments where the Local Group Policy Editor is inaccessible, the Windows Registry provides an alternative way to prevent access to the Clear TPM button in the Windows Security app.
⚠️ Caution: Unlike the Local Group Policy Editor, the Windows Registry doesn’t have templates to follow during configuration, which can lead to incorrect changes that may result in device instability. That said, it is recommended that you back up your registry settings before proceeding.
- Press Win + R, type regedit, and press Enter.
- Navigate the following path inside the Registry Editor: HKEY_LOCAL_MACHINE\SOFTWARE\Policies\Microsoft\TPM
- If the TPM key doesn’t exist, right-click Microsoft, press New > Key, and name it TPM.
- Find the HideClearTPM DWORD (32-bit) value inside the TPM registry key.
- If HideClearTPM doesn’t exist, right-click TPM and click New > DWORD (32-bit) value.
- Name the newly-created DWORD HideClearTPM.
- Double-click HideClearTPM and change its value data to match the change you want:
- Changing the value data to 1 hides the clear TPM button.
- Changing the value data to 0 shows the button.
- Restart the device or sign out of your account to apply the change.
Optional method: Use PowerShell to automate configuration
Having to manually apply the registry method outlined above across multiple endpoints can be tedious and time-consuming. It can also introduce human errors, such as typographical errors when creating the proper registry keys, which can cause the configuration to fail.
To address this challenge, the same registry changes can be adapted as a PowerShell script, eliminating the need for manual Windows registry configuration. In addition, PowerShell enables a precise and predictable standardization of registry changes, eliminating human error when repeatedly applying the change for multiple endpoints.
- Press Win + R, type PowerShell, and press Ctrl + Shift + Enter.
- This step allows you to open an elevated PowerShell prompt.
- Enter the following commands according to the change you want to implement:
- To hide the Clear TPM button:
New-ItemProperty -Path “HKLM:\SOFTWARE\Policies\Microsoft\TPM” -Name “HideClearTPM” -PropertyType DWord -Value 1 -Force - To show the Clear TPM button:
Set-ItemProperty -Path “HKLM:\SOFTWARE\Policies\Microsoft\TPM” -Name “HideClearTPM” -Value 0
- To hide the Clear TPM button:
- Close the PowerShell prompt.
📝 Note: These PowerShell commands applies on for all users in a local system. To effectively deploy this for multiple endpoints, you can set it as a logon script through Group Policy or use an automated scripting engine.
Easily deploy scripts rapidly and at scale.
Additional considerations when managing TPM settings
When managing access to the Clear TPM function, administrators should also account for TPM-dependent features, alternative access paths, and auditing procedures.
Consideration #1: BitLocker
Once you’ve enabled the Clear TPM function, make sure to suspend BitLocker protection before clearing the TPM. Failure to do so will lead to the loss of all stored keys inside the TPM, including BitLocker keys. This forces any encrypted drives to enter recovery mode, requiring the BitLocker recovery key to unlock the system at startup.
Consideration #2: Windows Security Center UI
The methods in this guide allow administrators to prevent the Clear TPM button from showing up in the Windows Security app. However, this doesn’t disable a device’s TPM management tool as a whole but only limits the GUI access of end users to prevent accidental TPM resets.
Consideration #3: TPM Management tool
As stated in Consideration #2, the methods outlined in this guide don’t disable the TPM management tool as a whole. Administrators can still access and clear it by entering tpm.msc in the Run dialog box. Additionally, the TPM can still be reset by entering the Clear-TPM command using an elevated PowerShell prompt.
Additional restrictions are required for a full lockdown of TPM settings, such as restricting tpm.msc using AppLocker and tighter control of administrative privileges in an environment.
Consideration #4: Monitor TPM usage using Event Viewer
Administrators can monitor changes in TPM settings through Event Viewer by navigating the path Application and Services > Microsoft > Windows > TPM > Operational. This allows for faster detection of unauthorized or accidental Clear TPM events. Active monitoring of the TPM can also help audit TPM ownership changes and accidental lockouts.
Safeguard encrypted keys by managing Clear TPM access
The Trusted Platform Module (TPM) stores all encryption keys in a device, providing access to encrypted programs and files in a system. However, end users may accidentally reset their device’s TPM without proper access management, leading to a plethora of security-related errors.
To prevent this from happening, you can disable the Clear TPM button via the Local Group Policy Editor or Registry Editor, allowing stricter control on who can access this function. You can combine these methods with AppLocker and stricter administrative access policies to further lock down access to TPM settings.


