

Key Points
- Windows 11 allows users and administrators to power down mechanical hard disks through the “Turn off hard disk after” power setting, reducing energy usage and hardware wear.
- The setting only applies to devices with mechanical hard drives; solid-state drives are unaffected and don’t require this configuration.
- Disabling hard disk sleep in Windows 11 requires local administrator privileges and applies globally to all users on a device.
- Admins can disable or adjust the timeout in Control Panel > Power Options, or use the powercfg command in Command Prompt or PowerShell.
- Setting the timeout value to 0 prevents hard disks from ever turning off, but can negatively impact battery life and reduce drive lifespan.
- The configuration can be automated and deployed at scale using RMM or MDM tools, ideally targeting only systems with mechanical drives to balance performance and longevity.
Mechanical hard disks can draw a significant amount of power over time, increasing office bills and wearing down batteries. The ‘turn off hard disk after’ setting in Windows 11 allows you to control when hard disks are powered down after a period of inactivity, with the aim of reducing energy usage and device wear. However, some users elect to disable this functionality or increase the delay before their hard disk is turned off to improve performance and reduce delays while drives spin back up after an idle period.
This tutorial demonstrates (with screenshots) how to disable ‘turn off hard disk after‘ in Windows 11.
What you need to stop your hard disk from turning off in Windows 11
You’ll need local administrative privileges to change the power settings on your Windows 11 device. Your device will also need to have a mechanical hard disk – SSD, M.2, and NVMe drives do not support (or require) this functionality.
Note that this setting is applied globally and affects every user on the device. You should carefully assess whether this is necessary for each device you are considering disabling hard disk sleep for, as it will negatively impact battery life and reduce the operating lifespan of any affected mechanical drives.
How to disable hard disk sleep via Power Options in the Windows Control Panel (GUI)
You can configure or disable hard disk sleep from the legacy Control Panel by following these steps:
- Right-click on the Start button and click Run
- Type control into the Run dialog and press the Enter key to open the Control Panel
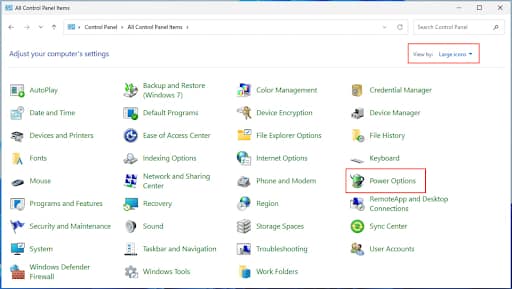
- Change the View By: option in the top-right corner of the Control Panel to Large icons
- Open Power Options
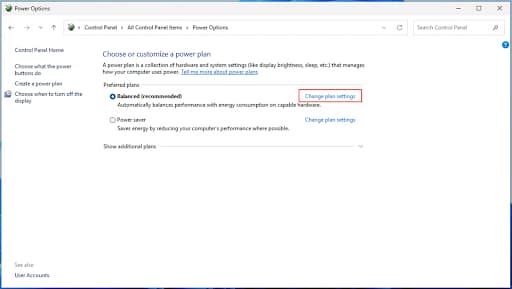
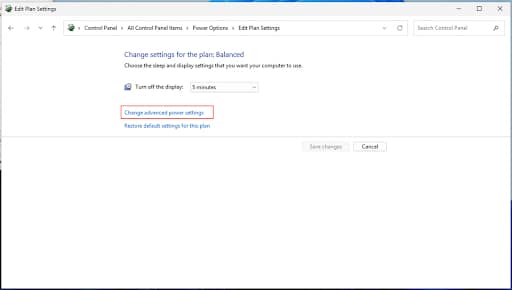
- Click Change plan settings for the enabled power plan, then click Change advanced power settings
- Expand the Hard disks item in the list of advanced settings, then expand Turn off hard disk after
- Use the arrows or type in the number of minutes in the Setting (Minutes) field
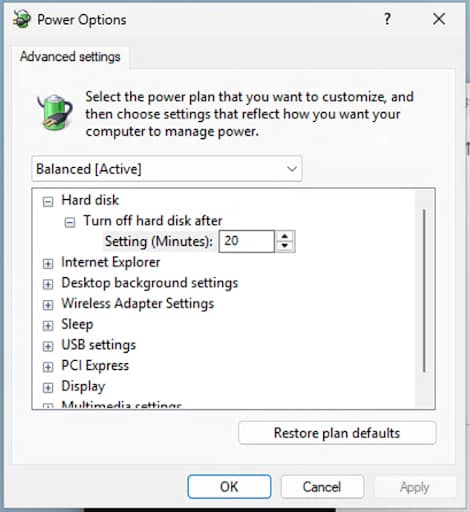
- If you are on a mobile device, there will be separate fields for when your device is On battery or Plugged in
- If you set the Setting (Minutes) field to 0, your mechanical drives will never turn off after becoming idle.
- Press OK to apply the change, and then close the Edit Plan Settings Control Panel window
Note that setting your hard disks to never sleep can drastically increase wear on them and reduce their lifespan.
How to disable ‘turn off hard disk after’ in Windows 11 from the command line
You can also change ‘turn off hard disk after’ from the Command Prompt or PowerShell using the powercfg command:
- Right-click on the Start button and select Terminal (Admin) to open an elevated PowerShell prompt
- To change the timeout to 0 and disable hard disk sleep when your device is plugged in (or on desktop devices), run the command: powercfg -change -disk-timeout-ac 0
- To change the timeout for when your device is running on battery, use: powercfg -change -disk-timeout-dc 0
- To change for both, run: powercfg -change -disk-timeout-ac 0 and powercfg -change -disk-timeout-dc 0
You can review these settings from the command line by running powercfg /getactivescheme to get the GUID for the active power scheme, and powercfg /q to get the current settings. Check the Turn off hard disks after setting output for the active power scheme. Use a positive integer greater than 0 to set the number of minutes before hard drives are powered down, rather than disabling sleep completely.
This script can be deployed by script using your remote monitoring and management (RMM) or mobile device management (MDM) solution if you need to configure multiple devices and optimize them for efficiency or performance. If your RMM/MDM platform supports it you can specifically target only devices with mechanical drives, or devices by organizational unit, so only the necessary devices are prevented from turning their disks off.
Troubleshooting ‘turn off hard disk after’ in Windows 11
The primary cause of disks not powering down even when ‘turn off hard disk after’ is disabled is background apps that continue to use the drive. You can use the Windows Task Manager or Process Explorer to find which processes are doing this. You should also check the Task Scheduler for any scheduled tasks that may be waking your hard disks.
If you have the ‘turn off hard disk after’ feature enabled and are noticing delays when opening files after stepping away from your PC, consider extending the time before your hard disk sleeps.
NinjaOne lets you optimize your entire fleet of devices for efficient power usage and longevity
NinjaOne provides IT administrators and managed service providers (MSPs) with a tightly integrated and automated set of remote IT management tools. Using unified mobile device management (MDM) and remote monitoring and management (RMM), you can configure, enforce, and check the power and performance settings of end-user devices, wherever they are located.


")
