

In Windows 11, the “Use the top of the pen to erase ink” setting (or, for Surface device users, the Surface Pen eraser function) can enhance a user’s experience with ink-enabled applications. By enabling it, users can use the top of the pen to erase ink on the screen, similar to how you would do it with a pencil and paper.
This function can make using compatible pens or styluses easier. However, there may be cases where the feature needs to be disabled or further configured.
If you need ways to easily enable or disable the pen eraser, read on. This guide covers different methods for enabling or disabling the pen’s top via the Settings app, Control Panel, Registry Editor, and .reg file.
How to enable or disable erasing with the top of a digital pen
Devices with pen support can enable or disable a convenient feature on Surface Pens: the use of the top of the pen to erase ink. This is extremely helpful and intuitive, especially for users who need to take notes. However, some users and environments may want the feature disabled for reasons, such as standardization.
📌 Prerequisites:
Before you make any changes, make sure that you have a Windows 11 device with pen support.
📌 Recommended deployment strategies:
| Click to Choose a Method | 💻 Best for Individual Users | 💻💻💻 Best for Enterprises |
| Method 1: Configure via Settings app | ✓ | |
| Method 2: Configure via Control Panel | ✓ | |
| Method 3: Configure via Registry Editor | ✓ | |
| Method 4: Configure via .reg file | ✓ |
Method 1: Enabling or disabling the pen eraser function using the Settings app
The Settings app is the quickest and simplest method of configuring the pen, making it ideal for fast changes.
📌 Use Cases: This method is great for:
- Individual end-users
- Non-technical users who want a GUI for making quick and simple changes
- Small teams that manage devices on a case-by-case basis
📌 Prerequisites:
- Open Settings.
💡 Tip: You can press the Windows key + I to quickly open the Settings app.
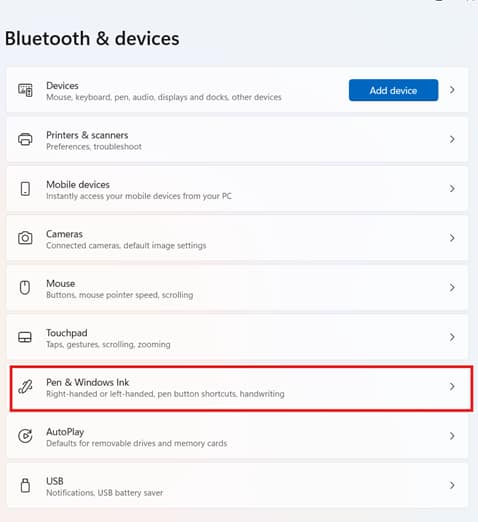
- Navigate to Bluetooth & devices > Pen & Windows Ink.
- Expand the Additional pen settings.
⚠️ Important: The Additional pen settings will only be visible when a pen is connected to your device. Read more about this in the Things to look out for section.
- Configure the “Use the top of the pen to erase ink” when it’s available:
- Toggle it On to enable the eraser function.
- Toggle it Off to disable the eraser function.
- Close the Settings app.
Method 2: Configuring the pen eraser function via the Control Panel
If the Settings app doesn’t work or if you’re simply looking for an equally simple alternative method to configure the use of the top of the pen, you can also use the Control Panel.
📌 Use Cases: This method is suitable for:
- Legacy environments that use old Windows tools
- When the Settings app method doesn’t work
To use this method, follow these steps:
- Open Control Panel (icons view).
- Click on Pen and Touch.
- In the Pen Options tab, under “Pen buttons”, check (enable) or uncheck (disable) “Use the top of the pen to erase ink” (where available).
- Click OK to apply changes.
Method 3: Enabling or disabling the pen eraser function using the Registry Editor
The Registry Editor is another method that configures the Surface Pen eraser feature. Since this method involves scripting and can cause issues when not done correctly, it’s recommended for advanced users.
📌 Use Cases: This method is ideal for:
- Advanced users and IT administrators who need granular control over the device
- Testing environments that require settings to be toggled repeatedly
- Environments requiring custom scripts and configurations
📌 Prerequisites: Before deploying this method, you’ll need administrator privileges.
To use the Registry Editor to configure the eraser settings, follow these steps:
- Press Win + R, type regedit, and press Enter to open Registry Editor.
- Navigate to HKEY_CURRENT_USER\Software\Microsoft\Wisp\Pen\SysEventParameters
- If the SysEventParameters key doesn’t exist, create it.
- In the right pane, create or modify the EraseEnable DWORD (32-bit) value:
- Use “1” to enable the eraser function.
- Use “0” to disable the eraser function.
⚠️ Warning: Editing the registry can cause system issues. Create a backup before proceeding. The Things to look out for section explains more about the consequences of misconfigured registry edits.
- Close Registry Editor.
- Sign out, then sign back in or restart your computer to apply changes.
Method 4: Using a .reg file to configure the top of a pen or stylus
The final method is via a .reg file, which is a good alternative to Registry Editor.
📌 Use Cases: This method is ideal for:
- Environments requiring mass deployment across many devices
- MSP and enterprise environments using remote device management tools
📌 Prerequisites: Before deploying this method, you’ll need administrator privileges.
Enable Eraser Function
Windows Registry Editor Version 5.00
|
Disable Eraser Function
Windows Registry Editor Version 5.00
|
To apply:
- Save the desired code snippet with a .reg extension (e.g., enable_eraser.reg).
- Double-click the file to merge it into the registry.
- Confirm any prompts.
- Sign out, then sign back in or restart the computer to apply changes.
⚠️ Things to look out for
| Risks | Potential Consequences | Reversals |
| No pen is connected to your device | Additional pen settings will not be visible. |
|
| Misconfigured Registry edits | You may experience system issues. | Ensure that you have backed up your registry before making any changes. |
Additional considerations before toggling the “Use the top of the pen to erase ink” feature
If you’re unsure which method to use, here are some considerations to keep in mind:
Lack of Group Policy setting
The pen eraser function can’t be applied via Local Group Policy. To configure multiple devices efficiently, you’ll need to use either the Registry Editor or a .reg file. Both methods require careful deployment to prevent any issues with your device.
User-specific setting
Generally, the Surface Pen eraser is a user-specific configuration. Unless you need a large group of individuals to have this feature enabled or disabled, then using the Settings app or Control Panel methods is the fastest way to configure the feature.
Standardized pen behaviour across devices
In a managed environment, using the Registry Editor or deploying the changes with a .reg file is a faster way to standardize pen behaviour across your Windows devices.
Troubleshooting
Here are common issues you may encounter while configuring the pen settings:
Pen not detected
Ensure the pen’s battery is charged and Bluetooth is paired.
Pen settings are missing or not visible
The following may be reasons for this issue:
The pen is not connected to your device
Fix: Ensure that your stylus or pen is connected to your device via Bluetooth and that it is fully charged and paired properly.
The device does not have pen support
Fix: There is no fix for this, since Pen Support is a prerequisite for configuring the Surface Pen eraser feature.
The necessary drivers to configure Pen settings are missing
Fix: Update your drivers to ensure that the settings are visible.
Quick-Start Guide
Enabling or Disabling the Use of the Top of a Pen to Erase Ink in Windows 11
To manage whether the top of your pen is used to erase ink in Windows 11, follow these steps:
Using Control Panel
1. Open Control Panel (in icons view).
2. Click/tap on the Pen and Touch icon.
3. Under Pen buttons, uncheck the box for Use the top of the pen to erase ink (where available) to disable this feature.
– To enable it, check the box.
Using Settings
1. Open Settings (Windows key + I).
2. Navigate to Bluetooth & devices > Pen & Windows Ink.
3. Under Pen buttons, toggle the Use top of pen to erase ink option on or off.
This setting determines whether the top of your pen functions as an eraser. If disabled, the top of the pen will not erase ink unless supported by the specific application you are using.
Standardize pen or stylus use by configuring the eraser settings
Enabling or disabling the top of the pen to erase ink in Windows 11 is straightforward when tailored to your environment. For individual users, the Settings or Control Panel methods are quick and user-friendly. For IT admins and managed environments, Registry Editor and .reg file deployments offer scalability and precision.
Related topics:


