

This guide demonstrates how to hide or show sync provider notification in File Explorer in Windows 10 and Windows 11. It explains what sync provider notifications are and provides instructions for using the Windows graphical interface, the Windows Registry Editor, and PowerShell to configure whether you can see sync provider notifications from OneDrive.
How to show sync provider notifications in Windows 10 and Windows 11
Sync provider notifications are configurable in Windows 10 build 14901 and later versions, and in all versions of Windows 11. You can configure whether you see sync provider notifications from OneDrive using one of the following methods.
Using the Windows File Explorer options dialog
To configure sync provider notifications using the Windows File Explorer Options dialog on Windows 10 or Windows 11, follow the below steps.
- Open the Windows File Explorer from the Start menu, or right-click the Start button and select File Explorer
- On Windows 10: select the View tab, then click the Options button

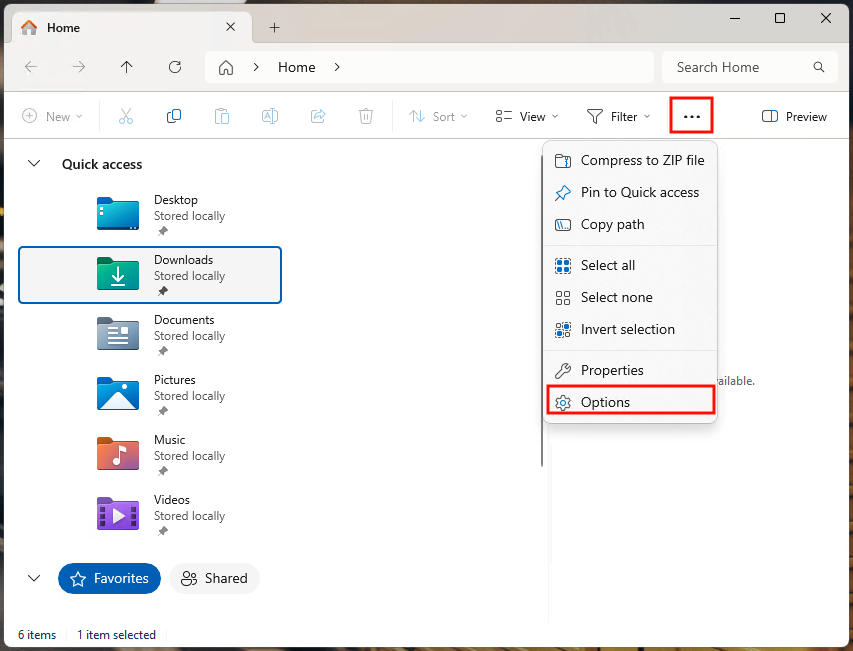
- On Windows 11: click the three dots menu (…), then click the Options button
- Then, on both Windows 10 and Windows 11, select the View tab in the Windows File Explorer Options dialog
- In the list of Advanced settings, scroll down to the Show sync provider notifications setting

- Check the checkbox to enable Show sync provider notifications
Any user can configure this setting, you do not need to be logged in as an administrator. Changing this setting will only affect the current user and will persist between logouts and restarts.
Using the Windows Registry Editor
You will need to be logged in as an administrator to use the Windows Registry Editor. Before you make changes to the Windows Registry, it is recommended that you create a full backup of it in case you make a mistake and need to restore it to its previous state.
The steps below show you how to show sync provider notifications in File Explorer using the Windows Registry:
- Press the Windows + R keyboard shortcut to open the Run dialog
- Enter the command regedit.exe and click on the OK button to launch the Windows Registry Editor
- Navigate to the registry key located at Computer\HKEY_CURRENT_USER\Software\Microsoft\Windows\CurrentVersion\Explorer\Advanced (to save time, you can copy and paste this location into the registry editor address bar)
- If the value ShowSyncProviderNotifications doesn’t yet exist in the Advanced key, select Edit > New > DWORD (32-bit) Value from the toolbar and rename the new DWORD value ShowSyncProviderNotifications
- Double-click the ShowSyncProviderNotifications DWORD and set its value to 1 to show sync provider notifications in the File Explorer
- Reboot your Windows device to apply the change
Note that the default setting is to show sync provider notifications.
Using a PowerShell script
Run the following PowerShell command to enable sync provider notifications in the Windows File Explorer by setting the registry value:
Set-ItemProperty -Path “HKCU:\Software\Microsoft\Windows\CurrentVersion\Explorer\Advanced” -Name “ShowSyncProviderNotifications” -Value 1
You can include this command in login scripts to set this value consistently for multiple users in enterprise or education environments.
How to hide sync provider notifications in Windows 10 and Windows 11
The same methods can be used to hide sync provider notifications on Windows 10 and Windows 11 PCs.
Using the Windows File Explorer Options dialog
To hide sync provider notifications in all editions of Windows 10 and Windows 11, follow the steps for enabling them shown above, but instead, uncheck the checkbox for Show sync provider notifications.
Using the Windows Registry Editor
To hide sync provider notifications using the Windows Registry Editor, follow the steps provided above to show them, but set the value of the ShowSyncProviderNotifications DWORD to 0 instead of 1.
Using a PowerShell script
You can deploy the following PowerShell script to automate the process for the above registry value.
Run the following PowerShell command to disable sync provider notifications in the Windows File Explorer:
Set-ItemProperty -Path “HKCU:\Software\Microsoft\Windows\CurrentVersion\Explorer\Advanced” -Name “ShowSyncProviderNotifications” -Value 0
What are sync provider notifications?
Sync provider notifications in the Windows File Explorer provide extra information from the OneDrive file sync service. While some of these notifications can be useful, they do include commercial offers which you may prefer not to see. You may also wish to hide them to reduce interface clutter that may confuse users.
Note that if you use file sync services other than OneDrive, you will need to configure notifications using their built-in settings.
Managing OneDrive and other sync settings at scale
Deploying settings that lack an associated Group Policy setting to Windows 10 and Windows 11 devices can be a frustrating task for IT support technicians. Remote Monitoring and Management (RMM) by NinjaOne lets you deploy automation scripts and security policies, as well as remotely monitor and access devices – ensuring a consistent configuration that is easy to troubleshoot.
FAQ
Does hiding or showing sync provider notifications apply system-wide to all users?
No, regardless of which method is used to configure whether to hide or show sync provider notifications, it only applies to the current user, and is set for each user individually.
Is there a Group Policy for managing sync provider notifications?
No, a Group Policy does not exist for hiding or showing sync provider notifications. However, you can deploy a PowerShell script as part of your logon process, or use Group Policy Preferences to push registry settings to multiple users.
Does hiding sync provider notifications affect OneDrive or other sync provider functionality?
No, hiding sync provider notifications on Windows 10 and Windows 11 only hides notifications in the interface and does not affect file sync or other functionality.


