
Here’s everything you need to know to go from blank slate to printable brochures that prospects will be delighted to receive — no design degree required!
Throughout our series on DIY MSP marketing, we’ve focused a lot of digital marketing efforts — everything from building and optimizing a solid website to launching successful Google, Facebook, and LinkedIn ad campaigns. But for all the focus on the digital world, the fact remains reaching prospects in the real world can really move the needle.
True, digital ads may be able to follow you around, but once you close your browser they’re out-of-sight, out-of-mind. Emails are easily ignored and deleted. Voice messages, too. But a piece of physical mail or a brochure you leave behind after a visit? Sure, prospects may toss it in the trash. But before they do, they’ll pick it up. Likely give it a glance. And statistics show they’ll be just a little more likely to consider taking the next step.
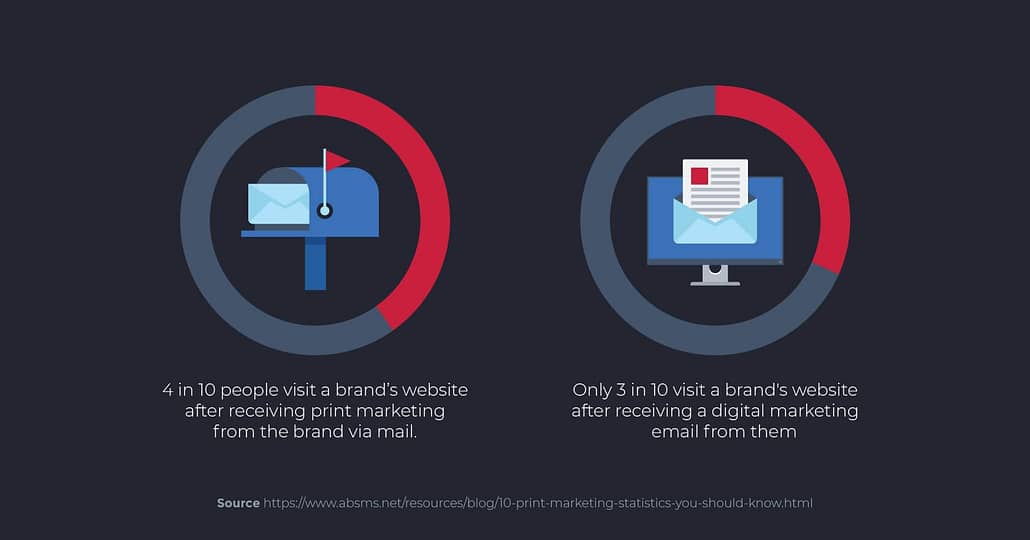
Source: absms.net
For many people, printed materials actually still seem to carry more, well, weight. It’s true for the smaller and/or more traditional businesses in your area, and it’s true for larger firms, as well. Think about it — which is easier? For a decision maker’s administrative assistant to delete an anonymous marketing email? Or toss an important-looking package that’s addressed to their boss in the trash?
A heavy, glossy, well-designed brochure that you’ve mailed specifically to a prospect, or even left behind as your calling card after a face-to-face meeting, is something worth spending some valuable, undivided attention on.
That’s not just a hunch. Statistics show that for every $167 U.S.-based marketers spend on printed marketing mailers, they sell $2,095 worth of goods. That’s an ROI of 1,300%!
Over 80% percent of U.S. internet users report trusting print ads when making a purchasing decision. More than 75% also trust print ads and catalogs received via mail.
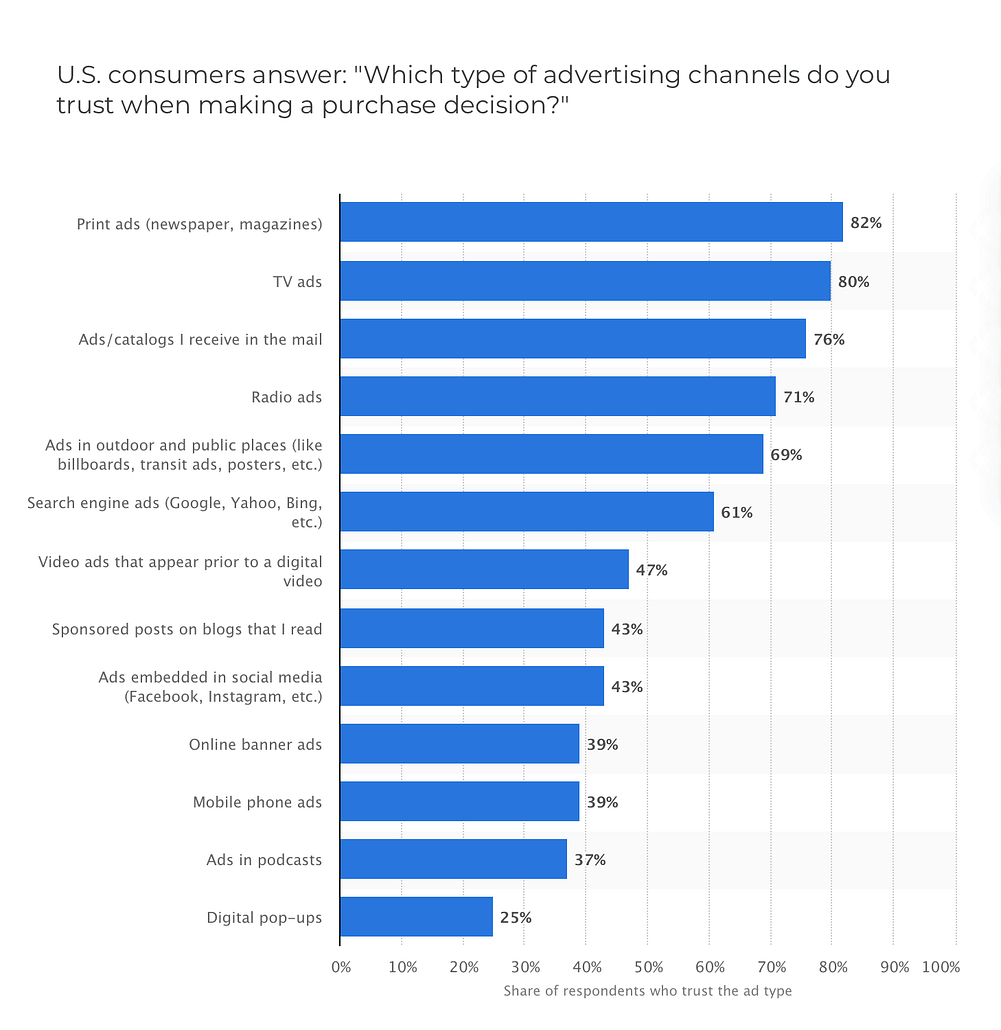
Source: Statista
It would seem that any reports about the death of print marketing have certainly been exaggerated.
Looking to design or redesign a better brochure for your MSP business? You’ve come to the right place. In this post, we’re going to run through everything you need to know so you can create eye-catching, professional-looking brochures yourself, without resorting to spending hours combing through Fiverr profiles for cheap but decent design help.
Phase 1: Writing your MSP brochure
Ever heard the phrase “Content is king”? While your brochures and other printed materials certainly need to look and feel impressive (please, do yourself a favor and spring for something higher-quality than printer paper), the thing that will fundamentally determine whether your efforts sink or swim is your copy. It’s the foundation. You can have all the fancy trimmings and window dressing, but if it’s built on top of weak core messaging you can expect your efforts to crumble.
So before we get into everyone’s favorite part (the design) let’s start with the really hard part (sitting down and actually writing the darn thing).
Tip #1: Find ways to get as specific and relevant as possible
Think about your website. If it’s like other leading MSP websites, you’ve got multiple pages dedicated to describing and highlighting the value of the services you provide. Now, think about trying to cram all of that information into a single brochure. If you insist on trying to capture everything you’ll either end up with giant blocks of super tiny, unreadable text, or you’ll be forced to go super short and light on everything and risk not being able to provide any convincing or compelling “meat”.
Neither is a great way to win business or set a positive impression of your business.
Instead, use your brochure as a chance to dive deep into messaging around one of the following:
- a single problem/solution
- an exclusive offer
- a really impressive case study (bonus points if it’s specific to the recipient’s industry)
Yes, that does mean you may end up creating more than one brochure. But what it also means is that each of those brochures will be more valuable to the recipient and therefore achieve higher ROI in the end.
Getting more specific and less general will help you better address your target audience’s specific interests and pain points. In addition, you can create content that speaks to them no matter where they are in the buying process.
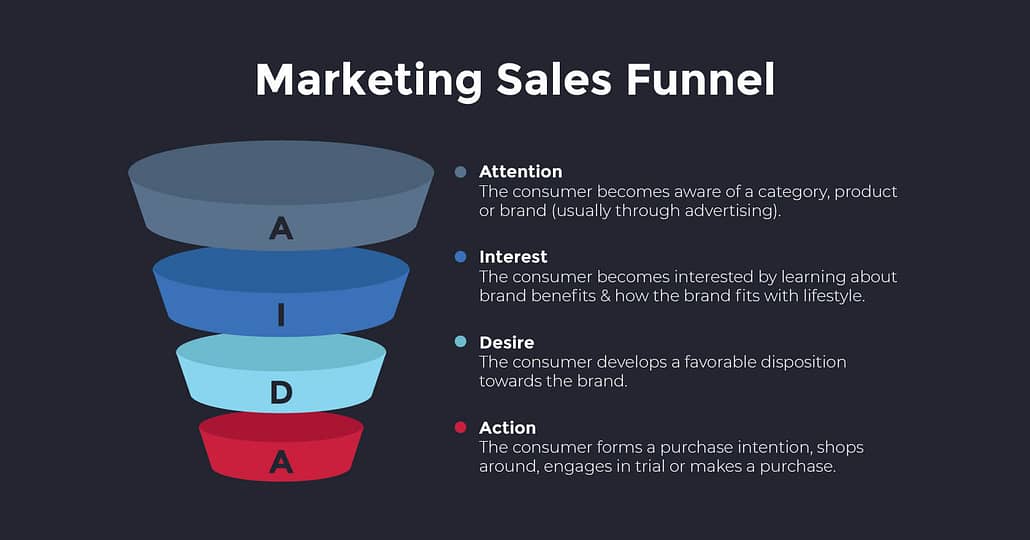
To learn how to create content for each stage of the buying process, check out the tried and true AIDA marketing model, a method for tapping into each of the “cognitive stages an individual goes through during the buying process … ”
Each stage in the AIDA model explains how businesses should portray information to make the most impact:
- Awareness: In this stage, you’re just making a prospect aware of your brand, what you offer (high-level value, not super technical specifics), and how it relates to their needs.
- Interest: Next, you’re generating enough interest in the benefits of your MSP that prospects are receptive to/seeking out additional info.
- Desire: Now that prospects are aware of and interested in your brand, you want to take them from “liking you” to “wanting to work with you.” This is where establishing a personal connection (if you haven’t already), and providing highly relevant success stories can come into play.
- Action: Here is where you finally call the prospect to take sales-related action. It’s important not to rush to this step, otherwise the prospect can feel pushed and back away. For those prospects not quite ready, you can also consider giving them lower stakes commitment options, like subscribing to your newsletter, webinar series, etc.
Side note on where brochures fit in your broader marketing strategy: Ideally, you should really be creating marketing materials to help guide prospects along through each of these stages, but that doesn’t necessarily mean you need to be creating print materials for each one. A better way of thinking about your brochures is as one part of a multi-channel approach that involves you reaching prospects across a variety of formats and contexts.
Obviously, some tactics/formats/channels are going to work better for particular stages than others. But the one thing that’s true across the board is you shouldn’t be treating any of them like they’re in a vacuum.
Ex: Maybe you get an ok response from using brochures as cold initial outreach. Not abysmal, but also not great. When you coordinate that outreach so your brochures are delivered around the same time those prospects are also getting a phone call, email, and/or social outreach from you, plus possibly seeing your ads show up in their feeds and searches, then your results may be markedly better thanks to the cumulative effect in play.
Brochures also don’t always have to be for cold outreach. Plenty of MSPs use them as leave-behinds during in-person prospect meetings, and as take-homes at events. Or take this cool approach from Dedicated IT, a fast-growing Florida-based MSP that’s surpassed $6M ARR, for example.
They send customer success story brochures to prospects, but not just any customer success stories. Hyper relevant ones that feature customers in the same vertical and/or geography as the prospect, who were able to overcome specific problems and challenges that Dedicated IT knows the prospect is also personally dealing with.
For an MSP like Dedicated It that services clients in a variety of industries nationwide, that means creating and juggling a lot of different case studies. One way they make it manageable and keep production costs down is by only delivering the brochures after a prospect has been qualified following an initial touchpoint.
In other words, they send brochures to prospects who are further down the funnel. And by going the extra mile to make sure the brochures are personalized and relevant they’re increasing engagement and ROI.
Tip #2: Answer FAQs
Once you’ve spoken to a lot of prospects, you’ll probably start to notice they ask similar questions. Many businesses answer those using a section on their website designed specifically for frequently asked questions (FAQs).
If you already have one of those, go ahead and reuse the most pertinent FAQs for your brochure.
Tip #3: Make it easy to skim
When it comes to marketing materials (or anything written for that matter), most people don’t read word-for-word. Most readers scan content to find the sections that are most relevant to them. Make it easy for them to find what they’re looking for by doing the following:
- Start with the most important information first (this is called the “inverted pyramid” style of writing)
- Use subheads to label different sections of content
- Use bulleted and/or numbered lists whenever applicable
- Keep sentences short
- Include plenty of empty space between content elements (this is known as “white space”)
- Avoid confusing terms or slang that only industry insiders would understand
- Make friends with graphics and design
- Align left (in languages that read from left to right)
Tip #4: Don’t forget the CTA!
We see this scenario all too often: A business spends a ton of time creating an amazing print marketing brochure just to fall flat when it comes time to inspire the reader to take action.
A call to action (CTA) should be used any time you want to get a reader to respond to the information they just consumed. In the case of a printed brochure, your CTA will probably be one of two prompts — encouraging a reader to visit your website or get in touch using the included contact information.
While there are thousands of ways you can word and design your CTAs, here two tactics to help drum up more responses:
- Be enticing: Include a unique coupon code or promotion that readers will need to visit your website or get in touch with in order to take advantage.
- Be specific: Give them a “script” so they know what to say if they do get in touch: “Ask about your free trial by emailing us at…”, “Call us today for answers to all your MSP questions at…”, etc.
Phase 2: Use Canva to Design Your MSP Brochure
Honestly, we could talk about Canva all day.
For the uninitiated, Canva is a free website and app — with paid options — with tons of fonts, graphics, and templates that enable users to whip up professional-looking flyers, business cards (stay tuned for more on that!), and of course brochures using an easy “drag-and-drop” format.
Step 1: Gathering On-Brand Resources
Just like any delicious, ridiculous treat on The Great British Bake Off (Seriously, these bakes are nuts!), the success of every project is only as good as the ingredients that go into it.
That said, it’s time to gather the resources you’re going to need to create your first brochure. These should at least include:
- Your brochure content
- A logo file
- Your specific brand colors
- Photos of your building and staff — or other graphics that further the goal of the brochure and build trust (Canva has plenty of stock imagery if you don’t have this resource yet)
While gathering your resources is easy enough, the bigger goal for this step is making sure they’re all on-brand. This is because your brochure is a representation of your brand and a stand-in for when you can’t be there in person. You want to make sure how it looks and what it says are in-line with what you want prospects to know and think about you.
That means making sure your brochure colors match all your other marketing materials, you’re using a crisp and up-to-date version of your logo, and there is consistency across all print marketing materials.
One of the best ways to ensure all your print and digital marketing materials are branded consistently and effectively is to develop a brand style guide. Check out this wonderfully in-depth yet easy-to-digest article on How to create a brand style guide from 99designs to learn more about the key elements of this kind of guide.
Either in conjunction with or in lieu of a brand guide, we recommend creating a “master template” for each brochure type that creators can go in a copy any time they need to create a new print marketing resource. How does one create a template in Canva, you ask? Let’s explore that right now.
Step 2: Use Canva to Bring Your Brochure to Life
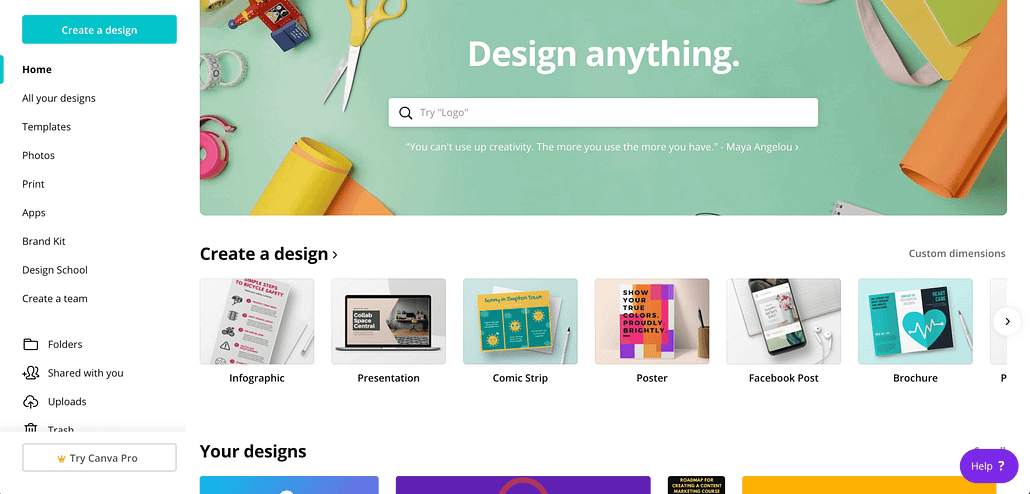
First things first, go to canva.com and sign up to create your account.
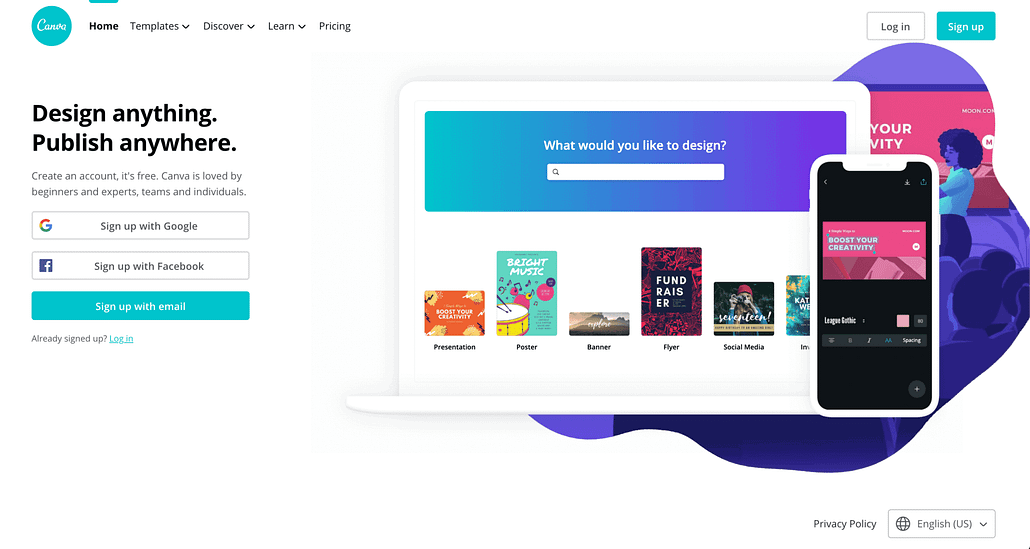
Once you’re in, your homepage will look something like this:
This is where the fun starts.
Update: You can still follow the directions below, or you can also go directly to Canva’s new brochures page!
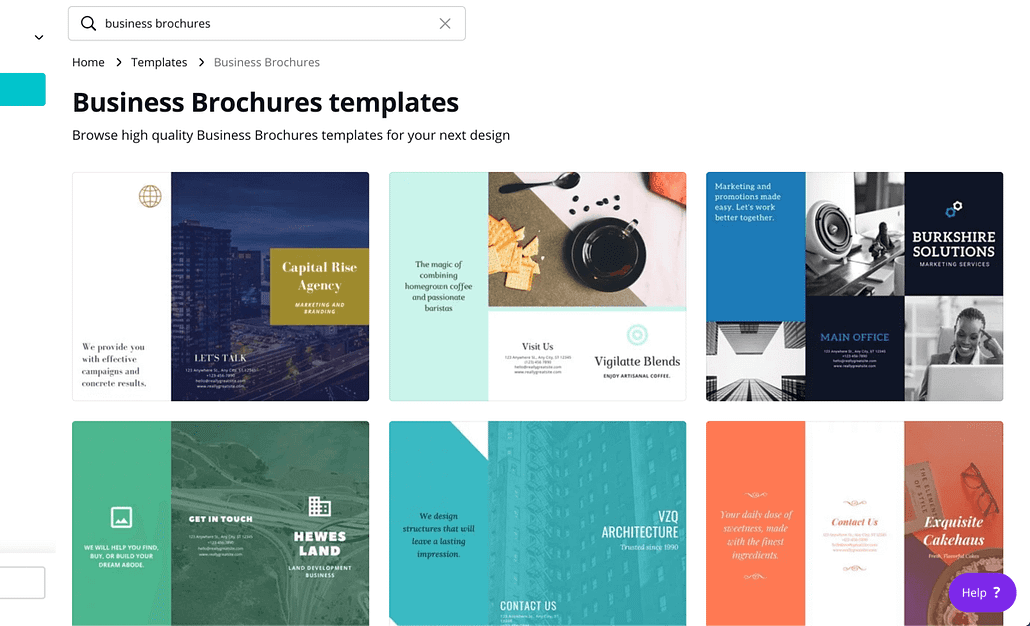
Select “Templates” the left sidebar to see all of Canva’s templates and browse by category, click on “Create a design” to enter custom dimensions or select the type of design you want to create, or use the search bar to look for specific templates. This last one is our favorite option, as it allows for the most flexibility. Test out the search bar by typing in “brochure” or “logo” and adding descriptors like “sales” or “business” to narrow your results.
We’re going to use the search bar to find “business brochures.” What we see next is a wide variety of tri-fold templates from which to choose (If you’re looking for a “one-sheet” style brochure, search “business flyers.”).
Once you selected a template for your print marketing brochure, the template will open up in Canva’s drag-and-drop editor:
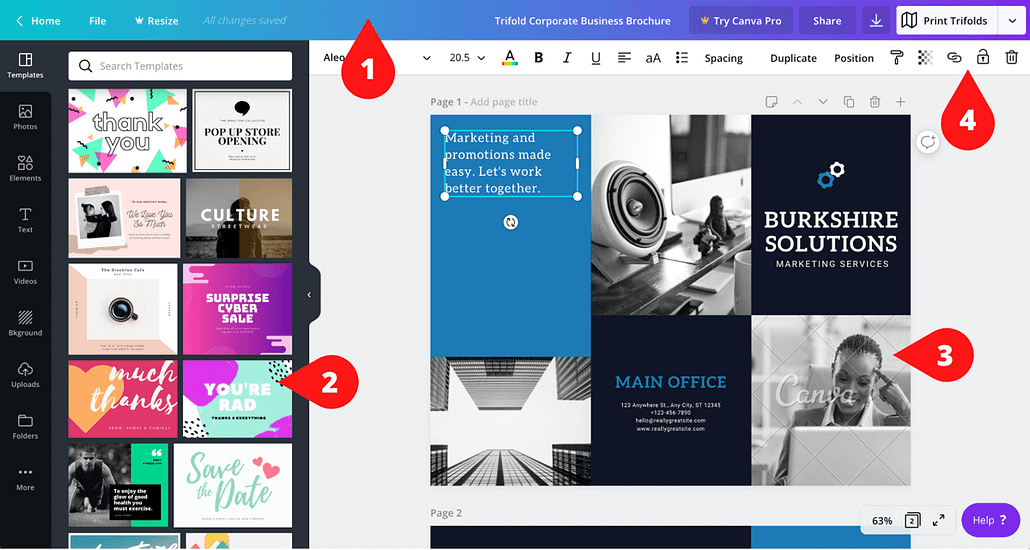
This is where you’ll make the template your own. Here are the key areas we recommend getting familiar with:
- The menu bar: This bar runs across the top of the editor. This is where you can access common editing features like undo, redo, resize, etc. From here, you can also name, share, download, and even start the printing process for your design.
- The side panel: This panel on the left allows you to access anything you may need to use when creating your brochure. This includes other templates, text, photos, your uploads, elements (graphics like symbols, shapes, charts, etc.), and more. If you want to add one of these items to your brochure, simply click on it and drag it onto your canvas. Items that cost money are marked with a dollar sign. If you choose to use any of these, you’ll be asked to pay before publishing the brochure.
- & 4. The canvas and toolbar: Your canvas is your main workspace where you’ll edit the brochure so it’s specific to your business. To add your own text, simply copy it from your document, click on the text box where you want it on your canvas, and paste it in. To add your own graphics, drag them onto your canvas and they’ll show up when they’ve fully uploaded. These will stay saved in the “Uploads” section in the side panel.You can edit most items on the canvas. Just click on one and you’ll notice a toolbar (number 4) pop up above the canvas that gives you editing options for that element. In our example, you’ll see all the options for editing the section of text we’ve selected. The options in the toolbar will change depending on the type of element you select.
Wow, was that a lot to read for you? It sure felt like a lot to write! We get that not everyone learns from written instructions, so if you’re ready to see Canva in action before diving in, this simple YouTube video touches on key features in the side panel, canvas, and toolbar. And if you’re more of a doer, Canva itself has an amazing tutorial series that will walk you take you from the basics to creating a brand kit to upping your design skills and much, much more.
Step 3: Prepare for Printing
Once your brochure is finalized and ready to print, Canva offers loads of options. If you select “Print Trifolds” in the upper, right-hand corner, Canva will walk you through ordering printed brochures through their service.
You can also select the arrow next to that button to see various other ways to publish your brochure.
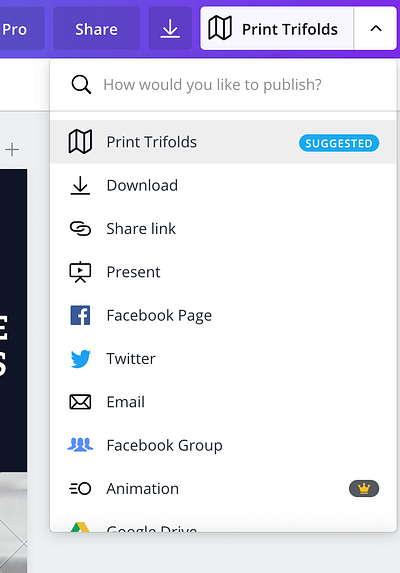
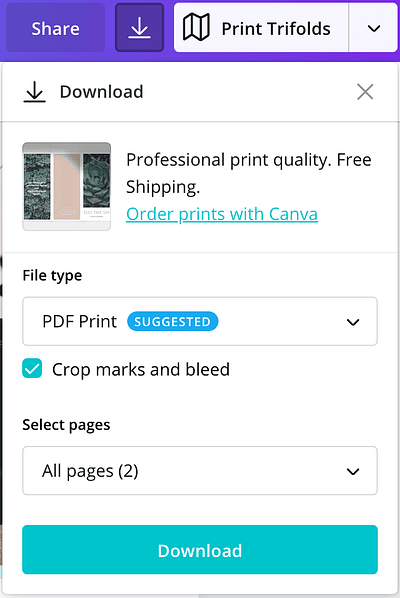
If you have your own printer in mind, select “Download” and choose the best options for your brochure.
And just like that, you’ve successfully used Canva to create a beautiful brochure that will set the tone for many more print marketing campaigns in the future!
Phase 3: Distribution
We can probably all agree that spending the time to design and the money to print and mail thousands of brochures to cold contacts isn’t going to generate the ROI and high-quality clientele you’re looking for.
Here are some decidedly more effective ways to distribute your valuable print marketing resources in conjunction with other sales and marketing efforts:
- Include personalized, industry-specific brochures in email exchanges with qualified prospects.
- Send these same personalized brochures via mail when a prospective client indicates interest but hasn’t taken action yet.
- Leave a brochure behind, along with your business card and a personalized note, after every in-person visit.
- Customize your brochure for each in-person event. These make for a powerful reminder of your unique brand when either you follow up or the lead rediscovers your brochure and (hopefully) reaches out.
- Inspire readers to take action on brochures by including time-bound offers that are unique to the recipients’ vertical, location, etc. In addition to drumming up interest, this is also a great way to clue them in to the not-so-obvious value you can offer their business.
Next steps
See the brochure design in action—watch this brief video guide: ‘DIY MSP Marketing: Designing Your Own Brochures and 1-Pagers with Canva.’
If you liked our guide to creating the content for your first print brochure and using Canva to bring it to life without the design fees or art degrees — stay tuned for future guides on doing the same for business cards and other print marketing collateral!
In the meantime, if you want to learn more about design itself, Canva’s “Design School” has all kinds of short, free videos on social media, graphic design, branding, and more.
And if you’re ready to expand your marketing efforts, check out our video on Creative MSP Marketing Campaign Ideas to learn how to Set the Stage for an Effective Direct Mail Marketing Program and get inspired by Ideas for Killer Direct Mail Marketing Campaigns that Work.
If you’re super excited to dig into the more creative side of your business instead of always being bogged down in the day to day (Can’t say we blame ya!) here’s one way to get out from behind client fires and in front of a sketch pad — try the top-rated, all-in-one RMM software for MSPs and IT pros. Just like Canva, you can try it for free in just a few clicks.
P.S. If this guide helped you create a brochure or other print marketing material, we’d love for you to help spread the word on Facebook, LinkedIn, or Twitter.


