

Windows 11’s widgets are interactive panels that provide real-time updates like news, weather, and calendar events on your desktop. However, others have it disabled to reduce distractions and save system resources. Some organizations also want it turned off for policy compliance.
In this step-by-step guide, you will learn different methods to enable or disable widgets feature in Windows 11 for greater optimization, system management, or troubleshooting.
Note: Using Registry, Group Policy, and PowerShell methods below requires administrative privileges.
Method 1: Using Settings (GUI)
This method is the quickest and easiest way to disable or enable widgets in Windows 11:
- Right-click the taskbar, then select Taskbar settings.
- Under Taskbar items, toggle the Widgets switch Off or On.
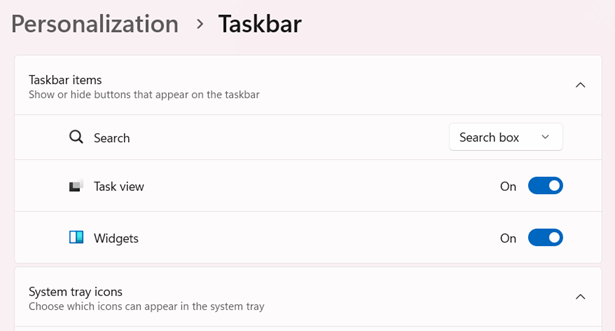
Note: This method only hides the taskbar button, but widgets will remain active in the background. For full removal, use the advanced approaches below.
Method 2: Using Group Policy Editor (GPO)
Before proceeding, note that GPO is only available in Windows 11 Pro, Enterprise, and Education. For Windows Home users, use Settings (see Method 1) or PowerShell (see Method 4).
- Press Win + R to open the Run dialog box.
- Type gpedit.msc, then hit Enter to open the Group Policy Editor.
- Go to Computer Configuration > Administrative Templates > Windows Components > Widgets.
- Double-click Allow widgets, then configure:
- To enable: select Enabled or Not Configured.
- To disable: select Disabled.
- Click Apply > OK.
- You can restart the PC or run gpupdate /force in Command Prompt to enforce the changes further.
Note: Disabling widgets using GPO removes the taskbar button and blocks users from re-enabling it via Settings.
Method 3: Using Registry Editor
Before proceeding with this method, we strongly recommend creating a backup for your Registry to undo possible mistakes that can disrupt your Windows system. You can read more about it in How to Back Up and Restore the Windows Registry.
- Press Win + R to open the Run dialog box.
- Type regedit, then hit Enter to open the Registry Editor.
- Go to the address key:
HKEY_CURRENT_USER\Software\Microsoft\Windows\CurrentVersion\Explorer\Advanced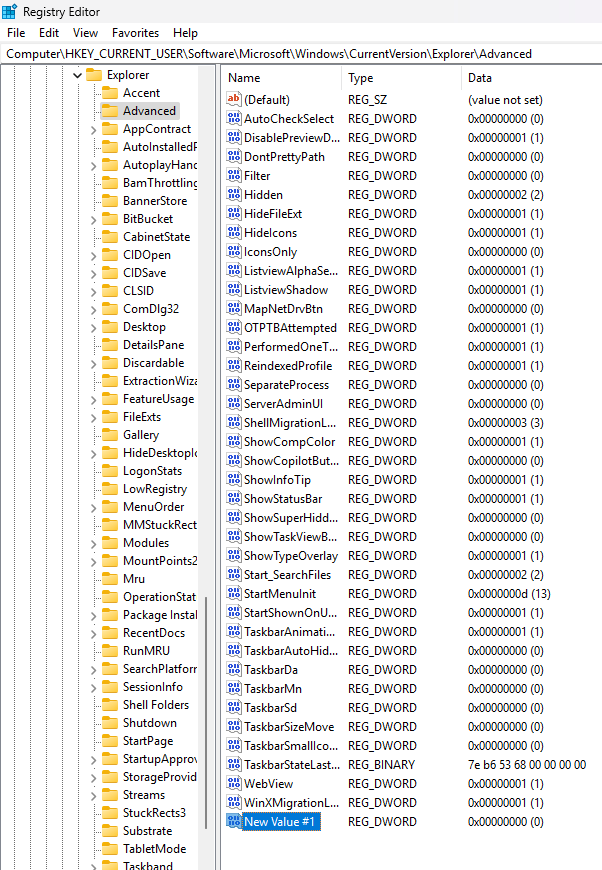
- Right-click the Advanced key, then select New > DWORD (32-bit) Value.
- Name the value TaskbarDa (if it doesn’t exist).
- Double-click TaskbarDa and set its value to:
- 0 to disable widgets.
- 1 to enable widgets.
- Click OK, then close the Registry Editor.
- Restart your PC or sign out and back in to enforce the changes.
Note: This method hides the widgets button, but will not uninstall the feature entirely.
Method 4: Using PowerShell
- Press Win + X, then select Terminal (Admin).
- PowerShell should be open on the window panel by default. If not, click the dropdown button next to the tab above, then select Windows PowerShell.
- To disable widgets, which are part of WWEP (Windows Web Experience Pack), run this command to uninstall the widget package:
Get-AppxPackage *WebExperience* | Remove-AppxPackage - To reinstall widgets, the simplest way is to use Winget:
Winget install –id “9MSSGKG348SP”
Note: Always verify the path in the reinstall command, since the alphanumeric string (e.g., cw5n1h2txyewy) may differ between systems. Check C:\Windows\SystemApps in File Explorer, and look for the Microsoft.Windows.Client.WebExperience_xxxxxxxxxxxx folder (replace the placeholder in the command with your system’s unique string).
Manage lock screen widgets on Windows 11
Widgets are also shown on Windows 11’s lock screen, especially in newer builds and certain regions. To disable, here’s how you can do it:
Disable lock screen widgets via Settings
- Go to Settings > Personalization > Lock screen.
- In Lock screen status, click the dropdown and select None.
Note: This option appears only in Windows 11 build 26100.3624+ and select regions.
Alternatively, you can use GPO to disable it, since this approach can turn off widgets system-wide.
Group Policy for lock screen widgets
- Open gpedit.msc in the Run (Win + R) dialog, then go to Computer Configuration > Administrative Templates > Windows Components > Widgets.
- Double-click Disable Widgets on Lock Screen, then set it to Enabled.
Quick-Start Guide
NinjaOne offers a script to manage Windows widgets specifically for Windows 11.
From the script library, there’s a script called “Set News and Interests” that can:– Hide or show the News and Interests tab in the taskbar– On Windows 11, it specifically can hide or show the widgets tab
– Can be deployed across multiple machines through NinjaOne’s management platform
If you’re looking to manage this setting across multiple devices, I recommend consulting with your IT team about using the NinjaOne script to control the Windows 11 widgets feature consistently.
Tailor Windows 11 Widgets to Your Needs
Managing Windows 11 widgets ensures your setup aligns with your priorities. The right method to enable or disable widgets seamlessly exists, whether you’re decluttering a personal desktop, optimizing a gaming rig, or enforcing corporate policies.
For quick fixes, the Settings app hides the taskbar icon in seconds. IT admins can leverage Group Policy for system-wide control, while advanced users tweak the Registry for granular adjustments. PowerShell scripts handle bulk deployments effortlessly.
Mastering these tools puts you in control. Disable widgets to reclaim focus, enable them for real-time updates, or strike a balance that suits your needs. Depending on your PC build and region, you may even be able to edit lock screen widgets. These changes ensure that your Windows 11 setup works for you, and not the other way around.


