

Key Points
How to Delete Temporary Files in Windows 11
- Identify temporary files:
- Common types include system updates, browser caches, installer leftovers, and crash dumps.
- Check folders like %temp%, C:\Windows\Temp, and C:\Users\<Username>\AppData\Local\Temp.
- Use Disk Cleanup:
- Right-click drive → Properties → Disk Cleanup → “Clean up system files.”
- Select temp files, update files, and recycle bin items to delete.
- Manually delete temp files:
- Open Run (Windows + R), type %temp%, and delete safe files.
- Skip files currently in use by the system.
- Automate cleanup with Storage Sense:
- Go to Settings → System → Storage → enable Storage Sense.
- Configure automatic removal of temp files and recycle bin items.
Temporary files in Windows take up valuable disk space and can slow down your system over time. While these files serve important functions during active processes, they often remain long after you need them. To maintain optimal system performance and storage space, you need to know how to delete temporary files in Windows 11. This should include which files are safe to remove and how to automate the cleanup process.
💡Free up space and improve speed—clean your temp files now. Watch How to Delete Temporary Files in Windows to learn the steps.
Leverage full device visibility to optimize Windows device performance.
What are temporary files in Windows 11?
Temporary files first appeared in early Windows versions to handle short-term data storage needs. When you open applications or browse websites, Windows creates temporary files to store information. For example, partially completed downloads, session data, and cached images.
Windows 10 generates several types of temporary files during routine operations. These include:
- Installer files that remain after software updates.
- Browser cache files store webpage data.
- System files that are created during Windows updates.
- Print spooler files accumulate when documents queue for printing.
- Crash dump files that appear after application errors.
The Windows operating system typically manages these files automatically, but the cleanup process doesn’t always work as expected. This leads to unnecessary storage consumption over time, especially on systems with limited disk space.
Where to find temporary files?
Locating temporary files across your Windows system requires understanding several key directories. You access most temp locations through File Explorer or specific system shortcuts.
Common temporary file locations
The primary locations for temporary files include:
- The Windows Temp folder stores system-level temporary data at “C:\Windows\Temp”, which contains installation files and system update remnants that persist after updates are complete.
- Your user account has a dedicated temp folder at “C:\Users\YourUsername\AppData\Local\Temp” where applications store session data and temporary configuration files during runtime.
User-specific temp folders
To access hidden temp folders quickly:
Open the Run dialog box by pressing “Windows key + R.”
- Access your user temp folder:
- Type “%temp%” in the Run dialog and press Enter.
- This opens the temporary folder specific to your user account.
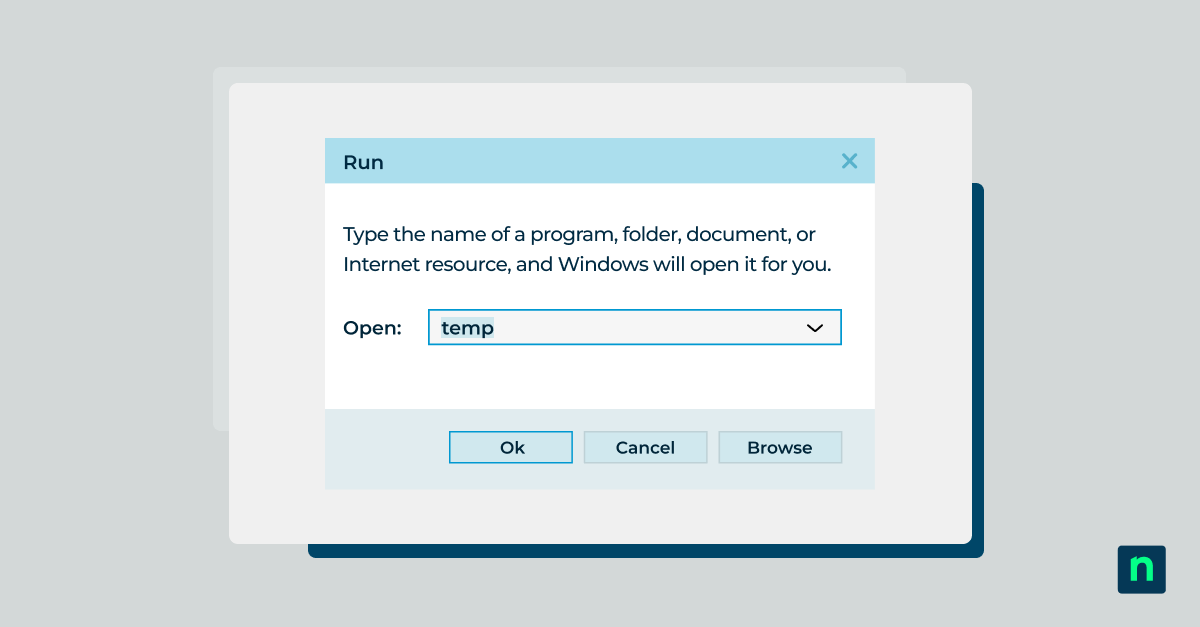
- Access the system-wide temporary directory:
- Type “temp” in the Run dialog and press Enter.
- This opens the folder containing temporary files used across the system.
Accessing these folders directly allows you to clear temporary files manually, freeing up space and resolving potential issues.
Windows system temp files
The Windows prefetch folder at “C:\Windows\Prefetch” maintains data that helps applications launch faster. However, these files regenerate as needed. The Software Distribution folder at “C:\Windows\SoftwareDistribution” contains Windows Update files that remain after system updates.
However, keep in mind that deleting Prefetch data might slow down the performance of your computer. Only modify prefetch files if you believe them to be corrupted. On HDD-based systems, clearing this folder can cause a temporary slowdown whenever you boot up an application for the first time as Windows needs to rebuild the prefetch data. But on SSD-based systems, Windows automatically regenerates prefetch files as needed, so you can delete files safely.
Application cache directories
Application caches occupy significant space across different locations. Browser caches typically reside in the AppData folders, with each browser maintaining its own cache directory. Microsoft Edge, Chrome and Firefox all store cached web content differently. This impacts how you clear temporary files in Windows 10.
Step-by-step guide: How to delete temporary files in Windows 11
Windows 10 provides multiple methods to remove temporary files from your system. From built-in utilities to manual processes, each approach offers different benefits depending on your needs. Let’s explore the most effective ways to delete temporary files and reclaim valuable disk space.
Use Storage Sense or the Disk Cleanup utility
Windows has a feature-based tool in Windows 11 called Storage Sense. This will automatically clean up your temporary files for you. If you have Storage Sense turned on under the default settings, it will remove the temporary files once it detects that your computer is low on disk space.
If you want a more manual approach Disk Cleanup utility can help. Right-click any drive, select “Properties” and click “Disk Cleanup.” Select “Clean up system files” for a comprehensive scan. Check boxes for “Temporary files,” “Windows update cleanup” and “Windows upgrade log files” to free up the most space.
💡 Note: While you can still access Disk Cleanup in Windows 11, Microsoft has deprecated it, so you might not find it via the right-click drive menu on Windows 11. An alternative option is navigation to Settings > System > Storage > Cleanup recommendations, which covers the same file categories.
If you’re not familiar with Disk Cleanup, check out our video tutorial: ‘How to Use Disk Cleanup in Windows‘.
Using Cleanup Recommendations
Windows 11 includes a built-in storage analyzer that gives users cleanup suggestions. This method is the fastest method to delete temporary files in Windows 11.
- Navigate to Settings > System > Storage.
- Click Cleanup recommendations.
- The topmost category you’ll find is “Temporary files”, with options for clearing the Download Folder or the Recycle Bin. You can also click on “See advanced options” to delete other file types.
- Look for the files you want to remove and click Clean up for each category.
Third-party cleanup tools
CCleaner and BleachBit offer advanced features for managing temporary files. These tools scan additional locations and provide detailed control over cleanup operations. However, built-in Windows tools are enough for most users who want to clear temporary files in Windows 11.
Setting up automatic temporary file management
Learning how to delete temporary files in Windows 11 isn’t complete without setting up automatic maintenance. Windows 11 includes a built-in utility called Storage Sense, alongside other tools, to help manage disk space automatically. This comprehensive system offers multiple ways to manage your temporary files effectively.
Schedule cleanup tasks
Create a scheduled task through Task Scheduler to run Disk Cleanup automatically:
- Open Task Scheduler by typing “taskschd.msc” in the Run dialog.
- Select “Create Basic Task” and choose your preferred schedule.
- Set the action to run “cleanmgr.exe” with the “/sagerun:1” parameter.
Storage Sense settings
Built directly into Windows 11, Storage Sense automatically manages disk space:
- Navigate to “Settings > System > Storage.”
- Click Storage Sense. Don’t just toggle it on, click the the label itself to open Storage Sense settings.
- Under “Cleanup of temporary files,” enable “Keep Windows running smoothly by automatically cleaning up temporary system and app files.
- Set your preferred schedule under “Run Storage Sense”. You can choose how often Windows should delete temporary files.
- Set rules for Downloads folder cleanup and emptying the Recycle Bin.
Custom cleanup rules
Windows Task Scheduler supports advanced rules for temporary file management:
- Create filters based on file age using “forfiles” commands.
- Exclude specific file types or folders from automatic deletion.
- Set size-based triggers to clear temp files when space runs low.
Monitoring space usage
Track storage trends through Windows built-in tools:
- Open Settings and select “System > Storage” to view usage by category.
- Check “Storage usage” for detailed breakdowns by file type.
- Review cleanup recommendations provided by Windows.
Deleting or reducing pagefile.sys? Watch this first!
Identifying safe-to-delete vs. critical temporary files
Understanding which temporary files to remove helps prevent system issues. While Windows creates many temporary files, some play essential roles in system stability and performance.
Safe temporary files to delete
These files can be safely removed to clear temporary files in Windows 11:
- Files in your user “%temp%” folder older than 24 hours.
- Browser cache files and downloaded installers.
- Windows Update delivery optimization files.
- Old Windows Defender scan results.
- Windows error reporting files.
Critical files to preserve
Exercise caution with these temporary file locations:
- Active “hiberfil.sys” and “pagefile.sys” in the root directory.
- Current Windows Update files in “C:\Windows\SoftwareDistribution.”
- Files in use by running applications.
- System restore points unless explicitly clearing space.
Best practices
When managing temporary files:
- Use built-in Windows tools rather than manual deletion.
- Never delete files from “System32” directory.
- Wait 24 hours after major system updates before cleanup.
- Create a system restore point before bulk deletions.
- Check running processes before removing temp files.
Keeping your Windows system free of unnecessary temporary files helps maintain optimal performance and storage space. Whether you choose Windows’ built-in utilities like Storage Sense and Disk Cleanup or set up custom automated tasks, regular maintenance of temporary files ensures your system runs smoothly while preserving critical system operations.
Clear up system storage space and boost efficiency with NinjaOne.
💻 Discover the features of NinjaOne Windows Endpoint Management.
Want to simplify system maintenance across all your endpoints? Check out our Endpoint Management FAQ to learn how NinjaOne helps IT teams save time and keep systems running at peak efficiency.
Take control of your entire IT infrastructure with NinjaOne’s comprehensive endpoint management platform. From automated maintenance to real-time monitoring, streamline operations across all your devices. Start your free trial today and experience enterprise-grade endpoint management made simple.


