

This straightforward guide will help you learn how to add and remove Folders in Photos app on Windows 10. You may have seen this built-in functionality on your Windows 10 device and, as its name implies, have used it to view and organize your photos much more easily.
What you may not have realized, however, is that the Windows 10 Photos app does not display all the images on your computer—only the ones stored in specific folders.
This guide will help you configure the folder view in the Windows 10 Photos app so you see only the photos you want and none that you don’t. By properly managing these folders, you can keep your image collection neat and relevant.
For a visual guide, watch How to Add and Remove Folders in Photos app in Windows 10.
How to add or remove folders in the Photos app
Windows 10 Photos app: Add a folder
Method 1:
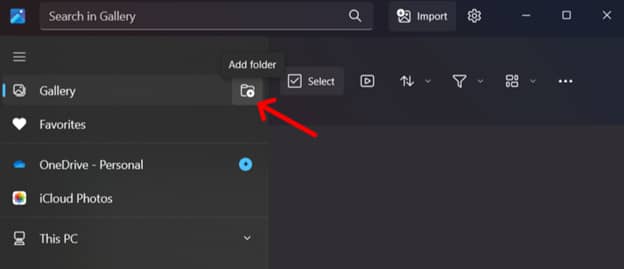
- Click on the Start button and search for Photos. Open the Photos app.
- Click the Add folder button on the left pane across the Gallery.
- Choose the folder you want to include and click Add this folder to Pictures.
Method 2:
- Open the Photos app.
- On the left-hand pane, right-click on the source/folder you want to add. On the dropdown, click Add Folder.
- Select the folder you want to add, click/select them, and tap on Select Folder.
💡 Remember: This process could take longer if you have a lot of photos in your folder or if these files are larger in size.

Remove a folder from the Photos app in Windows 10
Occasionally, your Windows Photos app can take longer to load—this is likely because it has to scan multiple folders. To clean up your Photos app in Windows 10, you can remove some folders.
- Open the Photos app.
- On the left pane, right-click on the folder you want to remove.
- Select Remove folder from Microsoft Photos.
💡 Note: This action does not delete the folder or its contents from your computer. It only affects the images displayed in the Photos app.
Troubleshooting common issues
Despite its simplicity, sometimes, when you add a folder, it does nothing in the Photos app in Windows 10. It can get frustrating, but here are some troubleshooting strategies to consider:
Issue: Newly added folders aren’t showing up
After adding a new folder, you may not see your intended photos right away. This can happen if your Photos app needs a refresh. To resolve this, close the app and restart it. Better still, restart your computer to ensure all changes are applied and allow your device to fully reload the app’s library.
Additionally, make sure that the folder you just included contains supported image formats, like JPG or PNG. If your desired folder contains non-image files, the app won’t display anything.
Issue: Removed folders still appear
You may still see a folder even after removing it due to cached data. To resolve this, we recommend resetting the Photos app.
To do this, go to Settings > Apps > Apps & Features, and scroll down to Photos. Click on it, then select Advanced Options. From there, you’ll find a Reset button.
Doing this procedure won’t delete your photos. The Reset button will just clear its cache.
Issue: Photos app not detecting images from an added folder
If the app doesn’t show your images even after successfully adding a folder, check if the folder is:
- Hidden or marked as a system folder, which may prevent it from being scanned.
- Located on an external drive or USB stick that’s currently unplugged.
💡Note: Make sure that your external drive is connected each time you open the app to see your desired photos.
If your folder is hidden or located on an external drive, you would need to either unhide it or move it from the external drive to your computer’s drive.
Frequently Asked Questions (FAQs)
Does removing a folder delete the images inside it?
No, removing a folder from the Windows 10 Photos app does not delete the images inside it. It simply prevents the app from scanning that folder and displaying the images within it. Your images remain safely stored on your PC.
Can I add folders from an external hard drive?
Yes, you can; however, make sure that the same external drive is connected when you add a folder and when accessing the Photos app. Keep in mind that if the drive is disconnected, the Windows 10 Photos app will not display the drive’s photos, even if the folder itself is added.
What image formats are supported in the Photos app?
The Windows 10 Photos app supports several image formats, such as JPG, JPEG, PNG, GIF, BMP, and TIFF. It also works with some RAW formats, but you may need to install an extension to view it without complication.
How do I reset the Photos app if folders do not update?
We’ve explained this in more detail in our Troubleshooting section.
Will this method work in Windows 11?
The steps are different for Windows 11.
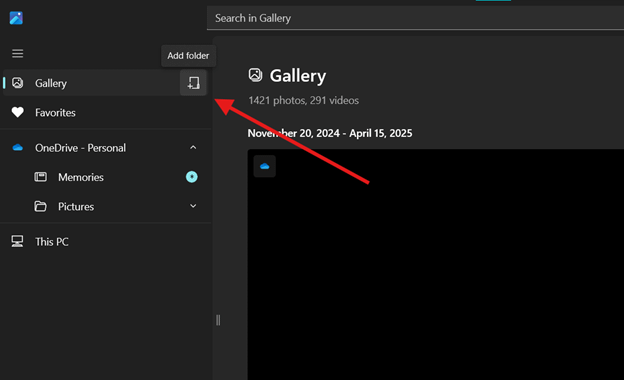
To add a folder in Windows 11:
- Access the main menu (often hidden under the three-line bar)
- Go to Gallery
- Click on the Add folder icon (with a plus sign), as shown below:
To remove a folder in Photos in Windows 11, right-click on the folder or subfolder you want to remove, click Remove folder, and confirm by clicking on the Remove button. This will stop the app from scanning that location but will not delete your actual files or folders.
Configuring the Windows 10 Photos app folder view
The Windows operating system has many built-in features that often get overlooked. In the case of the Photos app, you may not have paid much attention to it, perhaps because it looked too simple or because you didn’t know how to configure it properly. With this guide, we’ve shown you how to optimize this app so you can make your image library more personal and easier to browse.


