

Key Points
Adding a BYOD to Intune
- Methods for Adding BYOD to Intune: There are three general-purpose enrollment methods: Windows Settings, Company Portal, and PowerShell. Group Policy is recommended for hybrid Azure AD-joined devices.
- Preparing for Auto-Enrollment: You can use the Registry Editor to ensure proper auto-enrollment in Azure AD-registered BYOD environments.
- Enrollment Troubleshooting: Administrators can use Command Prompt to diagnose registration issues.
- Use dsregcmd /status to check device registration status.
- Use dsregcmd /join to force Azure AD registration check.
- Use dsregcmd /leavedsregcmd /join to repair broken registrations.
- NinjaOne services for secure BYOD enrollment: NinjaOne provides IT teams and MSPs with tools to streamline BYOD onboarding, such as custom scripting, device scripting, self-service portals, policy deployment, and alerting.
With a BYOD (Bring Your Own Device) policy, employees may be allowed to use personal devices for work. This involves a minimum level of control over such a device, requiring enrolment in a platform such as Microsoft Intune. IT teams can then enforce compliance policies, protect corporate data through MDM (Mobile Device Management) or MAM (Mobile Application Management), and reduce hardware costs.
Unlike corporate-owned devices, BYOD enrollment requires more careful handling of user privacy and minimal device control. This article explains how to add a BYOD device to Intune device management.
Intune enrollment methods for BYOD devices
You can enroll BYOD devices by using Windows settings or Intune’s Company Portal app. PowerShell, Registry Editor, Command Prompt, and Group Policy can also help prepare, configure, and troubleshoot enrollment.
💡 Note: If your Microsoft 365 plan includes Intune, signing in to a Microsoft 365 app or service on an unmanaged BYOD device with a work account may trigger a prompt to enroll the device in Intune, depending on your organization’s Conditional Access and compliance policies.
📌 Prerequisites:
- Microsoft Intune subscription with available licenses
- Azure AD identity (Entra ID) for each user
- Admin credentials for configuring tenant policies
- Intune enrollment restrictions are properly scoped
- Windows 10, 11, Pro, Education, Enterprise, Android 10+, or iOS 13+
📌 Recommended deployment strategies:
| Click to Choose a Method | 💻 Best for Individual Users | 💻💻💻 Best for Enterprises |
| Enrollment Method 1: Via Windows settings | ✓ | |
| Enrollment Method 2: Using Company Portal | ✓ | |
| Enrollment Configuration: With PowerShell | ✓ | ✓ |
| Preparing for Auto-Enrollment: Via Registry Editor | ✓ | ✓ |
| Enrollment Troubleshooting: Using Command Prompt | ✓ | ✓ |
| Enrollment for hybrid Azure AD-joined devices: Using Group Policy | ✓ |
Enrollment method 1: Manual enrollment via Windows settings
Individual Windows 10 or 11 users can enroll their device using Windows settings.
📌 Use Cases: Individual users manually enrolling personal Windows 10 or 11 devices
- Press the Win key, type Settings, and press Enter.
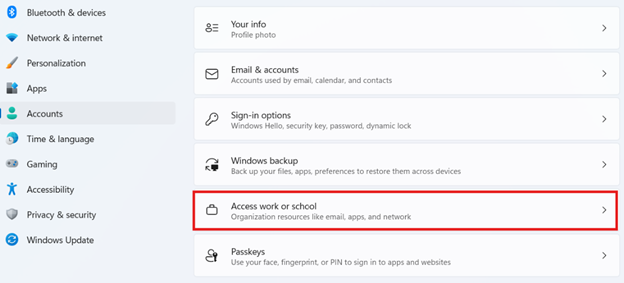
- Go to Accounts > Access work or school.
- Click Connect, and enter your work email address.
- Sign in, follow prompts to register the device, and accept MDM terms.
Once completed, the device should appear in Intune as a personal device.
💡 Note: Admins can check device status using the Endpoint Manager Admin Center.
⚠️ Warning: Ensure you enter the correct credentials for Intune to enroll the device properly. (For more info, refer to: Things to look out for)
Enrollment method 2: Using Intune’s Company Portal app
Microsoft Intune Company Portal is the preferred app for device enrollment.
📌 Use Case: Individual users who want to enroll their device
- Go to your device’s Microsoft Store, App Store, or Google Play, then search and download “Intune Company Portal”.
- Sign in with your work or school account.
- Follow the device setup process.
- Accept device management and privacy agreements.
Azure AD will register the device as “Workplace Joined” on Windows. Meanwhile, the app configures a work profile or MDM enrollment on Android or iOS, depending on the platform.
⚠️ Warning: The app could freeze during enrollment, resulting in enrollment failure. (For more info, refer to: Things to look out for)
Enrollment configuration using PowerShell
PowerShell does not allow direct enrollment, but IT administrators can use it to facilitate the registration process.
📌 Use Case: IT admins looking to manage device registration
📌 Prerequisite: Administrator privileges
- Press Win, type PowerShell, and press Enter.
- Copy and paste the following scripts into the prompt, then press Enter.
- Configure Intune MDM URLs for automatic discovery and device enrollment:
$enrollPath = 'HKLM:\SOFTWARE\Microsoft\Enrollments'if (-not (Test-Path $enrollPath)) {
New-Item -Path $enrollPath -Force
}
Set-ItemProperty -Path $enrollPath -Name DiscoveryServiceFullURL -Value "https://enrollment.manage.microsoft.com"
Start-Process "C:\Windows\System32\deviceenroller.exe" -ArgumentList "/c /AutoEnrollMDM"
- Audit device registration and state:
dsregcmd /status
Get-MsolDevice -RegisteredOwners
- Initiate sync:
Start-DeviceEnrollment
💡 Note: Full automation requires integration with provisioning tools.
Preparing for auto-enrollment via Registry Editor
You can use the Registry Editor to ensure proper auto-enrollment.
📌 Use Case: IT administrators who want to prep for auto-enrollment
📌 Prerequisite: Administrator privileges
- Press Win + R, type regedit, then press Enter.
- Navigate to:
HKEY_LOCAL_MACHINE\SOFTWARE\Policies\Microsoft\Windows\CurrentVersion\MDM
- Create or update the following entries:
- AutoEnrollMDM (DWORD): 1
- UseAADCredentialType (DWORD): 1
- Navigate to:
HKEY_LOCAL_MACHINE\SYSTEM\CurrentControlSet\Control\CloudDomainJoin\TenantInfo\{YOUR-TENANT-ID-HERE}
- Create or update the following:
- MDMEnrollmentURL (String): https://enrollment.manage.microsoft.com/enrollmentserver/discovery.svc
- Restart the device to apply the changes.
💡 Tip: To create the entries, right-click on the right pane, click New > DWORD (32-bit) Value or String Value.
💡 Note: These values work best with Azure AD-registered BYOD scenarios.
⚠️ Warning: Proceed with caution, and back up the registry before making changes. (See Things to look out for for details.)
Enrollment troubleshooting/diagnosing with Command Prompt
You can’t enroll a device using the Command Prompt, but IT administrators can use it to diagnose registration.
📌 Use Case: IT administrators who want to monitor enrollment status
📌 Prerequisites: Administrator privileges
- Press Win, type CMD, and click Run as administrator.
- Copy and paste the following scripts into the prompt, then press Enter.
- Check device registration status:
dsregcmd /status
- Force Azure AD registration check:
dsregcmd /join
- Repair broken registration:
dsregcmd /leavedsregcmd /join
- Repair broken registration:
- Check enrollment service availability:
ping enrollment.manage.microsoft.com
Enrollment for hybrid Azure AD-joined devices using Group Policy
This method is helpful for users who need minimal enrollment steps. The Group Policy Object can also be used in hybrid Azure AD join scenarios or as a fallback for BYOD.
📌 Use Case: IT administrators looking for a quick enrollment
📌 Prerequisites: Administrator privileges
- Press Win, type gpedit.msc, press Enter.
- Navigate to:
- Computer Configuration > Administrative Templates > Windows Components > MDM
- Enable the policy:
- Enable automatic MDM enrollment using default Azure AD credentials
- Set to User Credential
- Force GPO (Group Policy Object) update:
gpupdate /force
- Restart the device so the changes take effect.
⚠️ Things to look out for
| Risks | Potential Consequences | Reversals |
| User enters incorrect credentials | The device will not be enrolled. | Remove profile from Access work or school, then retry enrollment |
| App hangs or user denies permissions during setup | Enrollment will fail or could be incomplete, resulting in improper device registration | Uninstall/reinstall the app, clear the app cache, ensure internet access, and retry enrollment |
| Editing without backup | Incorrectly editing the registry could result in corruption, so it’s best to make a backup beforehand. | Export the registry key before making changes by selecting File > Export. |
Execute your data separation strategies with confidence and minimal disruption.
Best practices for managing BYOD in Microsoft Intune
There’s a fine line between enforcing security on BYOD devices and overstepping personal space. With that in mind, here are practices to help you manage BYOD in Intune effectively, ensuring corporate data stays protected while respecting user privacy.
Personal privacy
When managing BYOD endpoints, protecting corporate data without intruding on the user’s personal space is crucial. Use Intune’s app protection policies to enforce security at the app rather than manage the entire device. IT administrators can prevent data leaks without wiping or viewing personal content this way.
Device tagging
IT admins must distinguish BYOD from corporate-owned endpoints to apply appropriate policies to the proper devices. The IT team can configure device categories or tags during enrollment or use dynamic Azure AD device groups or filters based on device attributes to target policies appropriately.
Compliance settings
Avoid enforcing settings that could interfere with personal use. Instead, IT teams can configure compliance policies that are effective but non-intrusive. Some examples include:
- Requiring a minimum OS version to block outdated devices
- Checking for required apps
These policies enhance security while minimizing impact on personal configurations, apps, and usage habits.
Troubleshooting common issues
Below are common Intune enrollment issues and how to resolve them.
Failed enrollment
You can’t enroll some devices in Intune because they’re already enrolled in a different MDM solution.
- Press Win, type Settings, press Enter, then navigate Accounts > Access work or school to check the enrollment status.
- Remove existing MDM profiles.
- Afterward, restart the device and retry enrollment.
MDM enrollment page is not appearing
When the MDM enrollment page isn’t appearing, check the following registry keys to ensure enrollment is enabled:
- HKLM\SOFTWARE\Microsoft\Enrollments
- HKLM\SOFTWARE\Microsoft\PolicyManager\current\device\Update
Also, confirm if the MDM discovery URL in the Azure AD tenant is correct. You can also use the Event Viewer to check for Intune or MDM-related errors.
- Press Win, type Event Viewer, then press Enter.
- Navigate to:
- Applications and Services Logs > Microsoft > Windows > DeviceManagement-Enterprise-Diagnostics-Provider > Enrollment
The Company Portal app fails to launch
If Company Portal starts hanging or fails to launch, uninstall and reinstall it. You can also clear the app’s cached data by navigating to Settings > Apps > Company Portal > Storage on your phone.
dsregcmd shows “Not Joined”
Run dsregcmd /status in Command Prompt to confirm AzureAdJoined = NO. If not joined, log in with valid Azure AD credentials.
NinjaOne services for secure BYOD enrollment
NinjaOne provides IT teams and MSPs (Managed Services Providers) with tools to streamline BYOD onboarding and make endpoint management more efficient and secure across hybrid environments.
| NinjaOne service | What it is | How it helps with BYOD enrollment |
| Custom scripting | Custom scripting executes PowerShell scripts or registry-based modifications to configure Windows BYOD devices. | It eliminates manual device setup while ensuring consistent device security and compliance settings. |
| Device monitoring | Device monitoring provides real-time visibility into all connected BYOD endpoints. | IT teams can track which devices are user-owned, monitor status, confirm compliance with company policies, and detect connectivity issues. |
| Self-service portals | NinjaOne’s self-service portals allow end-users to enroll their devices. | Users can securely onboard devices with minimal assistance thanks to pre-configured scripts or software bundles. |
| Policy deployment | Policy deployment refers to the centralized distribution and enforcement of configuration settings, such as Group Policy Objects (GPOs), across hybrid and BYOD environments. | IT administrators can automatically push these policies to ensure every device meets organizational security, access control, and usability standards. |
| Alerting | NinjaOne has a built-in alerting mechanism that notifies IT teams when devices fail to enroll. | Alerting prevents security gaps and enables quick remediation to maintain compliance and protect sensitive company data. |
Adding BYOD devices to Intune
BYOD allows employees to use personal devices for work while still enabling the enforcement of compliance policies, securing data via MDM or MAM, and even reducing hardware costs. This guide covered enrolling devices through Windows settings and the Company Portal app, as well as related actions using PowerShell, Registry Editor, Group Policy, or diagnostic tools.
Related topics:


