

In 1995, computers had to have a standard memory of at least 4MB to run Windows 95. At that time, consistently updating time every second required at least 4KB, which was significant to Windows’ benchmark numbers. To ensure system performance, Microsoft opted to update the clock every minute, which has become the default time display in Windows systems.
Even in Windows 11, the system tray clock displays only hours and minutes by default—which is consistent across past Windows versions—despite having systems today with 16GB of RAM. It was not until Windows 11 build 22621.1776 that users were allowed to freely toggle this setting.
In this guide, you’ll learn how to enable the Windows 11 clock to show seconds via Settings, Registry Editor, and PowerShell. We’ll also go through ways to restore the system tray clock to its default format and provide you with additional considerations when enabling seconds in the Windows 11 taskbar clock.
Different ways to show seconds on the Windows 11 clock
Adding seconds to your time display format can do wonders, especially in use cases where precise time tracking is a practice—allowing events to be documented down to the very last second. For example, some developers may debug time-based functions or test scheduled tasks, all of which require monitoring of timestamped logs and the actual time it took these events to occur.
Before going any further in this guide, here are some of the things you should have to get the best results:
- Windows 11 build. You’ll need at least Windows 11 build 22621.1776 or later, as this is the first Windows build that allows you to toggle seconds in the system tray clock.
- Administrative privileges. You’ll need administrator access if you plan to make this change on a corporate device or roll it out across a managed environment using a script or registry tweak.
- Use case. Enabling the seconds display on VDI desktop infrastructures causes it to display on all user desktops, taking a significant chunk of the server’s resources, which can lead to slow performance for all virtual devices connected to the system. That said, knowing the scenario in which you’ll use this feature can help you determine whether to enable or disable it per user.
Method 1: Enable or disable via Windows Settings
- Use the Win + I hotkey to launch Windows Settings.
- Go to Personalization > Taskbar.
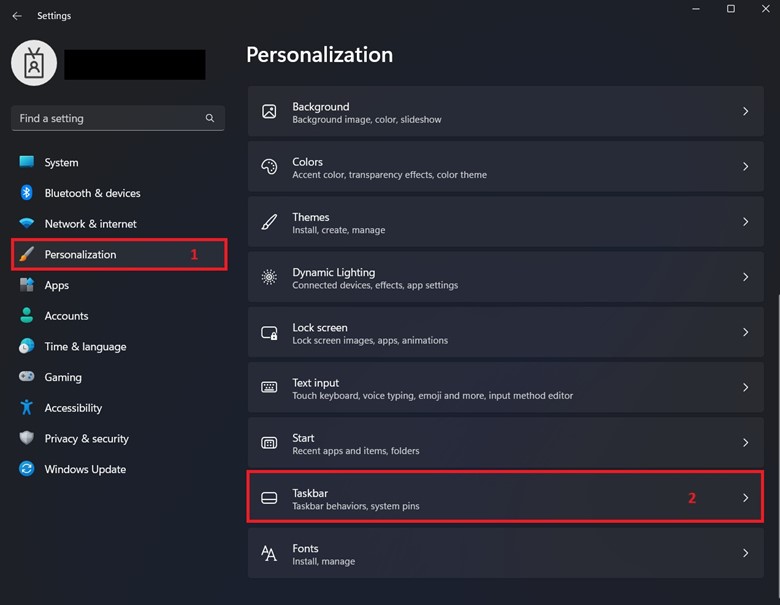
- Inside Taskbar, click the dropdown menu beside Taskbar behaviors, and check Show seconds in system tray clock.
- Checking the box shows seconds on the Windows 11 system tray clock.
- Unchecking the box hides seconds on the system tray clock.
- If you can’t find Show seconds in system tray clock, go to Time & language > Date & Time.
- After Windows 11 build 22635.4000, this setting has been moved from Personalization to Date & Time.
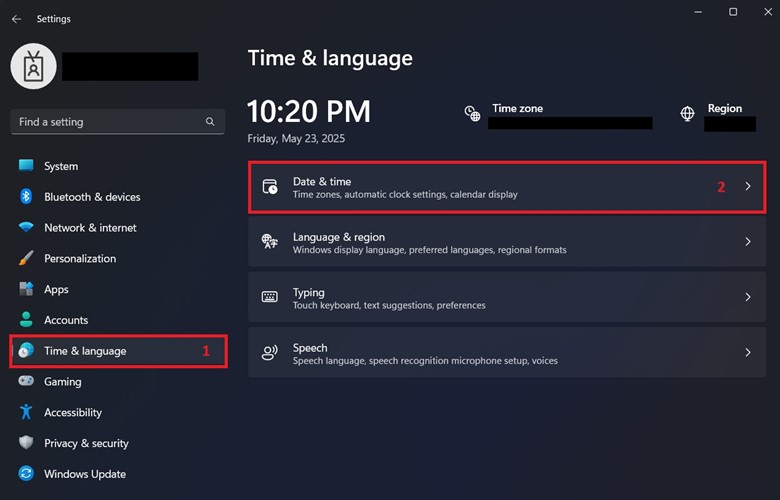
- Toggle on Show time and date in the System tray and click the dropdown menu beside it.
- Do the following to match the taskbar clock format you want:
- Check the box to enable seconds.
- Uncheck the box to hide seconds.
- Once you’re done, exit Windows Settings.
💡 Remember: This setting automatically applies once you check or uncheck the box beside the setting. Additionally, implementing this change using Settings applies the change per user.
Method 2: Enable or disable seconds via Registry Editor
Using the Registry Editor provides administrators with the flexibility to enforce a specific system tray clock format. The commands outlined in this method can be utilized as a script for per-user script deployment using PowerShell.
- Press Win + R, type regedit, and then press Enter.
- Go to HKEY_CURRENT_USER\Software\Microsoft\Windows\CurrentVersion\Explorer\Advanced.
- Modifying the HKEY_CURRENT_USER hive applies the change per user.
- Inside the Advanced subkey, find and double-click ShowSecondsInSystemClock.
- Change the value data inside ShowSecondsInSystemClock.
- 1 to show seconds on the system tray clock.
- 0 to hide seconds on the system tray clock.
- Exit the Registry Editor.
- If the change doesn’t reflect on the system tray clock, press Ctrl + Shift + Esc, find Windows Explorer under Processes, right-click, and press Restart.
⚠️ IMPORTANT: Accidentally making the wrong registry change in the user hive can cause system instability, boot problems, and loss of user profile. Always back up the Windows Registry before making changes.
Method 3: Configure via Windows PowerShell
It’ll be a pain to manually implement this change per user in an environment that requires precise time formats or a shared system where the clock format is customized per user. Luckily, you can automate this task using PowerShell, allowing you to hide or show seconds on the system tray clock of your managed devices without much effort.
- Press Win + R, type PowerShell, and press Enter.
- An elevated PowerShell isn’t necessary for this method, as it only modifies registry keys inside the HKCU hive.
- Input the command that reflects the time format you want:
- Enter this command to enable:
Set-ItemProperty -Path "HKCU:\Software\Microsoft\Windows\CurrentVersion\Explorer\Advanced" -Name "ShowSecondsInSystemClock" -Value 1. - Enter this command to disable:
Set-ItemProperty -Path "HKCU:\Software\Microsoft\Windows\CurrentVersion\Explorer\Advanced" -Name "ShowSecondsInSystemClock" -Value 0.
- Enter this command to enable:
- Optionally, you can save these scripts as a Notepad file for logon script deployment; just ensure that you save it with a .ps1 extension.
- E.g., ShowSecondsScript.ps1
- If the time format you prefer doesn’t show immediately on the system tray clock, enter the following command within the same PowerShell prompt:
Stop-Process -Name explorer -Force
Start-Sleep -Seconds 2
Start-Process explorer.exe
📝 Note: Configuring seconds into your system tray clock format is applied per user, even in PowerShell scripts, since Windows considers this a personal UI setting. Additionally, implementing this time format consumes a significant amount of a device’s resources due to the frequency of updates it does per second, so only apply this format on capable devices.
Group Policy and MDM considerations during setting deployment
Now that we have gone through the steps to show seconds on the Windows 11 clock, we’ll go through the different considerations when deploying this change automatically at scale.
Group Policy considerations
Currently, there’s no native Group Policy template setting to enable seconds on the system tray clock. However, you can still use the Group Policy Management Console (GPMC) to add the PowerShell scripts above as logon scripts for an Active Directory.
Here’s how you do it:
- Press the Windows Start button and type gpmc.msc.
- Find and right-click the Organizational Unit (OU) on which you want to make changes.
- Choose Create a GPO in this domain.
- Navigate to User Configuration > Windows Settings > Scripts (Logon).
- Click Add > Browse and then locate the path for your logon script.
- If you don’t have a prepared logon script, you can save the following scripts on a Notepad and then save it as a .ps1 file.
- Enable seconds:
Set-ItemProperty -Path "HKCU:\Software\Microsoft\Windows\CurrentVersion\Explorer\Advanced" -Name "ShowSecondsInSystemClock" -Value 1. - Disable seconds:
Set-ItemProperty -Path "HKCU:\Software\Microsoft\Windows\CurrentVersion\Explorer\Advanced" -Name "ShowSecondsInSystemClock" -Value 0.
- Enable seconds:
- If you don’t have a prepared logon script, you can save the following scripts on a Notepad and then save it as a .ps1 file.
- Exit the GPMC; the changes will apply to the intended OU at the next user logon.
MDM considerations
You can also use an MDM when deploying your PowerShell scripts to hide or show seconds on a managed endpoint’s system tray clock. Some features to look for in an MDM would be the ability to execute PowerShell commands remotely and the flexibility to automate scripting for multiple devices in one fell swoop. This can help you quickly show or hide seconds without having to tweak this setting for all your environment’s devices manually.
→ Execute PowerShell scripts in real-time and at scale using our Remote PowerShell tool.
Other considerations when adding seconds to the Windows 11 clock
Battery impact. Adding seconds to the system tray clock stops a device’s CPU from entering a low-power state due to the time format’s frequent refresh demand per second. Enabling this setting means a higher system performance requirement, which also entails higher power consumption for battery-dependent devices.
Multi-monitor setups. The show seconds feature is intended for a single system tray clock. That means if you’re running two or more monitors, seconds will only appear on the system tray clock of your primary monitor.
Roaming profiles. If you’re running a VDI or shared PC setup, roaming profiles save your personalization options on a server and then reapply them when you switch to another compatible device on the network.
Multi-user systems. Enabling this setting in multi-user systems, like a terminal server, can push hardware to its limit, leading to sluggish performance as each user’s system tray clock vies for resources to refresh every second.
Show seconds on your Windows 11 clock for precise time tracking
Having the ability to track every second on your system tray clock in Windows 11 is ideal for workflows that require accurate and precise time tracking. However, enabling this setting comes with minor performance drawbacks and power trade-offs.
You can configure the show seconds feature via Windows Settings, Registry Editor, or PowerShell, and it’s applied on a per-user basis. If you’re managing an Active Directory environment, you can use the GPMC to deploy the change as a logon script to users working in a specific Organizational Unit. For a more automated approach, you can deploy this change using an MDM with Remote PowerShell and scalable scripting features.


