

Key points
- Manage Microsoft Defender Exclusions Safely: Add or remove Microsoft Defender Antivirus exclusions in Windows 10 and 11 to prevent safe files, folders, file types, or processes from being scanned, quarantined, or deleted.
- Use the Windows Security Interface for Quick Edits: Open “Settings” > “Windows Security” > “Virus & threat protection” > “Manage settings” > “Add or remove exclusions” to view, add, or delete exclusions.
- Automate Exclusions with PowerShell Commands: Use “Add-MpPreference” and “Remove-MpPreference” PowerShell cmdlets to script or automate exclusion management.
- Advanced Control via the Windows Registry: Manually manage exclusions under “HKLM\SOFTWARE\Microsoft\Windows Defender\Exclusions” for paths, extensions, and processes.
- Review, Export, and Audit Exclusions Regularly: List exclusions with “Get-MpPreference” in PowerShell, export them for audits, and review regularly to ensure the exclusions remain justified.
This guide provides step-by-step instructions on how to add or remove exclusions for Microsoft Defender Antivirus in Windows 10 and Windows 11. This allows you to exclude known safe files, file types, directories, and processes from being scanned by Microsoft Defender, and stops them from being removed, quarantined, or blocked.
Before you start adding or removing Microsoft Defender exclusions
You can use several methods to add or remove exclusions from Microsoft Defender Antivirus: all of these methods require that you be logged in as an administrator, and all will work on any edition (Pro, Home, Education, and Enterprise) of Windows 10 and Windows 11 where Microsoft Defender Antivirus is enabled. (Just keep in mind that in enterprise or organizational environments, exclusions may be controlled or overridden by policy.)
You should be careful when adding exclusions, as Microsoft Defender will not scan them for malware. Broadly omitting directories from real-time or anytime scanning can leave places for malware to hide on your system. For instance, recently, attackers have hidden exclusions via the HideExclusionsFromLocalAdmins registry value.
You should only exclude specific files you are certain are malware-free, and carefully consider which files and directories to exclude. For example, it would be unwise to exclude your Downloads directory, as this would make it easy to accidentally download malware that would not be detected.
There are four types of exclusions you can create:
- Files: Single files can be excluded from Microsoft Defender antivirus scans
- Folders: Whole folders and all files and folders within them can also be excluded
- Processes: Processes including apps and services can be excluded from real-time scanning
- File types: You can also specify file types that will be skipped during scans
Overall, you should regularly review your exclusions to ensure that they are still appropriate.
Efficiently manage IT and endpoint secuirty with a single IT management dashboard.
How to add or remove a Microsoft Defender exclusion using the Windows Security GUI
The easiest way to list, add, and remove exclusions from Microsoft Windows Defender is to use the Windows Security settings interface:
- Right-click the Start button and select Settings.
- On Windows 10, click Updates and Security.
- On Windows 11, click Privacy and security
- On both Windows 10 and Windows 11, continue by clicking Windows Security, and then Open Windows Security
- Select Virus & threat protection in the Windows Security sidebar
- Scroll down to Virus & threat protection settings and click Manage settings
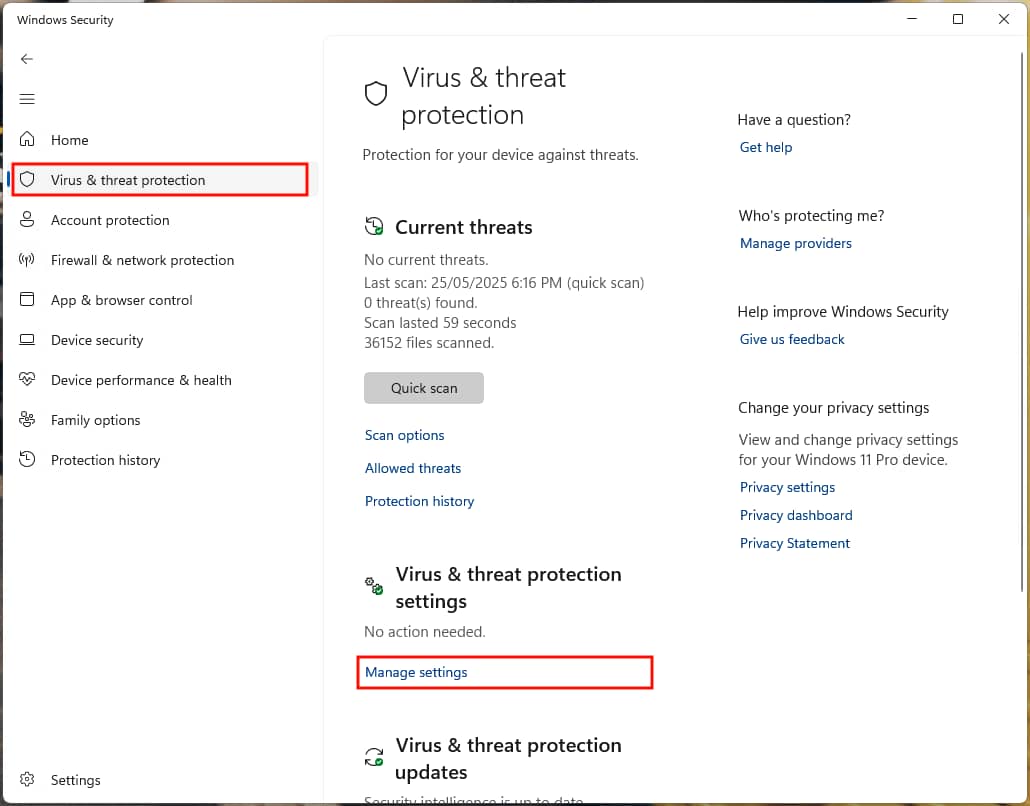
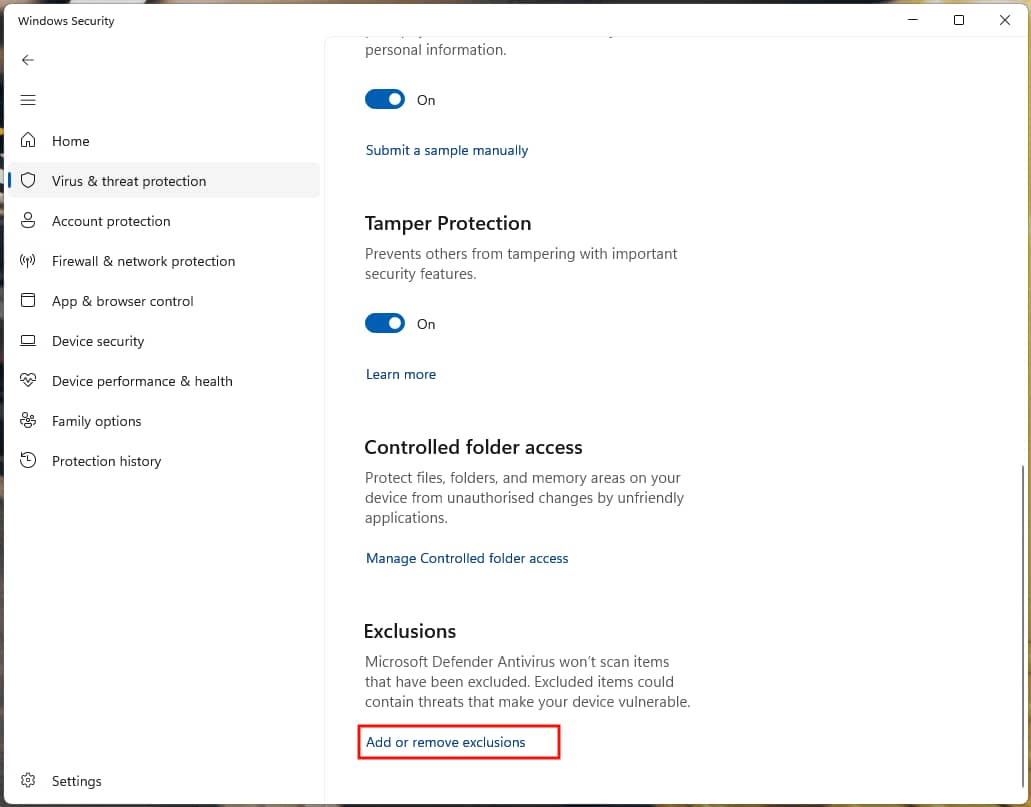
- Scroll to the Exclusions section and then select Add or remove exclusions
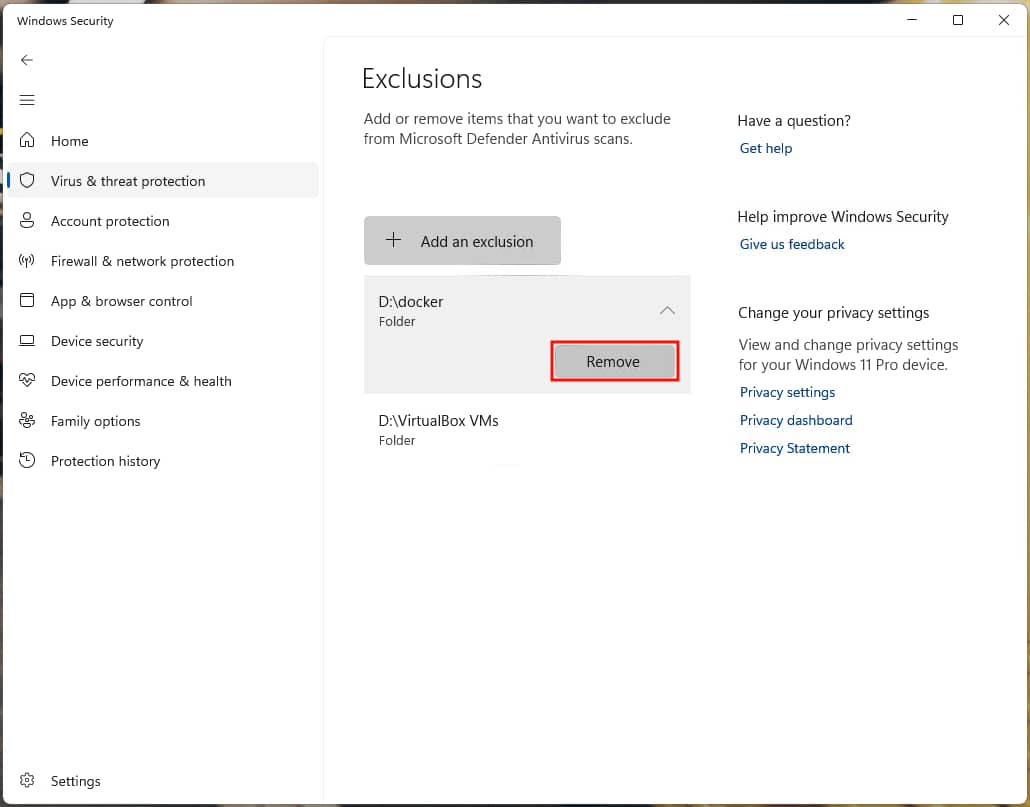
- A list of existing exclusions will be displayed
- To remove an exclusion, click an existing exclusion, then click Remove
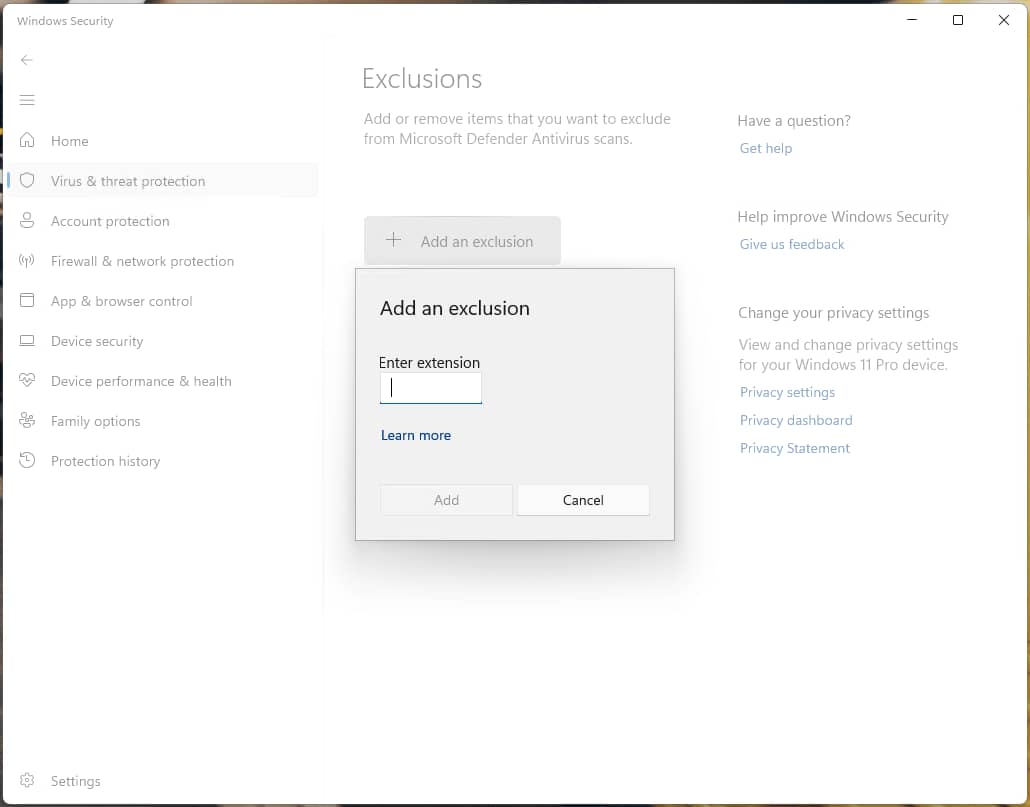
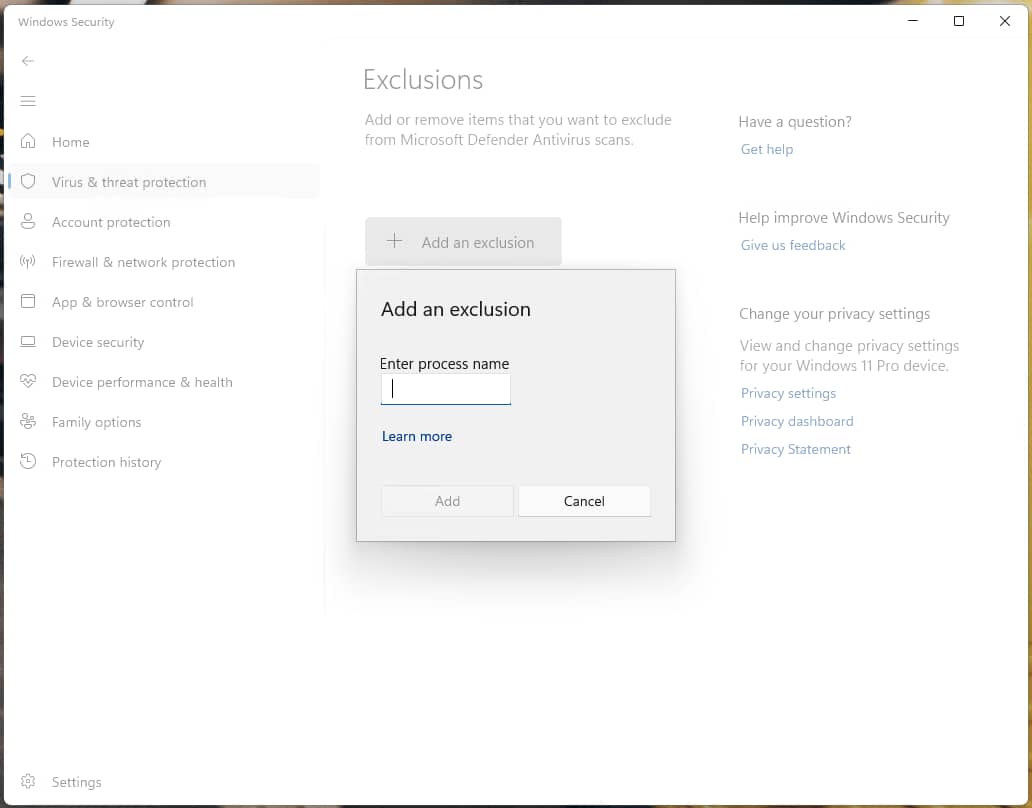
- Click the + Add an Exclusion button to add a new Microsoft Defender exclusion
- Select File, Folder, File Type, or Process from the dropdown list
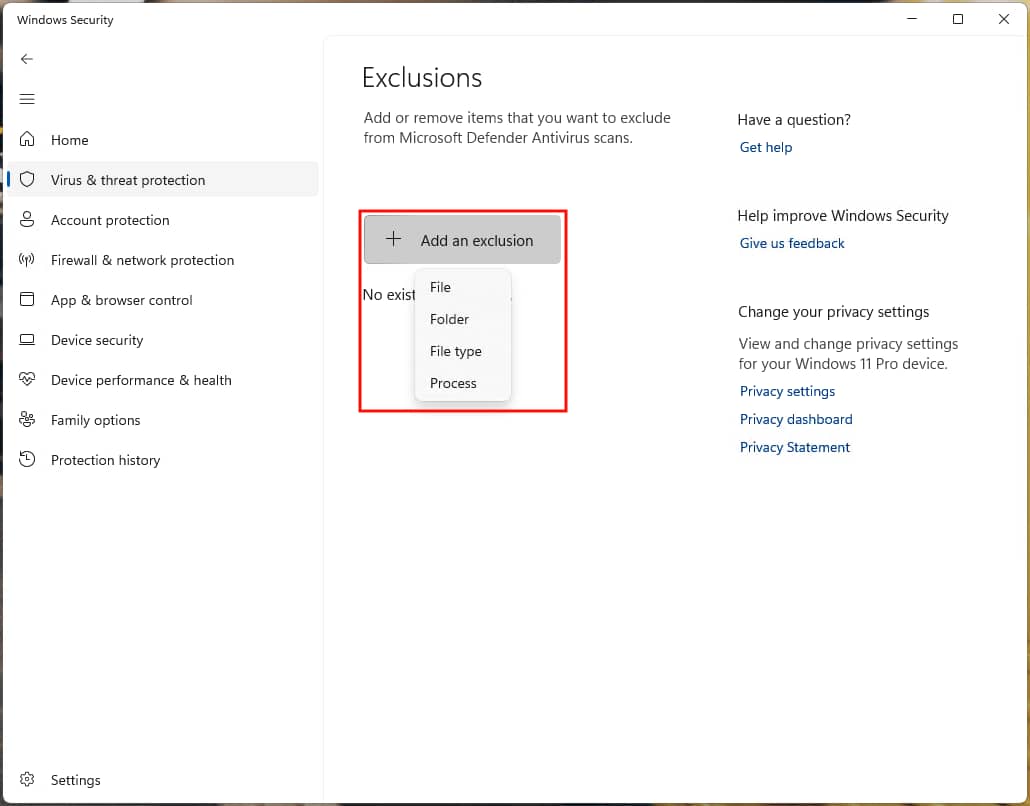
- If you select File or Folder, locate and select the item you wish to exclude from real-time and on-demand antivirus scans using the file explorer dialog
- If you select File Type, enter the file extension that will be excluded (including the preceding period, e.g foo)
- If you select Process, enter the name of the process that will be excluded
The selected file, folder, file type, or process will then be added to the list of exclusions.
How to add or remove Microsoft Defender exclusions using PowerShell
You can use PowerShell to script the process of adding and removing exclusions to Microsoft Defender. This allows you to create shortcuts to temporarily enable or disable exclusions during certain tasks, or to automate the deployment of exclusions.
In these PowerShell commands, you will need to replace the
- example paths,
- file type extensions, and
- process names
File exclusions
To add a file exclusion to Microsoft Defender, run the following PowerShell command:
Add-MpPreference -ExclusionPath “C:\full\path\to\file.txt”
To remove a file exclusion from Microsoft Defender, run this PowerShell command:
Remove-MpPreference -ExclusionPath “C:\full\path\to\file.txt”
Folder exclusions
To add a folder exclusion to Microsoft Defender, run the following PowerShell command:
Add-MpPreference -ExclusionPath “C:\full\path\to\folder”
To remove a folder exclusion from Microsoft Defender, run this PowerShell command:
Remove-MpPreference -ExclusionPath “C:\full\path\to\folder”
Note that you don’t need to include the trailing backslash in the path when adding folder exclusions to match those you wish to exclude.
File type exclusions
To add a file type exclusion to Microsoft Defender, run the following PowerShell command:
Add-MpPreference -ExclusionExtension “.foo”
To remove a file exclusion from Microsoft Defender, run this PowerShell command:
Remove-MpPreference -ExclusionExtension “.foo”
Be sure to include the period character at the beginning of the extension.
Process exclusions
To add a process exclusion from Microsoft Defender, run this PowerShell command:
Add-MpPreference -ExclusionProcess “process_name.exe”
To remove a process exclusion to Microsoft Defender, run the following PowerShell command:
Remove-MpPreference -ExclusionProcess “process_name.exe”
Listing Microsoft Defender exclusions using PowerShell
You can list existing Microsoft Defender exclusions using this PowerShell command:
Get-MpPreference | Select-Object -Property ExclusionPath, ExclusionExtension, ExclusionProcess
Managing Windows Defender exclusions using the Registry Editor
When you add and remove Microsoft Defender exclusions, the settings are stored in the Windows Registry. This means that you can also manage exclusions by adding and removing registry values.
First, open the Windows Registry Editor by right-clicking the Start button, selecting Run, and then running the command regedit.exe.
Next, navigate to one of the following registry key locations (you can copy and paste the below addresses into the address bar to save time):
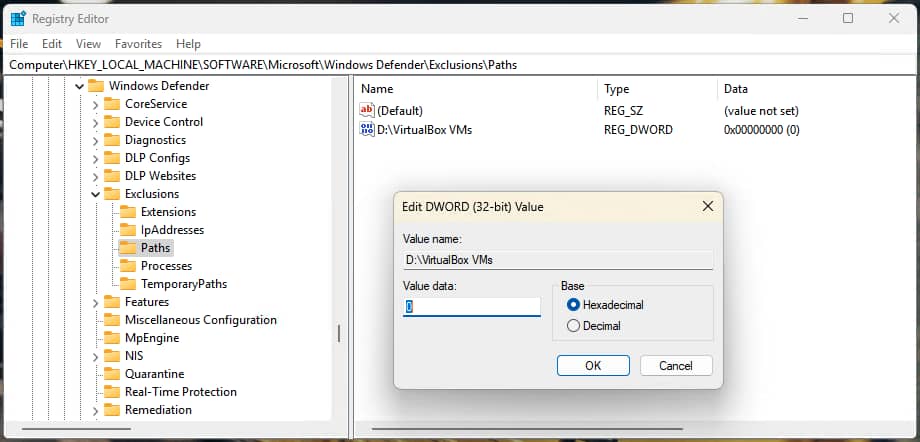
- File and folder exclusions are stored at Computer\HKEY_LOCAL_MACHINE\SOFTWARE\Microsoft\Windows Defender\Exclusions\Paths
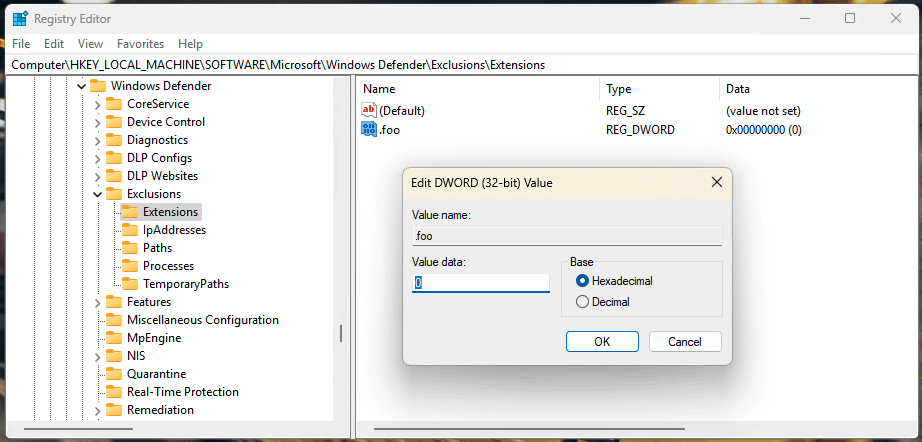
- File type exclusions are stored at Computer\HKEY_LOCAL_MACHINE\SOFTWARE\Microsoft\Windows Defender\Exclusions\Extensions
- Process exclusions are stored at Computer\HKEY_LOCAL_MACHINE\SOFTWARE\Microsoft\Windows Defender\Exclusions\Processes
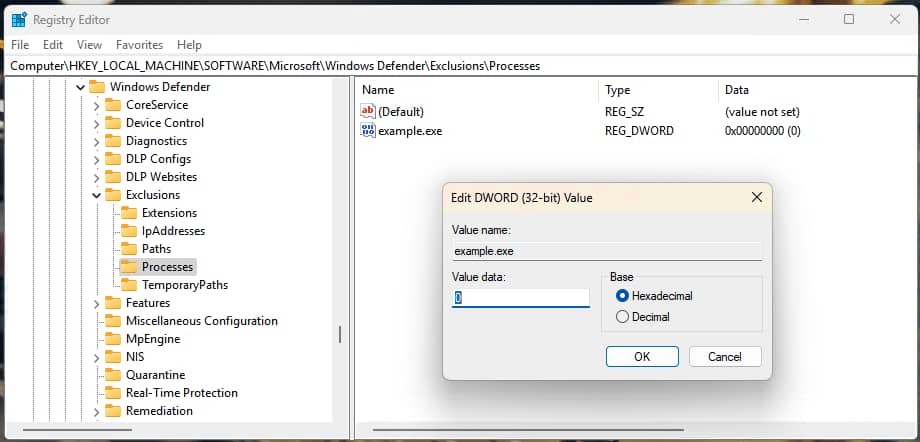
Exclusions can be removed by right-clicking on a registry value and then selecting Delete.
On the other hand, they can be added by following these steps:
- With the Paths, Extensions, or Processes sub-key selected in the Registry Editor navigation pane, select Edit > New DWORD (32-bit) Value from the toolbar
- Rename the new DWORD value to
- the full path to the file or directory,
- the file extension (including the period character), or
- the name of the process you wish to exclude from Microsoft Defender scans
- Leave the DWORD value set to 0
Enjoy granular control over your security channels and managed endpoints.
👉 Watch this IT management demo to see NinjaOne in action
Why manage exclusions in Microsoft Defender Antivirus?
There are a number of common scenarios where you may want to exclude files, folders, file types, or processes from Microsoft Defender Antivirus:
- to exclude known safe files that are triggered as false positives
- to exclude large files (such as virtual machine disk images) that do not need to be scanned and take significant time/resources to scan due to their size
- to omit in-house developed software from scans that may not be recognized as safe by Microsoft Defender Antivirus
- to speed up scans by omitting large directories where files do not change
- to prevent conflicts with other software.
Malware is constantly evolving and implementing innovative ways to avoid antivirus software. You must ensure that you’re only omitting files and directories that won’t include data saved from the internet, and that can only be written to by trusted parties.
Also, only exclude trusted processes and be careful when excluding file types as this will exclude all files of that type where they’re located, or where they came from.
Lastly, before adding exclusions to Microsoft Defender, you should manually scan them for malware.
Adding and removing Microsoft Defender exclusions from multiple PCs in enterprise and education environments
While manually adding and removing antivirus exclusions can be done for any Windows 10/11 system with Microsoft Defender enabled, as mentioned earlier, such exclusions can be overridden by policy in enterprise environments that host multiple PCs. In addition, the excess of Microsoft Defender exclusions can create a serious protection gap that can leave more endpoints vulnerable than safeguarded from threats.
To help avoid this scenario, Endpoint Security by NinjaOne gives you the tools to take full control of the security of all of your devices. You can remotely manage your antivirus or EDR solution, including Microsoft Defender, as well and granularly manage scan options, schedules, and exclusions.


