

Share across devices in Windows 11 allows users to sync their application experience across multiple devices. This feature is suitable for multi-device application access, provided that they have the same logged-in Microsoft or Azure AD account. Although this is beneficial, enabling it in secure environments can lead to unintentional syncing across personal and work devices, expanding an environment’s attack surface.
Methods to manage cross-device experiences in Windows 11
The “Share across devices” feature enables seamless content sharing, enhancing productivity by reducing friction for document and file transfers. Before we begin, let’s first answer the question: Should I enable or disable “share across devices”?
This feature is ideal for personal use devices or small teams who value convenience and ease of access. In enterprise environments, however, it can sync sensitive data on unmanaged devices, leaving them vulnerable to unauthorized users.
It’s important to configure this setting according to your environment’s priority to optimize accessibility or security further. For a streamlined configuration process, ensure that you meet the prerequisites below.
📌 Prerequisites:
- Any edition of Windows 11
- Microsoft account or Azure AD account for cross-device syncing
📌 Recommended deployment strategies:
| Click to Choose a Method | 💻 Best for Individual Users | 💻💻💻 Best for Enterprises |
| Method 1: Configure “Share across devices” via the Windows Settings app | ✓ | |
| Method 2: Manage Cross-device experiences via Registry Editor | ✓ | |
| Method 3: Leverage a PowerShell script for automation | ✓ | |
| Method 4: Use a .reg file for non-script deployment | ✓ | ✓ |
(Refer to ⚠️ Things to look out for.)
Method 1: Configure “Share across devices” via the Windows Settings app
The Windows Settings app offers a user-friendly and uncomplicated way to configure the “Share across devices” feature on a device. The GUI’s simplicity provides a visual guide that’s easily reversible, making it ideal for one-off changes per user.
📌 Use Cases: This method is best suited for everyday users managing the cross-device experience across their own set of personal devices.
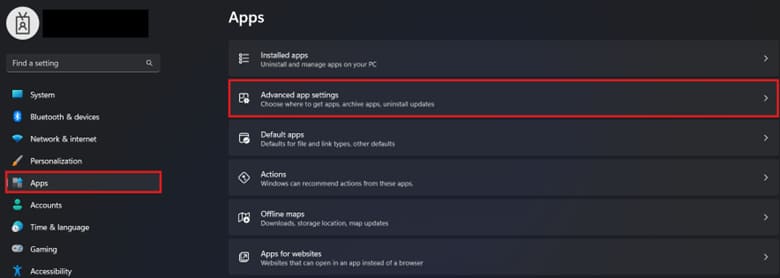
- Press Win + I to open the Windows Settings app.
- Select Apps, then scroll down and choose Advanced app settings.
- Press the drop-down menu beside Share across devices.
- Tick the radio button that best fits the cross-device experience you prefer:

- Off: This disables the feature entirely.
- My devices only: Allows syncing only between devices that have the same Microsoft account signed in.
- Everyone nearby: Allows content sharing with all nearby Windows devices.
- Close the Windows Settings app after.
💡 Note: Toggling the GUI setting doesn’t require restarting your device; this change applies instantly per user.
Method 2: Manage Cross-device experiences via Registry Editor
The Registry allows advanced users to bypass the GUI and directly configure the value that controls a local machine’s shared experiences.
⚠️ Warning: The Registry contains keys and values that affect how a system behaves. Precision is required when making Registry changes, as misconfigurations at this level can result in broken device functionality. (Refer to ⚠️ Things to look out for.)
📌 Use Cases: Administrators can modify the Registry when creating a golden image to provision shared experiences settings for new users. Additionally, administrators can utilize a PowerShell script or .reg file to automate this process for deployment.
📌 Prerequisite: Windows Registry backup
- Press Win + R, type regedit, and press Enter.
- Navigate the following path inside the Registry:
HKEY_CURRENT_USER\Software\Microsoft\Windows\CurrentVersion\CDP
- Inside the CDP subkey, find the DWORD value CdpSessionUserAuthzPolicy.
- If the DWORD value doesn’t exist, right-click CDP and select New > DWORD (32-bit) value.
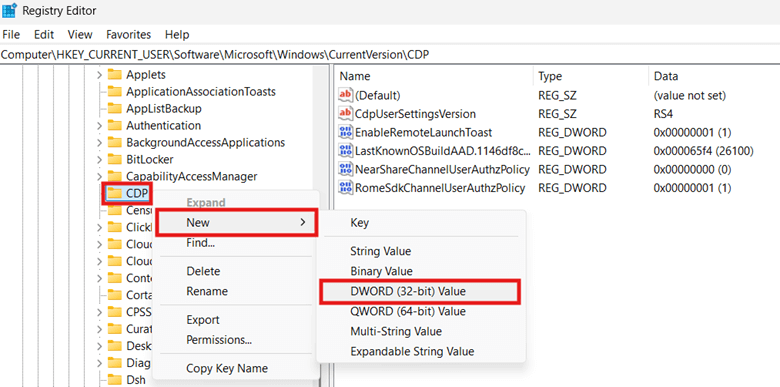
- Name the newly created value CdpSessionUserAuthzPolicy.
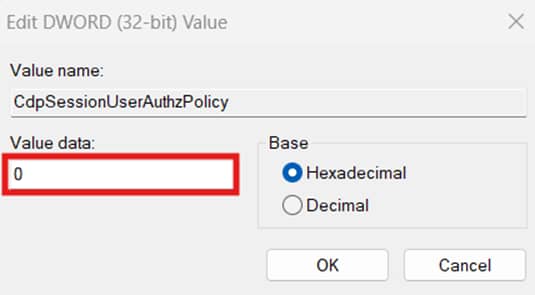
- Modify the value inside CdpSessionUserAuthzPolicy to match the behavior you prefer:
- 1 = Enable sharing across devices with the same signed-in Microsoft account.

- 0 = Disable sharing across devices.
- Press OK and exit the Registry Editor.
- Sign out of your Microsoft account or restart the device.
💡 Note: You must sign out or restart the device for the configuration to fully apply. (Refer to ⚠️ Things to look out for.)
Method 3: Leverage a PowerShell script for automation
Managing the “Share across devices” feature manually per user becomes too repetitive as you scale it. PowerShell makes this process repeatable and scalable for administrators looking to deploy this setting for multiple endpoints.
📌 Use Cases: Administrators can leverage a PowerShell script to automate cross-device experience configurations on a local machine or multiple endpoints. This script can also be utilized as a log-on script to help ensure consistency per user account across an environment.
📌 Prerequisite: Windows Registry backup
- Press Win + R, type PowerShell, and press Enter.
- Enter the command that reflects your preferred Share across devices behavior:
(a) Enter the following command to enable the feature:
New-Item -Path "HKCU:\Software\Microsoft\Windows\CurrentVersion\CDP" -Force | Out-NullNew-ItemProperty -Path "HKCU:\Software\Microsoft\Windows\CurrentVersion\CDP" -Name "CdpSessionUserAuthzPolicy" -PropertyType DWORD -Value 1 -ForceStop-Process -Name explorer -Force
(b) Enter the following command to disable the feature:
New-Item -Path "HKCU:\Software\Microsoft\Windows\CurrentVersion\CDP" -Force | Out-NullNew-ItemProperty -Path "HKCU:\Software\Microsoft\Windows\CurrentVersion\CDP" -Name "CdpSessionUserAuthzPolicy" -PropertyType DWORD -Value 0 -ForceStop-Process -Name explorer -Force
- Wait for the script to finish and then close the PowerShell prompt.
💡 Note: The scripts outlined above also restart File Explorer automatically, eliminating the need to sign out or restart the device to apply the setting.
Method 4: Use a .reg file for non-script deployment
Alternatively, administrators can leverage a .reg file for a non-script configuration of the CdpSessionUserAuthzPolicy registry value.
📌 Use Cases: It’s ideal to leverage a .reg file if you want to quickly toggle the “Share across devices” feature with just two clicks.
📌 Prerequisite: Windows Registry backup
- Press Win + S, type Notepad, and select the Notepad app.
- Input the command that reflects the cross-device experience you want:
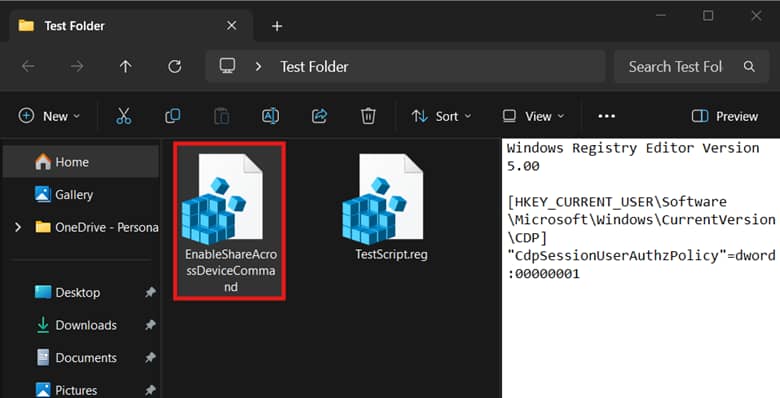
(a) Enter the command below to enable “Share across devices”:
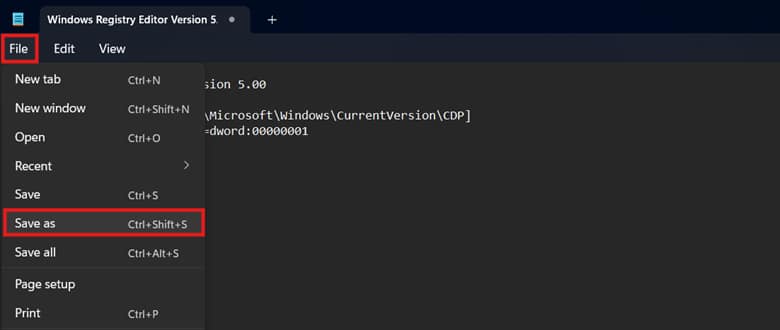
Windows Registry Editor Version 5.00
[HKEY_CURRENT_USER\Software\Microsoft\Windows\CurrentVersion\CDP]"CdpSessionUserAuthzPolicy"=dword:00000001
(b) Enter the command below to disable the feature entirely:
Windows Registry Editor Version 5.00
[HKEY_CURRENT_USER\Software\Microsoft\Windows\CurrentVersion\CDP]"CdpSessionUserAuthzPolicy"=dword:00000000
- Once you’re done inputting the appropriate commands, press File and select Save as.
- Name the file and add a .reg extension at the end, then change its Save as type to All files.
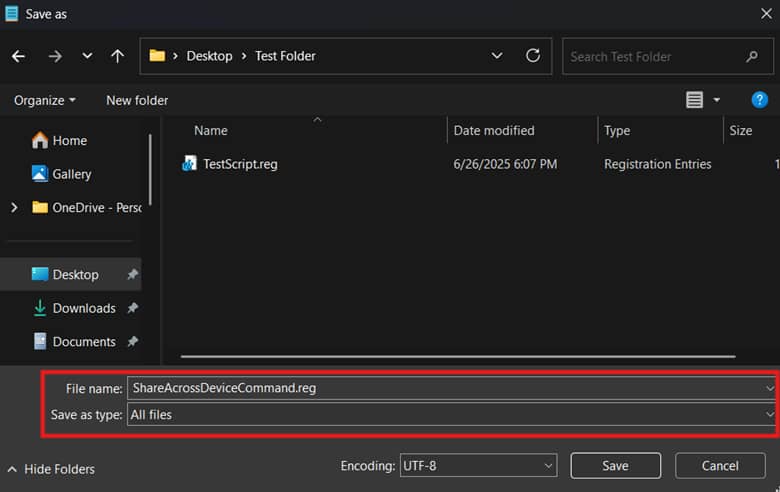
- Save the .reg file.
- Locate the .reg file and double-click it to run the command inside.
- Sign out from your Microsoft account or restart the device to apply the changes.
⚠️ Things to look out for
| Risks | Potential Consequences | Reversals |
| Making Registry changes without a backup | The Registry stores settings that control almost everything related to the OS. Without a backup, a misconfiguration can break system functionality, and recovering lost keys or values can be difficult. | Before proceeding to make changes, it’s important to first create a Windows Registry backup to ensure easy rollback in case of a misconfiguration. |
| The registry change doesn’t apply after configuration. | Depending on the change made, some modifications in the Registry won’t fully apply until the next device startup. | Restart your device or sign out to ensure that the system properly recognizes the configurations you made to CdpSessionUserAuthzPolicy. |
| Non-enforceable per-user configuration | Both the Windows Settings and Registry methods outlined in this guide apply on a per-user basis. That said, users can easily reverse the change on their end. | Administrators can use PowerShell scripts and assign them as a log-on script to a profile, ensuring user account compliance at startup. Additionally, administrators can also restrict end-user access to the Windows Settings app and the Registry to avoid unwanted reversals. |
Considerations when managing “Share across devices” in Windows 11
When managing a Windows 11 device’s cross-device experience, there are key considerations to remember. These influence how the configuration is applied and how it impacts related features like app behavior and other sharing methods.
Group Policy application
There’s currently no native policy in the Local Group Policy Editor dedicated to managing the CdpSessionUserAuthzPolicy value in the Registry. Nevertheless, you can leverage the Windows Settings or Registry Editor when configuring the “Share across devices” feature on a local machine. Additionally, instead of manually configuring the Registry per user account, you can use a PowerShell script or .reg file for automation and deployment
Clipboard sync
In Windows 11, the Clipboard Sync feature allows users to easily copy and paste snippets between connected devices. However, disabling the CdpSessionUserAuthzPolicy value in the Registry disables the Clipboard’s sync. If your environment’s workflow heavily relies on syncing clipboard snippets, then it’s not advisable to turn off the “Share across devices” feature.
Other sharing methods
While configuring CdpSessionUserAuthzPolicy affects cloud-based and cross-device communication, it does not affect local sharing methods like LAN and nearby sharing. That said, regardless of how you configure a local machine’s cross-device experience, it won’t affect local device-to-device sharing unless disabled separately.
Configure “Share across devices” to avoid unintentional syncing
Whether to enable or disable cross-device experience will depend on your environment’s objectives. For environments that heavily rely on multiple Windows device setups, keeping it on can boost productivity. On the other hand, it’s advisable to turn this off for environments that prioritize security and data privacy compliance.
While end users can manage this feature via Windows Settings, registry configurations are best left to advanced users. Additionally, administrators can automate the Registry configuration using PowerShell scripts or .reg files for a local machine or at scale.
Related topics:


