

That little arrow that expands folders in File Explorer’s left sidebar? That’s controlled by Windows 11’s Expand to open folder in the Navigation pane. Some users love how it automatically shows where they are while browsing. Others find it distracting, especially when setting up kiosks, avoiding clutter, or wanting a calmer workspace.
In this guide, you’ll learn three easy ways to turn this auto-expand feature on or off, whether you’re using Windows 11 Home or Enterprise. Take control with just clicks, registry edits, or automated scripts.
Methods for turning on or off the Navigation pane’s expand folder
Enabling the expand folder feature in File Explorer’s Navigation pane is simple. All the methods here are easy to do and available in all editions of Windows 11 (Home, Pro, Enterprise, and Education). Also, ensure that you currently have administrator privileges so you won’t experience hindrances in the procedure.
Method 1: Toggle expand folder on or off via File Explorer GUI
To toggle the expand folder on or off, here’s how:
- Press Win + E to open File Explorer.
- Right-click on an empty area in the Navigation pane, then click Expand to current folder to toggle it on or off.
- ✅ Enabled: There is a checkmark next to the option.
- The folders in the pane will automatically expand to where your current Explorer address.
- ⬜ Disabled: There is no checkmark next to the option.
- The folders will remain closed or will not expand to where your current Explorer location.
- ✅ Enabled: There is a checkmark next to the option.
Method 2: Turn on or off the expand folder via Folder Options
Here’s another easy approach to toggle on or off the expand folder feature in File Explorer.
- Open File Explorer (Win + E).
- Click the three-dotted button in the top toolbar.
- Select the Options button in the menu.

- Another window will open for the Folders Option.
- In the Folders Option windows, go to the View tab.
- Under Advanced settings, scroll down until you find the Expand to open folder option.
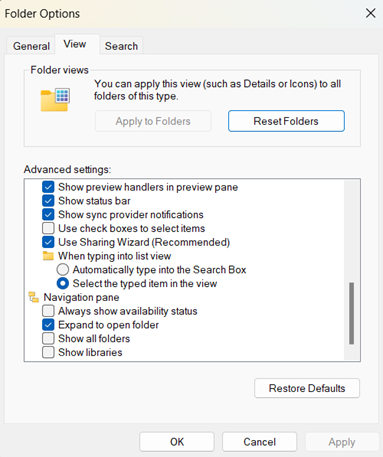
- Tick the box for your preferred setting:
- ✅Check the box to turn on the expand folder.
- ⬜Uncheck it to turn off the option.
Optional: How to hide the navigation panel
Now that you know how to toggle the expand folder on or off, if you want to further avoid distractions from your process, you also have the option to hide the Navigation pane completely.
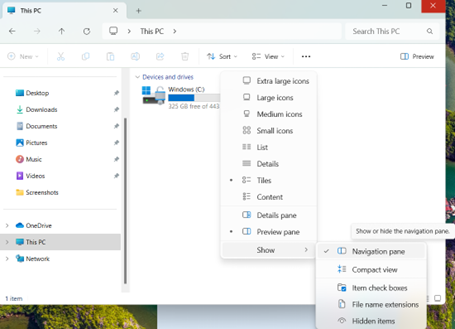
Option 1: Enable or disable via File Explorer (GUI)
It only takes three clicks in File Explorer to hide your Navigation pane. This method is instant, requires no administrator rights, and is ideal for individual users.
- Open File Explorer:
- Press Win + E or click the folder icon in your taskbar to open File Explorer.
- Access the View menu:
- Click View in the top toolbar of File Explorer.
- Navigate to the Navigation pane options:
- Hover over Show, then select the Navigation pane from the submenu.
- ✅ Enabled: There is a checkmark next to the option.
- The Navigation pane automatically expands to highlight your current folder location as you browse.
- ⬜ Disabled: There is no checkmark next to the option.
- The Navigation pane disappears, and you must double-click on folders to expand them.. Another option is to right click on the folder and select Open.
- ✅ Enabled: There is a checkmark next to the option.
- If enabled:
- You can click the arrows next to the folders in the Navigation pane to expand them. You can also right-click a folder in the pane and select Expand or Collapse.
- If disabled:
- The sidebar is hidden and cannot be interacted with until re-enabled.
- Hover over Show, then select the Navigation pane from the submenu.
The changes take effect instantly. The setting will remain on your current user profile until reconfigured.
Option 2: Enable or disable via Registry Editor
For IT admins or advanced users needing deployment control, the Windows Registry offers direct management of the Navigation Pane’s expansion behavior.
⚠️ Warning: Editing the Registry incorrectly can cause system instability. Back up your registry before proceeding. Admin rights required. Watch How to Back Up and Restore Windows Registry for more details.
- Open Registry Editor:
- Press Win + R to open Run.
- Type regedit, then press Enter to open the Registry Editor.
- Confirm any UAC prompts if needed.
- Navigate to the Advanced Settings key:
- Paste or go to this address key: HKEY_CURRENT_USER\Software\Microsoft\Windows\CurrentVersion\Explorer\Advanced
- Modify the DWORD value:
- Double-click the NavPaneExpandToCurrentFolder value.
- If it doesn’t exist, right-click the right pane, then select New > DWORD (32-bit) Value.
- Name the value as NavPaneExpandToCurrentFolder.
- Double-click the NavPaneExpandToCurrentFolder value.
- Set the value:
- Input 1 to enable auto-expand in the Navigation Pane.
- Input 0 to disable it.
- Apply changes:
- The changes should take effect instantly. If not, restart File Explorer or your PC to apply.
Option 3: Automating via PowerShell
Automate your Navigation Pane settings with these ready-to-run PowerShell scripts. Make sure you have administrator privileges.
- Open PowerShell:
- Press Win + X, then select Terminal (Admin).
- If PowerShell is not the default command-line tool in the Terminal, click the dropdown arrow in the tabs above, then select it.
- Press Win + X, then select Terminal (Admin).
- Run commands:
- To enable expanding folders, run:
Set-ItemProperty -Path "HKCU:\Software\Microsoft\Windows\CurrentVersion\Explorer\Advanced" `
-Name "NavPaneExpandToCurrentFolder" -Value 1
Stop-Process -Name explorer -Force
The Navigation Pane will now dynamically expand to show your current folder location.
- To disable expanding folders, run:
Set-ItemProperty -Path "HKCU:\Software\Microsoft\Windows\CurrentVersion\Explorer\Advanced" `
-Name "NavPaneExpandToCurrentFolder" -Value 0
Stop-Process -Name explorer -Force
Folders will no longer expand when opened, keeping your sidebar stable.
Pro tips and key considerations when modifying the expand folder feature
Keep these practices in mind when managing your Navigation pane’s expansion behavior across Windows 11 environments.
Navigation Pane Visibility Required
The Expand feature only works when the Navigation pane is enabled. If hidden, follow Option 1 (View > Show > Navigation pane) to show it.
Per-User Profile Setting
Changes apply only to your current user account. Adjusting this won’t impact other users on the same device, making it ideal for shared workstations.
Roaming Profiles & Enterprise Sync
The NavPaneExpandToCurrentFolder registry value roams with user profiles if enabled via:
- Active Directory Folder Redirection
- Enterprise State Roaming
- OneDrive Known Folder Move
Folder Redirection Compatibility
The expand feature works well with redirected folders, like files and documents moved to network paths via Group Policy. You’ll see folders expand in the Navigation pane exactly as if they were still on your PC.
The Navigation pane expansion follows the logical path, not physical storage.
Improve your File Explorer navigation experience
Controlling the “Expand to open folder” behavior in Windows 11 File Explorer puts you in charge of navigation. Toggling this setting tailors the sidebar to your needs, keeping it dynamic for quick path visibility or static for a distraction-free workspace.
With simple methods like the quick View > Show menu toggle or advanced registry/PowerShell controls, Windows 11 adapts to your preferences, not the other way around. Just restart File Explorer afterward and enjoy a cleaner, more predictable navigation experience. Simplify file management your way.


