

Ever opened a PDF only to find your preferred reader was silently replaced by another app? The UserChoice Protection Driver (UCPD) in Windows 11 is your built-in guard against such unexpected hijacks, ensuring only your choices set default apps.
In this guide, you’ll learn clear, step-by-step methods to enable or disable UCPD using tools like Registry Editor, PowerShell, and Group Policy.
Methods to enable or disable UserChoice Protection Driver (UCPD)
Sometimes, controlling how apps set defaults requires temporarily bypassing Windows 11’s safeguards.
📌 Use cases: Changing your UCPD settings is ideal for enterprise deployments, silently configuring default apps via scripts or custom software that programmatically sets file associations. It can also help troubleshoot apps that are blocked by setting defaults despite user consent/privileges.
📌 Prerequisites: Before proceeding, ensure that you have Registry Editor, Command Prompt, PowerShell, and Group Policy, as well as administrative privileges to use them. These tools are available on all Windows 11 (version 22H2 or later) and Windows 10 (Build 19045.3030 or later) editions.
We recommend checking ⚠️Things to look out for before proceeding.
📌 Recommended deployment strategies:
Click to Choose a Method | 💻 Best for Individual Users | 💻💻💻 Best for Enterprises |
| Method 1: Registry Editor | ✓ | ✓ |
| Method 2: Windows Terminal (Command Prompt) | ✓ | ✓ |
| Method 2: Windows Terminal (PowerShell) | ✓ | ✓ |
| Method 3: Group Policy Preferences | ✓ |
Method 1: Registry Editor
This hands-on approach gives immediate control over UCPD settings through Windows’ configuration database.
📌 Use case: This registry key directly controls the UserChoice Protection Driver (UCPD) at the system level. This is ideal for quick testing individual machines, non-managed environments where Group Policy is not available, and making temporary adjustments during software deployments.
⚠️ Warning: Editing the Registry incorrectly can lead to serious system instability. Always back up your Registry or create a system restore point before proceeding. Review the ⚠️ Things to look out for section to learn more.
Step-by-step procedure:
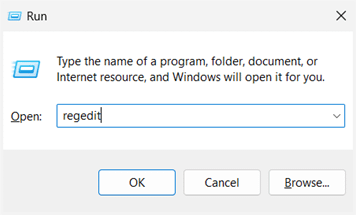
- Open Run (Win + R), then type regedit and press Enter to open the Registry Editor.
- Go to or paste this in the address bar: HKEY_LOCAL_MACHINE\SOFTWARE\Policies\Microsoft\Windows\System
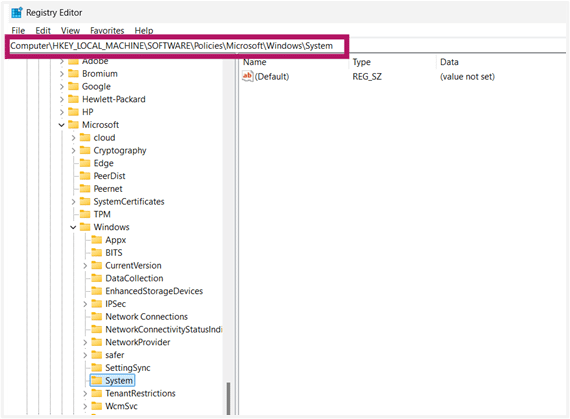
- Double-click the EnableUCPD DWORD.
- If it does not exist, right-click the right pane, then select New > DWORD (32-bit) Value.
- Name it as EnableUCPD.
- Set its value to:
- 0 = Disables UCPD protection
- 1 (or delete the key) = Re-enables protection
- Close the Registry Editor, and restart your PC to apply changes.
If you’ve set the value to 0, third-party apps or scripts can now modify default file associations without Windows blocking them. This means your custom deployments will work, but it also means malicious software can hijack defaults. If you’ve re-enabled UCPD (whether by setting the value to 1 or deleting the key), it will resume protection.
Method 2: Windows Terminal (Command Prompt or PowerShell)
Automate UCPD management through scripts for efficient deployment across multiple systems. Here’s how you can configure it via Command Prompt or PowerShell.
Option 1: Via Command Prompt
📌 Use case: Use when scripting batch deployments or troubleshooting without GUI access.
Step-by-step procedure:
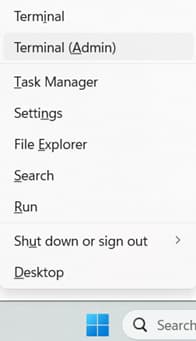
- Press Win + X, then select Terminal (Admin).
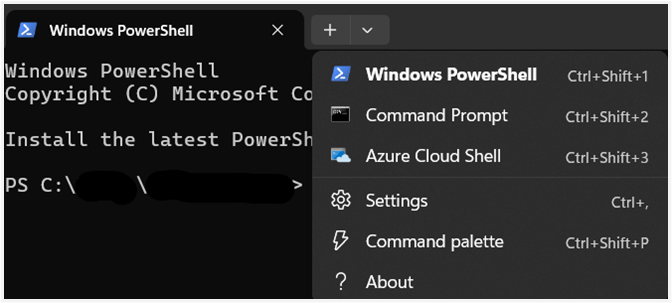
- In the Terminal (Admin) window, click the drop-down arrow in the tabs section above the window, then select Command Prompt.
- Run the following commands:
- If the registry key EnableUCPD does not exist:
- To disable UCPD:
sc config UCPD start=disabled
schtasks /change /Disable /TN “\Microsoft\Windows\AppxDeploymentClient\UCPD velocity” - To re-enable UCPD:
sc config UCPD start=auto
schtasks /change /Enable /TN “\Microsoft\Windows\AppxDeploymentClient\UCPD velocity”
- To disable UCPD:
- If the registry key EnableUCPD exists:
- To disable UCPD:
reg add “HKLM\SOFTWARE\Policies\Microsoft\Windows\System” /v EnableUCPD /t REG_DWORD /d 0 /f - To re-enable UCPD:
reg delete “HKLM\SOFTWARE\Policies\Microsoft\Windows\System” /v EnableUCPD /f
- To disable UCPD:
- If the registry key EnableUCPD does not exist:
- Restart your PC to apply changes.
Option 2: Via PowerShell
📌 Use case: Ideal for modern IT environments using configuration scripts.
Step-by-step procedure:
- Press Win + X, then select Terminal (Admin).
- In the Terminal (Admin) window, click the drop-down arrow in the tabs section above the window, then select Windows PowerShell.
- Run the following commands:
- If the registry key EnableUCPD does not exist:
- To disable UCPD:
Set-Service -Name UCPD -StartupType Disabled
Disable-ScheduledTask -TaskName “\Microsoft\Windows\AppxDeploymentClient\UCPD velocity” - To re-enable UCPD:
Set-Service –Name UCPD -StartupType Automatic
Enable-ScheduledTask -TaskName “\Microsoft\Windows\AppxDeploymentClient\UCPD velocity”
- To disable UCPD:
- If the registry key EnableUCPD exists:
- To disable UCPD:
New-Item -Path “HKLM:\SOFTWARE\Policies\Microsoft\Windows\System” -Force | Out-Null
Set-ItemProperty -Path “HKLM:\SOFTWARE\Policies\Microsoft\Windows\System” -Name “EnableUCPD” -Value 0 - To re-enable UCPD:
Remove-ItemProperty -Path “HKLM:\SOFTWARE\Policies\Microsoft\Windows\System” -Name “EnableUCPD” -ErrorAction SilentlyContinue
- To disable UCPD:
- If the registry key EnableUCPD does not exist:
- Restart your PC to apply changes.
This method directly manipulates the UCPD Windows service and its scheduled task, or falls back to the registry key if present. By disabling the service and task, Windows 11 stops enforcing app association locks, allowing silent script-based deployments. If re-enabled, UCPD will resume monitoring the details of the app settings immediately.
Method 3: Group Policy Preferences (Enterprise deployment)
Centrally manage UCPD across your organization for consistent security policies.
📌 Use case: This procedure is ideal for enterprise environments requiring uniform security configurations, large-scale deployments where manual or scripting methods are inefficient, and policy enforcement according to IT standards.
Step-by-step procedure:
- Open Group Policy Management Console (gpmc.msc).
- Right-click your target OU (Organizational Unit), then create a GPO and name it accordingly.
- Navigate to the following: Computer Configuration > Preferences > Windows Settings > Registry.
- To disable UCPD:
- Right-click, then select New > Registry Item.
- Configure:
- Action: Update
- Hive: HKEY_LOCAL_MACHINE
- Key Path: SOFTWARE\Policies\Microsoft\Windows\System
- Value Name: EnableUCPD
- Value Type: REG_DWORD
- Value Data: 0
- To re-enable UCPD:
- Create another Registry Item with:
- Action: Delete
- Input the same Hive, Key Path, and Value Name from Step 4.
- Create another Registry Item with:
- To apply, link GPO to the target OU, then run gpupdate /force on clients, and restart the systems.
After deploying these configurations, the UCPD will honor your enterprise settings once these systems restart.
⚠️ Things to look out for
This section highlights potential challenges to keep in mind while following this guide.
| Risks | Potential Consequences | Reversals |
| 1. Incorrect Registry edits | The operating system becomes unstable, and booting up fails. | Back up the registry (regedit > File > Export) or create a System Restore Point. Watch How to Back Up and Restore Windows Registry for more details. |
| 2. Disabling UCPD protection | Malware hijacks file associations (e.g., PDFs open in malicious apps). | Re-enable UCPD immediately after task completion using the original method. |
| 3. Typos in scripts (e.g., UCPD vs. UCPd) | The commands fail, or the protection state is unchanged. | Validate syntax with sc query UCPD (CMD) or Get-Service UCPD (PowerShell). |
| 4. Running Windows Terminal without admin rights | Access denied errors or no changes applied. | Re-launch Terminal as Administrator and retry commands. |
| 5. Mislinked OUs/GPO conflicts | Settings deploy to the wrong devices or the policies override. | Unlink GPO > adjust scope > run gpupdate /force on clients. |
| 6. Delayed policy propagation | UCPD remains active/inactive unexpectedly. | Force update with gpupdate /force, then reboot. Check gpresult /r for errors. |
Key considerations when managing UCPD in Windows 10/11
Managing UCPD requires balancing flexibility with security. Here’s what to keep in mind.
Security vs. Convenience
While disabling UCPD enables script-driven app deployments, it temporarily lowers defenses against malware hijacking file associations. Re-enable it immediately after completing your task in production environments.
System-wide impact
The HKLM\SOFTWARE\Policies\Microsoft\Windows\System registry key (used in all methods) applies settings machine-wide. There’s no per-user toggle, so changes affect all accounts on the device.
Deployment limitations
Microsoft provides no official ADMX template for UCPD. For enterprise rollout, use Registry Preferences (Method 3) for Group Policy or Scripts (Method 2) for non-GPO managed devices.
Restart requirement
Changes only take effect after a reboot. Windows 11 loads the UCPD driver at startup, and protection remains unchanged.
Manage UserChoice Protection Driver for secure flexibility
Whether preventing unexpected app hijacks or enabling automated deployments, managing the UserChoice Protection Driver (UCPD) in Windows 11 lets you balance robust security with administrative efficiency. By implementing these methods strategically, you maintain control over default apps while accommodating custom workflows securely.
Related topics


