

Windows 11 names newly created folders “New folder” by default, but users can customize this to any valid name. This guide shows you ways to change the default new folder name. This includes methods to do this per user and organization-wide, along with other matters you should consider.
Methods to change the default folder name in Windows 11
Changing the “New folder” template helps streamline folders for searchability while saving time by reducing repetitive renaming across an environment. Users and administrators can also modify this to align with personal naming preferences or organizational standards.
📌 Prerequisite: Any Windows 11 PC
📌 Recommended deployment strategies:
| Click to Choose a Method | 💻 Best for Individual Users | 💻💻💻 Best for Enterprises |
| Method 1: Change the default new folder name via Registry Editor | ✓ | |
| Method 2: Script the Registry change using the Command Prompt | ✓ | |
| Method 3: Automate the Registry configuration using PowerShell scripts | ✓ | ✓ |
| Method 4: Change the default new folder name for all users via GPO | ✓ |
Method 1: Change the default new folder name via Registry Editor
The Registry contains low-level settings that control OS behavior, including the ability to modify the default name for new folders.
⚠️ Warning: Misconfigurations in the Registry may cause system instability or break device functionality. (See Things to look out for.)
📌 Use Case: Users can leverage the Registry Editor to change their account’s default folder name template.
📌 Prerequisites: Windows Registry backup.
- Press Win + R, type regedit, and then press Enter.
- Go to:
HKEY_CURRENT_USER\Software\Microsoft\Windows\CurrentVersion\Explorer
- Inside Explorer, find and click the NamingTemplates subkey.
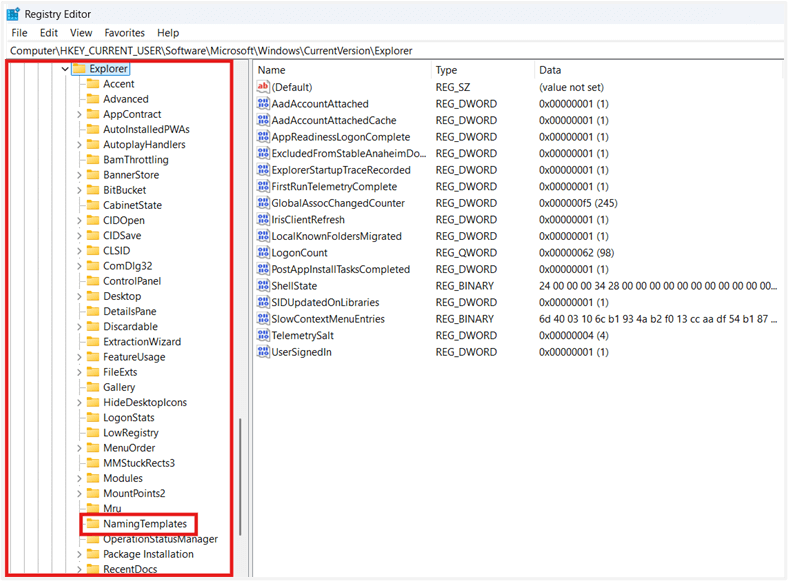
- If the key doesn’t exist, right-click Explorer, then select New > Key.
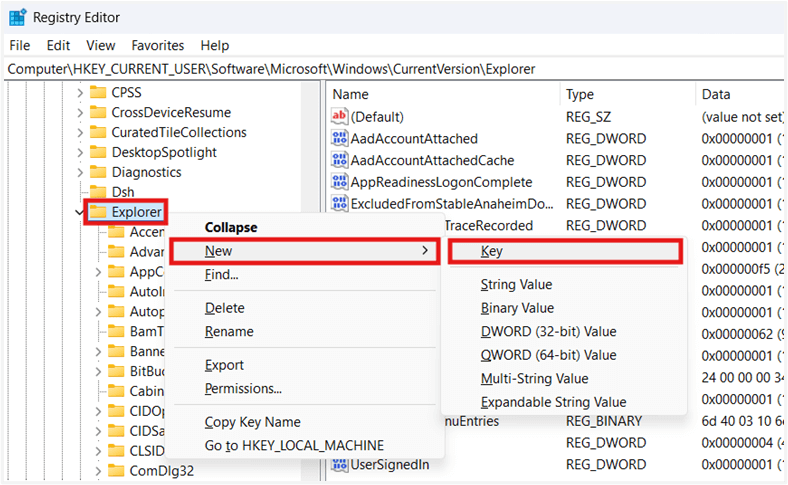
- Name the newly created key as NamingTemplates.
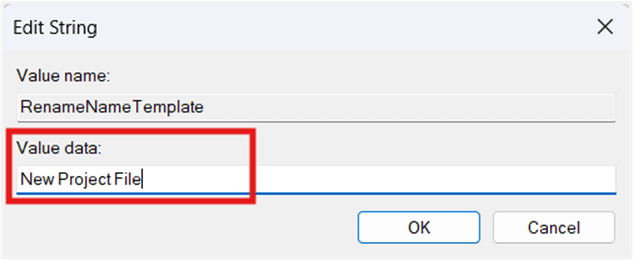
- Find and double-click the RenameNameTemplate String Value.
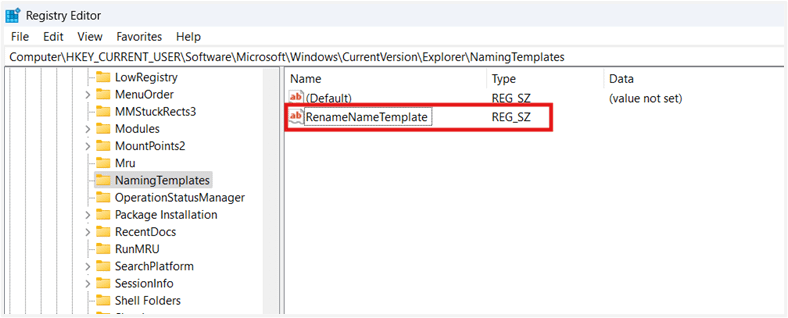
- If it doesn’t exist, right-click NamingTemplates, press New > String Value.
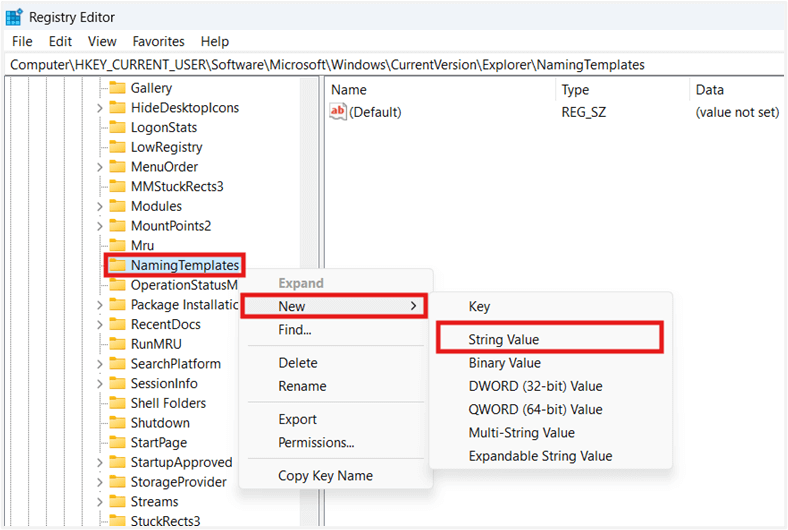
- Name it as RenameNameTemplate.
- Enter your preferred default folder name in the Value data field and press OK.
- Restart Windows Explorer or your device to apply the change.
- Once done, new folders will take the entered Value data as their default name.

💡 Note: Avoid using invalid characters such as \ / : * ? ” < > | to prevent errors when creating a new folder. (See Things to look out for.)
Method 2: Script the Registry change using the Command Prompt
Manually editing the Registry can be difficult and error-prone, especially for everyday users. Scripts allow users to automate the process, allowing them to apply the change accurately without opening the Registry.
📌 Use Case: Use the Command Prompt to automate the Registry change and minimize the risk of misconfigurations.
📌 Prerequisites:
- Command Prompt access
- Windows Registry backup.
⚠️ Important: When working with scripts, it’s crucial to ensure syntax accuracy to avoid errors. (See Things to look out for.)
- Log in to the target user account.
- Press Win + R, type cmd, and press Enter.
- Enter the script below:
reg add "HKCU\Software\Microsoft\Windows\CurrentVersion\Explorer\NamingTemplates" /v RenameNameTemplate /t REG_SZ /d "Untitled Folder" /f
- Replace Untitled Folder with your preferred valid default folder name.
- Wait for the script to finish.
- Restart Windows Explorer or your device to apply the change.
Method 3: Automate the Registry configuration using PowerShell scripts
Like the Command Prompt, PowerShell can also automate the same Registry configuration. However, the latter is better for managing multiple users due to its remote deployment capabilities.
📌 Use Case: Use PowerShell scripts to assign a new default folder name template for one or multiple accounts within non-GPO environments.
📌 Prerequisites:
- User-level PowerShell access for individual configurations.
- Admin rights for deployment.
- Windows Registry backup.
⚠️ Important: Always test configurations locally before deploying them for multiple users. (See Things to look out for.)
- Log in to the target user account.
- Press Win + R, type PowerShell, and press Enter.
- Execute the following script:
New-Item -Path "HKCU:\Software\Microsoft\Windows\CurrentVersion\Explorer\NamingTemplates" -ForceSet-ItemProperty -Path "HKCU:\Software\Microsoft\Windows\CurrentVersion\Explorer\NamingTemplates" -Name "RenameNameTemplate" -Value "Untitled Folder"
- Change Untitled Folder to the valid default folder name you prefer.
- Restart Windows Explorer or your device to apply the change.
💡 Tip: You can run the script above for multiple users by leveraging NinjaOne’s Remote PowerShell tool.
Method 4: Change the default new folder name for all users via GPO
Enforcing a default new folder name can be done centrally by deploying a Group Policy. This ensures consistent new folder name templates across a domain-joined environment.
📌 Use Case: Administrators managing domain-joined enterprise environments can deploy a Group Policy for multiple users through a domain controller.
📌 Prerequisites:
- Group Policy Management Console (gpmc.msc) access.
- Approver or AGPM Administrator rights required.
- Active Directory backup.
- Windows 11 Pro, Enterprise, or Education editions.
⚠️ Important: Some GPOs don’t automatically revert to their default behavior once removed, affecting administrators’ ability to rollback in case of misconfigurations. (See Things to look out for.)
- Press Win + R, type gpmc.msc, and press Enter.
- On the left pane, find and right-click the target Organizational Unit (OU) or domain.
- Press Create a GPO in this domain, and Link it here….
- Name the GPO (e.g., NewDefaultFolderName).
- Right-click the newly created GPO, select Edit, then go to:
User Configuration > Preferences > Windows Settings > Registry
- Right-click Registry, select New > Registry Item, then enter the following:
| Settings | Value |
| Action | Update |
| Hive | HKEY_CURRENT_USER |
| Key Path | Software\Microsoft\Windows\CurrentVersion\Explorer\NamingTemplates |
| Value Name | RenameNameTemplate |
| Value Type | REG_SZ |
| Value Data | Untitled Folder |
💡 NOTE: Value Data defines the system’s default new folder name, which in this example is Untitled Folder. Change it according to your environment’s needs.
- Find and right-click the target OU, select Group Policy Update, and press Yes when the Force Group Policy update prompt appears.
⚠️ Things to look out for
| Risks | Potential Consequences | Reversals |
| Errors when editing the Registry. | Changes in the Registry apply immediately; a single mistake can break system stability and functionality. | Back up your Windows Registry before proceeding to ensure easy rollback in case things go wrong. |
| Invalid characters in new default name templates. | Using invalid characters in the default new folder name will cause errors and prevent the creation of new folders. | Avoid using characters like \, /, :, *, ?, “, <, >, or | when assigning a new default folder name on Windows 11 systems. |
| Deploying untested scripts and GPOs. | Misconfigurations can hide inside scripts and GPOs, negatively impacting environments when deployed. | Test scripts and GPOs locally to verify their effects on an environment’s device fleet before deployment. |
| Not having an Active Directory backup. | Although not common, errors during GPO deployments can introduce issues like login errors and Active Directory corruption. | It’s important to have an Active Directory backup when deploying GPOs to ensure quick recovery in case of accidental errors. |
Considerations before changing default new folder names
To ensure your configuration works smoothly and within expectations, it’s necessary to understand its behavior and impact before proceeding. Below are key considerations you should keep in mind when applying the change to your user account or environment.
Picking a new default folder name doesn’t impact existing folders
When applying a new default folder name, this only changes the template Windows 11 uses for newly created folders. That said, this change won’t have any retroactive impact on preexisting folders.
Per-user and deployment methods
There are multiple ways to specify a new default folder name, whether for a single user or across an environment. Depending on your use case, this can be done through direct Registry edits, script-based automation, or GPO deployment.
How do I change the default folder name in Windows 11?
The Registry can be used to configure a user’s default new folder name, which can be automated via CMD. PowerShell possesses the same automation capabilities that CMD offers, but is more flexible for non-GPO deployments. Lastly, administrators handling Active Directories should leverage the Group Policy Management Console to deploy GPOs centrally across a managed environment.
Applying new default folder names
When modifying File Explorer settings via Registry or GPO, the changes made won’t fully apply until the next app reboot. You’ll need to restart your device to do this, which takes a while, especially if you’re booting from an HDD. To avoid rebooting, you can press Ctrl + Shift + Esc, scroll down the Processes tab, right-click Windows Explorer, then select Restart.
Assign a new default folder name for a faster workflow
By default, Windows names newly created folders as “New folder”. Changing the default new folder name is ideal to automate name assignments, especially in organizations that use customized name templates. This helps save time by standardizing the naming process when creating new folders.
Editing the Registry or automating it via CMD is the ideal method for one-time, local configurations per user. You can also use PowerShell for local configurations or when deploying this for non-GPO environments at scale. Administrators who manage an Active Directory can enforce this centrally per user by deploying the configuration as a GPO.
Related topics:
- How to Change the Default Location of the Screenshots Folder in Windows 11
- How to Change or Restore the Videos Folder Icon in Windows
- How to Remove a Folder or Drive from a Library in Windows
- Change the Default Folder When Opening File Explorer in Windows 10
- How to Change Folder and Search Options in Windows 10


