

Key Points
How to Enable or Disable the Action Center in Windows
- Disabling the Action Center removes the notification pane, reducing distractions and limiting exposure to sensitive alerts.
- Use Local Group Policy (gpedit.msc) → User Configuration → Administrative Templates → Start Menu and Taskbar → Remove Notifications and Action Center to hide or show it.
- Edit the registry key HKLM\SOFTWARE\Policies\Microsoft\Windows\Explorer\HideNotificationCenter (set to 1 to disable, 0 to enable) for all Windows editions.
- Run a PowerShell script that creates or updates the same registry value for fast, remote deployment.
- Deploy via GPO linked to an AD OU for enterprise‑wide, auditable control.
This comprehensive guide demonstrates how to enable or disable the Action Center in Windows 10 and Windows 11 PCs. This allows you to show or hide system notifications and quick actions. It includes instructions for doing this using the Local Group Policy Editor and the Windows Registry Editor and for automating the process using PowerShell.
Methods to configure the Action Center in Windows 10 and Windows 11
You can use any one of the methods below to enable the Action Center in Windows 10 and Windows 11.
Constant pop‑up alerts create clutter and interrupt focused work.
Method 1: Configure using the Local Group Policy Editor
The Local Group Policy Editor is only available in the Pro, Enterprise, and Education editions of Windows 10 and Windows 11 (it is not included in Windows Home Edition).
You must be logged in as an administrator to use the Local Group Policy Editor, and you should create a backup of your Local Group Policy settings before you begin, so that they can be restored if necessary.
- Press the Windows + R key combination on your keyboard to open the Windows Run dialog.
- Type the command gpedit.msc into the Run dialog, then press the Enter key, which will open the Local Group Policy Editor.
- Go to User Configuration → Administrative Templates → Start Menu and Taskbar in the navigation sidebar.
- Scroll down to the Remove Notifications and Action Center setting, and double-click to edit it.
- Set the value of the Remove Notifications and Action Center Group Policy Object to Enabled or Not Configured (disable).
- Click OK to save and apply the change immediately.
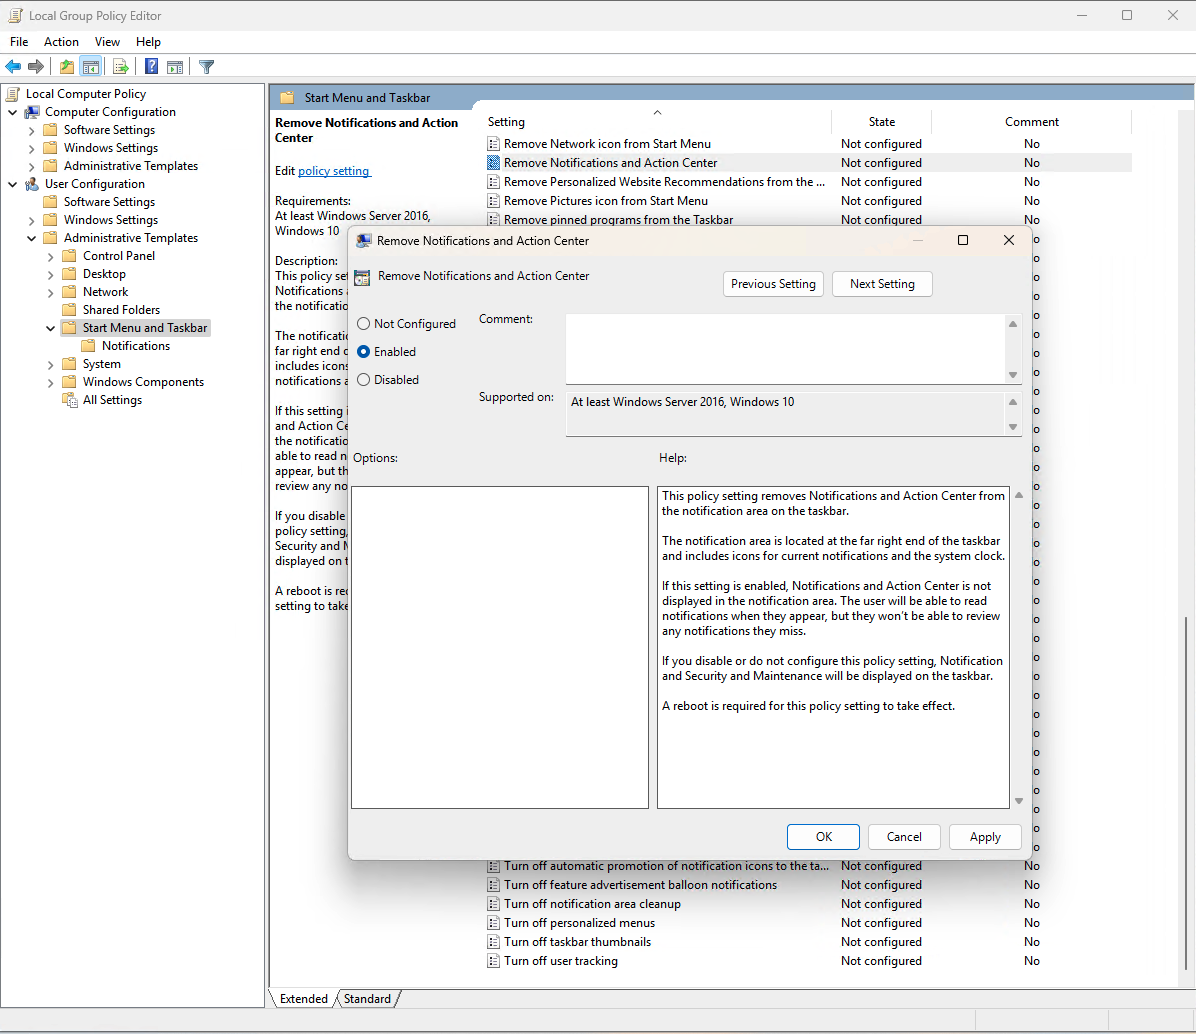
By applying the policy through the Local Group Policy Editor, you gain precise, centrally managed control over the Action Center’s visibility across the targeted machines.
Method 2: Use the Registry Editor
You can use the Windows Registry Editor on all editions of Windows 10 and Windows 11, including Home editions, to enable the Action Center.
You must be logged in as an administrator, and it is recommended that you back up your registry settings in case a mistake is made and you need to restore them.
- Open the Windows Registry Editor as an administrator.
- Navigate to the registry key located at Computer\HKEY_LOCAL_MACHINE\SOFTWARE\Policies\Microsoft\Windows\Explorer (you can copy and paste this location into the address bar).
- If the Explorer key does not yet exist, right-click on the Windows registry key and select new key, and rename the new key Explorer.
- If the DisableNotificationCenter value does not exist in the Explorer key, create it by selecting Edit → New → DWORD (32-bit) Value from the toolbar and renaming the new value DisableNotificationCenter.
- Set the DWORD value of DisableNotificationCenter to 0 to enable the Action Center for all users on the current device or set it to 1 to disable it.
- Restart your device to apply the change.
Configure the Action Center for the current user using the Registry
To enable the Action Center notifications for only the current user using the registry editor, follow the steps above, but instead navigate to the key located at Computer\HKEY_CURRENT_USER\Software\Policies\Microsoft\Windows\Explorer in step 2.
Editing the registry allows you to toggle the Action Center on any Windows edition instantly, providing a lightweight, per-machine solution when Group Policy isn’t available.
Method 3: Using PowerShell for automation
As Administrator, the following command will enable the Action Center for all users:
Remove-ItemProperty -Path “HKLM:\Software\Policies\Microsoft\Windows\Explorer” -Name “DisableNotificationCenter” -ErrorAction SilentlyContinue
The following command will enable the Action Center for only the current user:
Remove-ItemProperty -Path “HKCU:\Software\Policies\Microsoft\Windows\Explorer” -Name “DisableNotificationCenter” -ErrorAction SilentlyContinue
On the other hand, this PowerShell command will disable the Action Center:
Set-ItemProperty -Path “HKLM:\Software\Policies\Microsoft\Windows\Explorer” -Name “DisableNotificationCenter” -Value 1 -Type DWord
or use the following command to affect only the currently logged-in user:
Set-ItemProperty -Path “HKCU:\Software\Policies\Microsoft\Windows\Explorer” -Name “DisableNotificationCenter” -Value 1 -Type DWord
You can script or automate the configuration of the above registry settings using PowerShell. Again, you should back up your registry before you run these commands.
Action Center can expose sensitive data in shared devices.
Managing the Action Center and notifications for multiple users and devices
You can configure settings such as showing or hiding the access center and notifications in Windows 10 and 11 using Group Policy in Education and Enterprise Environments. However, built-in
Windows management tools often do not meet the needs of organizations with remote workers using a variety of different Windows, macOS, Linux, and iOS devices.
Mobile Device Management (MDM) by NinjaOne gives you all the tools you need to remotely manage almost any kind of device, as well as deploy configurations, and assist users no matter where they are located.
Related topics:


