

The Microsoft Vulnerable Driver Blocklist is part of the Windows Defender Application Control (WDAC) framework. It works with Hypervisor-Protected Code Integrity (HVCI) or Smart App Control to block known malicious or exploitable drivers. This enhances security by preventing unsigned or vulnerable kernel-mode drivers from loading.
Enabling the blocklist strengthens protection against bring-you-own-vulnerable-driver (BYOVD) attacks and aligns with Microsoft’s security baselines. However, some users may disable it due to compatibility issues with legacy or custom drivers or when conducting driver compatibility testing.
This guide will walk you through several methods to enable or disable the Microsoft Vulnerable Driver Blocklist in Windows 11.
Protect critical data and devices from driver-based vulnerabilities.
How to turn on or turn off the Microsoft Vulnerable Driver Blocklist in Windows 11
Before proceeding, here are a few essential requirements and considerations to keep in mind:
- Windows 11 version 22H2 or later is required.
- Your device must support and have enabled either Memory Integrity (HVCI) or Smart App Control (SAC).
- Administrative privileges are required for all configuration changes.
- A system restart may be needed for the changes to take effect.
Method 1: Using Windows Security (GUI)
This is the simplest way to enable or disable the Microsoft Vulnerable Driver Blocklist, which is tied directly to Memory Integrity in non-enterprise versions of Windows 11. Turning on Memory Integrity automatically activates the driver blocklist.
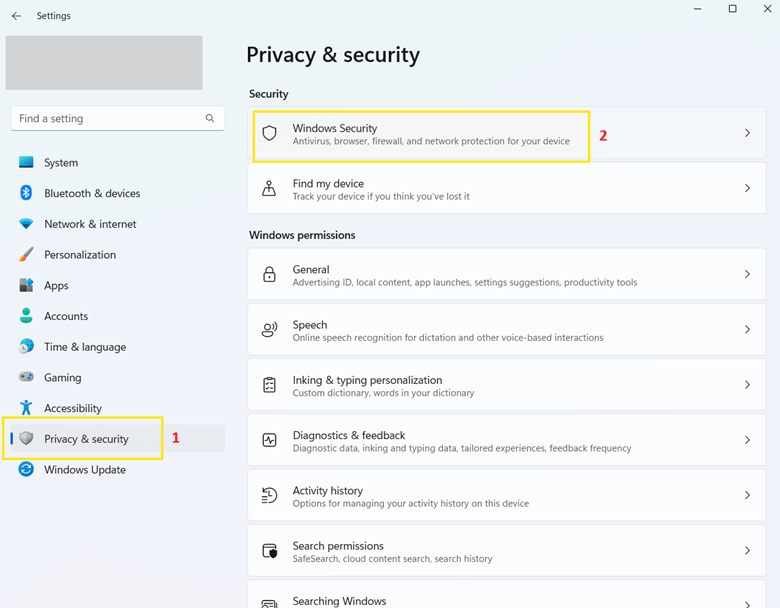
- Press Win + I to open the Settings.
- Go to Privacy & security > Windows Security.
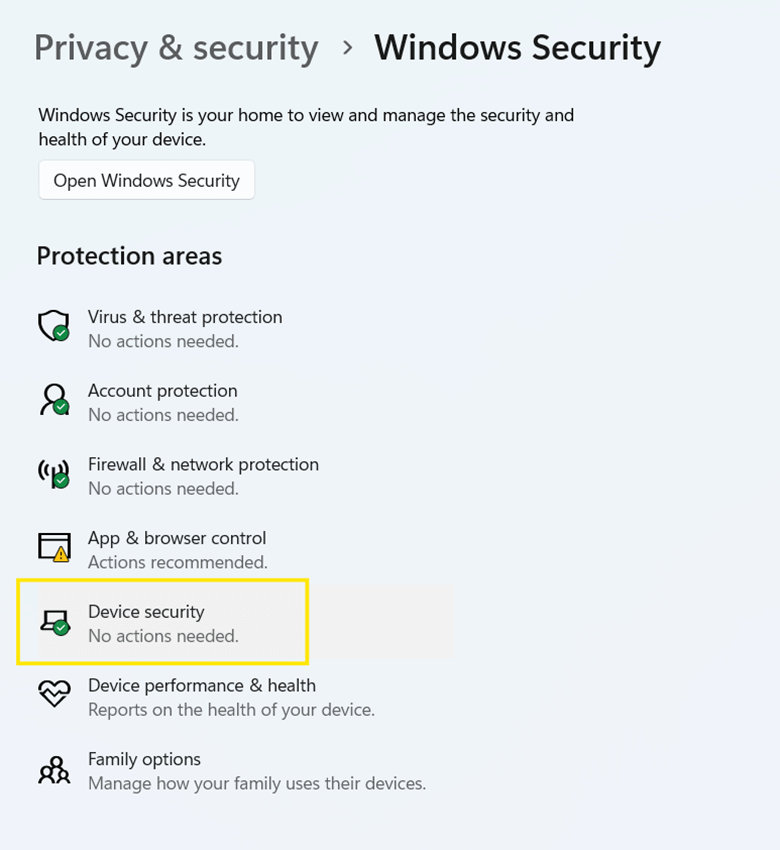
- In the Windows Security window, click Device security.
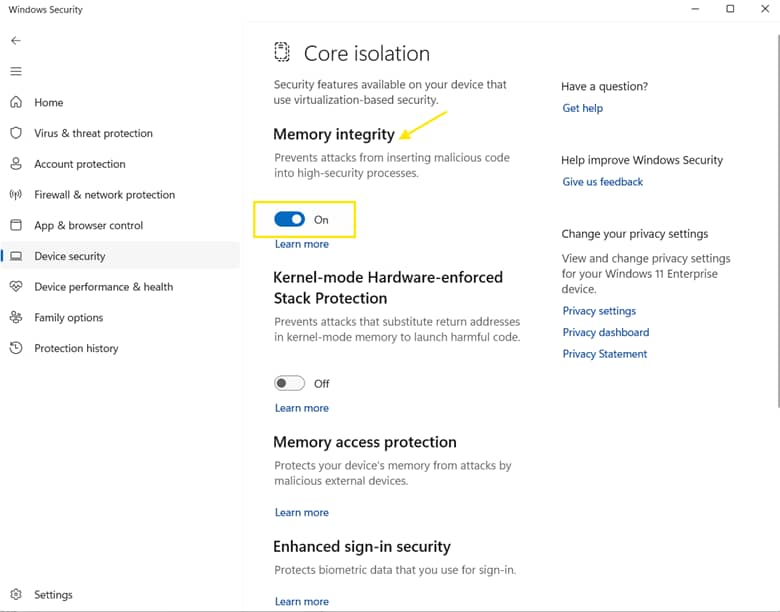
- Under the Core isolation section, click Core isolation details.

- Use the Memory Integrity toggle:
- Turn it On to enable the Microsoft Vulnerable Driver Blocklist.
- Turn it Off to disable the Microsoft Vulnerable Driver Blocklist.
- Restart your PC when prompted to apply changes.
⚠️ Caution: Disabling the blocklist allows drivers with known security flaws to run, potentially exposing your system to malware. Only disable it if you understand the risks and have a valid need (e.g., legacy hardware compatibility).
Method 2: Using PowerShell
Using PowerShell allows you to directly manage Defender settings, including the vulnerable driver blocklist. This method is ideal for scripting and confirming blocklist policy applications.
- Press Start and type PowerShell.
- In the search result, right-click Windows PowerShell and select Run as administrator.
Check blocklist status
- Run this command to check if the blocklist is enabled:
Get-MpPreference | Select-Object -ExpandProperty EnableVulnerableDriverBlocklist
Output interpretation
- True – The blocklist is enabled.
- False – The blocklist is disabled.
- Nothing/blank – It may be managed via Memory Integrity or another policy method.
Enable the Blocklist
- Run this command to turn on the Microsoft Vulnerable Driver Blocklist:
Set-MpPreference -EnableVulnerableDriverBlocklist $true
Disable the Blocklist
- Run this command to turn off the Microsoft Vulnerable Driver Blocklist:
Set-MpPreference -EnableVulnerableDriverBlocklist $false
- Restart your PC to apply changes.
Method 3: Using Group Policy (enterprise control)
This method is ideal for IT administrators managing Windows security across multiple endpoints. It requires Windows 11 Pro, Enterprise, or Education, and administrator privileges.
- Press Win + R to open the Run dialog box.
- Type gpedit.msc and click Enter to open the Group Policy Editor.
- Navigate to Computer Configuration > Administrative Templates > System > Device Guard.
- Double-click Turn On Virtualization Based Security.
- Set the policy to Enabled.
- Under Secure Boot Configuration, select:
- Secure Boot (provides basic protection) or
- Secure Boot with DMA Protection (recommended for maximum security)
- Under Virtualization-Based Protection of Code Integrity, choose:
- Enabled with UEFI Lock (prevents unauthorized changes)
- Enabled without Lock (allows modifications via Group Policy or Registry)
- Click Apply, then OK.
- Restart your PC to apply the changes.
These settings activate Hypervisor-Enforced Code Integrity (HVCI), which enforces the Microsoft Vulnerable Driver Blocklist (when supported) by blocking unsigned or known-vulnerable kernel-mode drivers.
Method 4: Using Registry Editor
This method is useful if you can’t access Group Policy or want to automate the setting across multiple systems using scripts.
⚠️ Warning: Editing the registry incorrectly can cause system instability. Always back up your registry or create a system restore point before making changes.
- Press Win + R to open the Run dialog box.
- Type regedit and click Enter to open the Registry Editor.
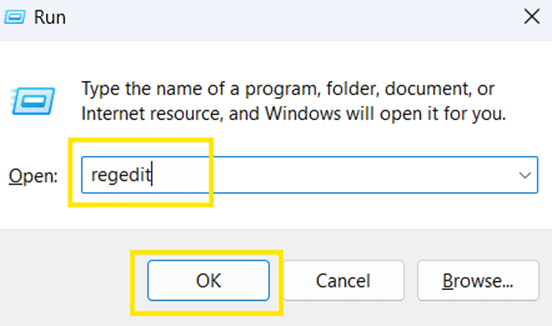
- Click Yes if prompted by User Account Control (UAC).
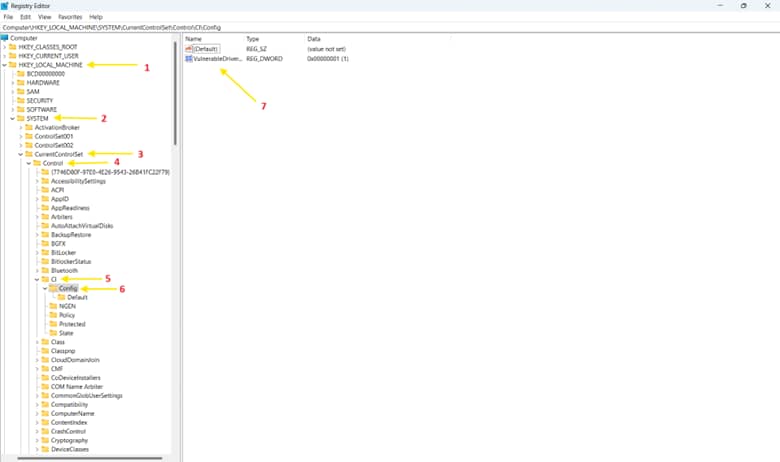
- Navigate to:
HKEY_LOCAL_MACHINE\SYSTEM\CurrentControlSet\Control\CI\Config
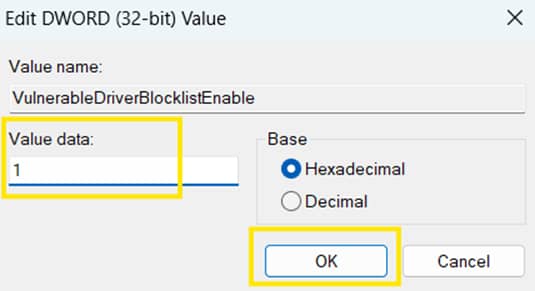
- In the right pane, create or modify a DWORD (32-bit) Value named:
- VulnerableDriverBlocklistEnable
- Set the value to one of the following:
- 1 = Turn on the Microsoft Vulnerable Driver Blocklist.
- 0 = Turn off the Microsoft Vulnerable Driver Blocklist.
- Click OK to save changes.
- Restart your PC to apply changes.
Important considerations about the Microsoft Vulnerable Driver Blocklist
Before enabling or disabling the Microsoft Vulnerable Driver Blocklist in Windows 11, it’s crucial to understand the broader implications. Here are key points to help ensure system stability and compatibility:
Driver compatibility
The blocklist is intended to prevent known vulnerable or risky drivers from running, even if they’re digitally signed. However, this protective measure can also unintentionally block unsigned or older drivers, especially those used by legacy software or hardware.
Before enabling the blocklist, it’s recommended that you test all critical applications and drivers to ensure they work as expected.
Smart App Control (SAC)
Smart App Control (SAC) is a security feature in Windows 11 that blocks untrusted or unsigned applications and drivers. When SAC is set to Evaluation or Enforced mode, it may activate the vulnerable driver blocklist if it determines that the system is compatible and secure enough to enforce the policy.
If SAC prevents a trusted driver from loading, you may need to temporarily disable SAC or whitelist the driver using Windows Defender Application Control (WDAC).
Event logging
When the system blocks a driver, Windows logs the event for troubleshooting purposes. To review blocked attempts:
- Press Win + S to open the Search.
- Search for Event Viewer and press Enter once found.
- In the Event Viewer window, click Windows Logs > System.
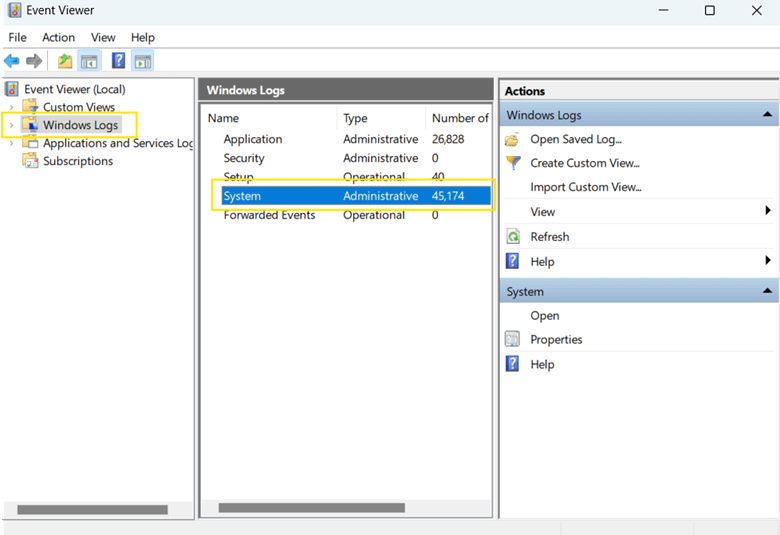
- Look for Event ID 3023 or 3033.
These logs help you pinpoint and investigate blocked drivers, especially when diagnosing device or application issues.
Custom policies
Enterprises using Windows Defender Application Control (WDAC) can define custom driver policies to align with their operational requirements.
These custom policies can extend or supplement the Microsoft Vulnerable Driver Blocklist with additional drivers to block. They can also allow drivers that are blocked by default if they’re business-critical and have been vetted.
Centrally manage the Microsoft Vulnerable Driver Blocklist at scale.
Manage the Microsoft Vulnerable Driver Blocklist to balance security and compatibility
The Microsoft Vulnerable Driver Blocklist helps secure Windows 11 systems against driver-based vulnerabilities. Depending on your environment and administrative needs, it can be managed through Windows Security, Group Policy, Registry, or PowerShell. When deploying this feature, it’s important to balance security with driver compatibility.
You can review entries in the system log via Event Viewer to assess the impact of blocked drivers or diagnose related issues. Lastly, always proceed with caution when making system-level changes. Creating a system backup or restore point beforehand is strongly recommended to prevent potential issues.
Quick-Start Guide
Here’s how to handle the Microsoft Vulnerable Driver Blocklist in Windows 11:
Overview
The Microsoft Vulnerable Driver Blocklist is a security feature in Windows 11 that helps protect your system from potentially harmful drivers.
Key Points
– The option to enable/disable the blocklist may be grayed out under certain conditions:
1. When Hypervisor-Protected Code Integrity (HVCI) is enabled
2. When Smart App Control is active
3. When the device is in S mode
Methods to Enable/Disable
Method 1: Windows Security App
1. Open Windows Security
2. Go to Device Security
3. Navigate to Core Isolation
4. Look for the Microsoft Vulnerable Driver Blocklist option
Method 2: PowerShell
– To disable: Set-MpPreference -EnableVulnerableDriverBlocklist $false
– To enable: Set-MpPreference -EnableVulnerableDriverBlocklist $true
Method 3: Registry (If Other Methods Don’t Work)
– You may need to modify registry settings, but this should be done cautiously
Troubleshooting
– If the option is grayed out, you may need to:
– Disable HVCI
– Turn off Smart App Control
– Exit S mode
– Restart your computer after making changes
NinjaOne Specific Notes
– NinjaOne supports Windows 11 and its security features
– You can manage driver and security settings through NinjaOne’s policy management
Caution
Disabling the Vulnerable Driver Blocklist can potentially expose your system to security risks. Only disable it if you have a specific, legitimate reason and understand the implications.


