

Have you ever closed Microsoft Edge after finishing a task, expecting data persistence on your next session, only to find out that all your previous tabs are gone? Although this setting can be seen as a nuisance when it comes to workflows that reuse login and session data, it’s essential for enforcing data hygiene on shared systems or public devices, such as library kiosks.
You can automatically clear browsing data when Microsoft Edge closes by setting which data to delete. This is one of the key privacy features of Microsoft Edge, along with others like tracking prevention, private browsing, and DNS encryption.
This guide will walk you through different methods for automatically clearing browsing data upon closing Microsoft Edge. We’ll also look into other considerations when implementing this as an enterprise-level change to help match end-user browsing session privacy with your organization’s compliance requirements.
Methods to automatically clear browsing data when closing Edge
Before proceeding to configure which browser data to clear in Edge, ensure that you have the following prerequisites for a smooth and consistent implementation or deployment:
- Administrator privileges. End users can set which browsing data is cleared directly within Microsoft Edge without needing elevated permissions. However, you’ll need access to an administrator account when making device level changes via Group Policy and Registry Editor.
- Microsoft Edge installation. Ensure you have the appropriate Microsoft Edge version installed on your system. To verify if you have the correct Chromium-based version installed, launch Microsoft Edge, click the three-dot menu in the upper-right corner, click Help and Feedback > About Microsoft Edge, and then check if your version is 79 or higher. For example, version 136.0.3240.92 is higher than 79, implying that this Edge version is Chromium-based.
- Group Policy. If you want to use Group Policy to implement your preferred browsing data behavior, you’ll need at least Windows 11 Pro, Enterprise, or Education editions.
- Edge ADMX templates. You’ll need the proper Edge ADMX policy files to configure this setting via Local Group Policy Editor.
If you don’t have the proper files, here’s how you get them:
-
- Open the Microsoft Edge Enterprise page.
- Scroll down and input the correct channel/version, build, and platform that reflects your installed Microsoft Edge.
- Press Get policy files, wait for the download to finish, and extract the files.
- Copy msedge.admx to C:\Windows\PolicyDefinitions\ and the msedge.adml file to the C:\Windows\PolicyDefinitions\en-US.
- Verify by opening the Local Group Policy Editor and going to Computer Configuration > Administrative Templates > Microsoft Edge.
- If you can do this, you have successfully installed the proper admx files.
Method 1: Enable or disable via Microsoft Edge Settings
This method is best suited for managing personal browsing data, as it only affects your user profile. Since the changes using this method are stored in the user’s profile folder, the setting will only apply as long as you’re signed in and will not persist for other users on the same system.
- Click the Windows Search Bar, type Microsoft Edge, and press Enter.
- On the upper-right corner, press the three-dot menu and click Settings.
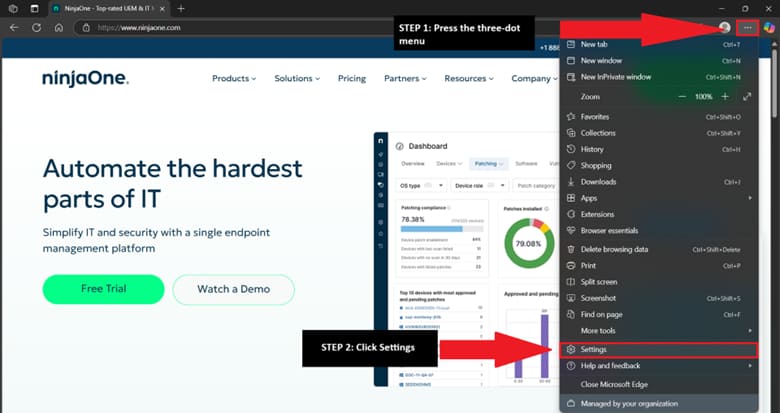 On the left pane, choose Privacy, search, and services, and then select Clear browsing data on the right.
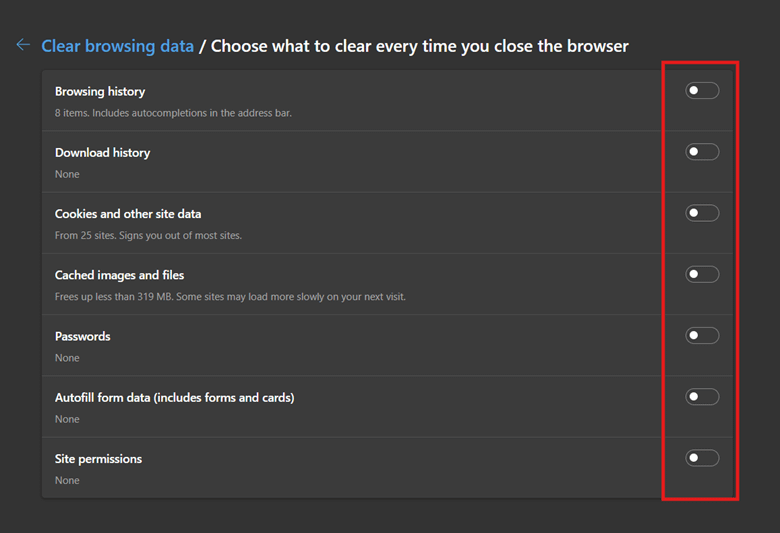
- Click Choose what to clear every time you close the browser.
- Toggle on or off which browser data to clear each time you close Microsoft Edge.
- Once you’re done configuring, close Microsoft Edge.
Method 2: Set which Edge browsing data to clear on close via Registry Editor
This method is ideal for implementing system-wide changes that apply to all users in a system. Additionally, it’s ideal to utilize the Registry Editor when configuring Microsoft Edge’s browsing data in Windows 11 Home since this version doesn’t have access to the Local Group Policy Editor.
⚠️ Caution: Making wrong changes to the Registry can break system functionality, so before proceeding, it’s recommended that you first back up your Windows registry settings for easy rollback in case things go wrong.
- Press Win + R, type regedit in the dialog box, and press Ctrl + Shift + Enter.
- Navigate to the following path: HKEY_LOCAL_MACHINE\SOFTWARE\Policies\Microsoft\Edge
If the key doesn’t exist, right-click Microsoft, select New > Key, and then name it Edge. - Double-click the ClearBrowsingDataOnExit DWORD if it exists inside the Edge key.
- If the DWORD doesn’t exist, right-click Edge and select New > DWORD (32-bit) value.
- Name it ClearBrowsingDataOnExit.
- Set the DWORD’s value data according to the browsing data behavior you want:
- Value = 1; Automatically clears browsing data upon closing Microsoft Edge.
- Value = 0; Allows data to persist even after closing Microsoft Edge.
- Press OK to set the DWORD’s value, then reboot your machine to apply the changes.
Method 3: Enforce browsing data clearing on close via Local Group Policy Editor
Thanks to its inclusion of Edge-specific Windows Administrative Template files (ADMX), it’s safer to modify which browsing data to clear upon closing Microsoft Edge via the Local Group Policy Editor. Additionally, it provides administrators with a way to enforce and lock the settings via Group Policy, preventing users from overriding them using Microsoft Edge.
- Press Win + R, type gpedit.msc, and simultaneously press Ctrl + Shift + Enter.
- Navigate the following path:
Computer Configuration > Administrative Templates > Microsoft Edge
📝 Note: You’ll need to have the proper Microsoft Edge ADMX templates to access the policies outlined below. - Inside Microsoft Edge, find the Clear browsing data when Microsoft Edge closes policy.
- Double-click the policy and set it to match the browsing data persistence you want:
- Set it to Enabled: This clears browsing data when Microsoft Edge closes.
- To undo this change, set the policy to Disabled or Not Configured.
- Optionally, configure the following policies to match the behavior you prefer:
Policy Description Enable deleting browser and download history It deletes browser and download history, but can be left unconfigured once the Clear browsing data when Microsoft Edge closes is enabled. This policy is located within Configuration > Administrative Templates > Microsoft Edge. Clear cached images and Files when Microsoft Edge closes Removes the cached images and files that make web browsing faster. It can be left unconfigured once Clear browsing data when Microsoft Edge closes is enabled. Save cookies when Microsoft Edge closes This setting can work hand-in-hand with Clear browsing data when Microsoft Edge closes, allowing cookies to be retained upon browser exit. Prevent passwords from being deleted if any Edge settings is enabled to delete browsing data when Microsoft Edge closes To prevent the removal of passwords after closing Microsoft Edge, enable this policy. You can find this setting via Computer Administration > Administrative Templates > Microsoft Edge > Password manager and protection.
- Once done, press Apply and then OK.
- Alternatively, you can open an elevated PowerShell and enter the following: gpupdate /force
- The command above expedites the policy application process, eliminating the need to wait for the GPE’s usual automatic refresh cycle.
- Restart Microsoft Edge to ensure the policy applies properly.
🥷 Quick tip: Although this method is only intended for a local machine, you can use the Group Policy Management Console (GPMC) to deploy this change as a new Group Policy Object (GPO) for an Organizational Unit (OU) you’re managing, when your computers are joined to a domain.
Additional considerations for enterprise-level deployments
User-level control
When managing an environment that requires specific browsing data policies for maintaining privacy and security, endpoints must handle browsing data uniformly. By configuring how Microsoft Edge handles data when it closes via Group Policy, administrators can disable GUI-based toggles available in Windows Settings. This prevents an organization’s browsing data policies from being overridden on a user level.
Selective deletion of browsing data
Aside from toggling the deletion of browsing data on Microsoft Edge’s close, administrators can also leverage Group Policy to customize which browsing data is removed. Matching clear browsing data when Microsoft Edge closes with other policies helps administrators have more granular control over which browsing data persists and gets deleted after a session.
Kiosk and shared devices
In environments like shared devices and kiosks, it’s a given that multiple users will use the same device, exposing their personal information and data if no data-clearing policy is enabled on the shared device. To help protect user information, shared devices and public kiosks should have all browsing data removed after every session.
Use of roaming profiles
Some environments allow for the use of roaming profiles, allowing their end user’s preferred settings to persist on every session within domain-controlled devices. Instead of enforcing browser data purging on a system level, administrators can allow end users to manage their browsing data. Additionally, administrators can also opt to integrate browsing data deletion on specific user accounts that don’t need to retain browsing data by combining browsing data wipe policies with roaming profiles, ensuring consistent privacy across users in an environment.
Improve data privacy by clearing browser data when closing Edge
By managing how Microsoft Edge handles browser data when it closes, administrators can help organizations balance data privacy and compliance within their environment. Additionally, this setting can also be customized per user to match their workflow needs, allowing better flexibility when managing browsing data.
Configuring this setting via Windows Settings allows browser data management on a per-user basis, but this won’t persist across different user accounts on a device. To apply your browser data management configurations on a device level, you can utilize the Registry Editor, especially when you want to deploy this method as a script for non-GPO environments.
The best method for enforcing and locking this setting for users is to leverage the Local Group Policy Editor, which can be deployed as a GPO for a domain-controlled environment. When applied as a GPO, it ensures that these settings are consistently applied across all devices and user accounts within a domain.


