

The Windows Master Control Panel shortcut, or “God Mode,” as the blogging community calls it, is one of the most effective ways to manage a personal device or a network of PCs.
Ironically, a Control Panel God Mode in Windows 10 shortcut looks unsuspecting at first glance, even as it provides quick access to critical administrative tools. It’s also not something an average user would look for in their free time, so if you’re here, you most likely appreciate this feature’s usefulness and are interested in learning more.
💡If you prefer to watch instead of read, check out our video on How to Create a Control Panel All Tasks Shortcut in Windows 10
Creating the “All Tasks” (God Mode) shortcut
Is God Mode for Windows real? Well, if you’re willing to put in some light work, then you can set it up using two easy methods:
✔️ Creating a special folder
✔️ Creating a desktop shortcut
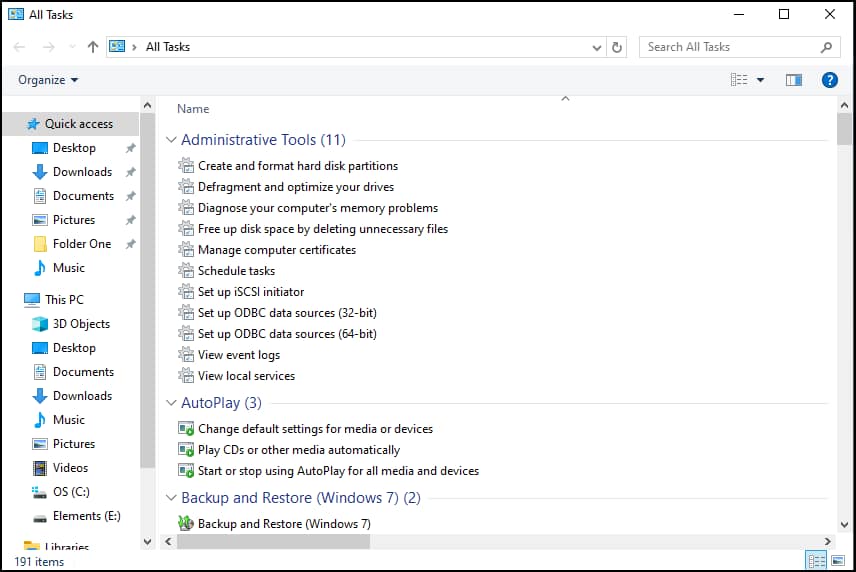
So, what does “God Mode” do on Windows? The God Mode folder essentially consolidates nearly 200 settings in one control panel.
That sounds a lot like NinjaOne RMM software, but in the meantime, this Control Panel All-Tasks shortcut in Windows 10 is enough to simplify workflow—or for amusement, why not?
Option 1: Creating a special folder (Recommended)
- Right-click on your desktop, then tap on New → Folder.
- Use this file name:
- Control Panel All Tasks.{ED7BA470-8E54-465E-825C-99712043E01C}
- Press Enter to confirm.
🥷 Tip: The icon will change upon pressing Enter, and its name will disappear from the GUI.
You can pin this folder to Start, Quick Access, Quick Launch, or wherever you find it safest or most convenient.
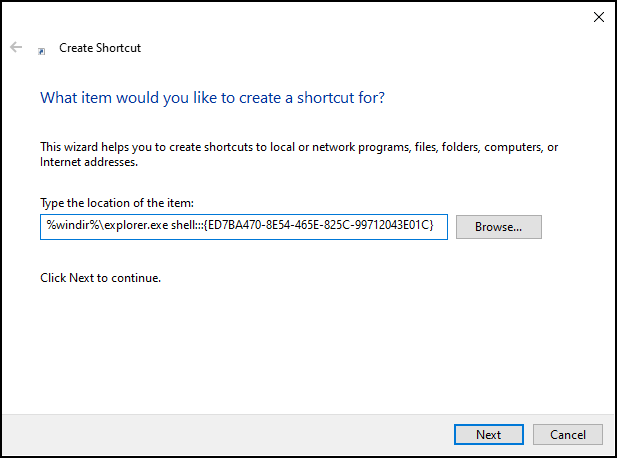
Option 2: Creating a desktop shortcut
- Right-click on your desktop, then tap on New → Shortcut.
- Copy and paste the address below into the Create Shortcut pop-up window:
- %windir%\explorer.exe shell:::{ED7BA470-8E54-465E-825C-99712043E01C}
- Tap Next and set the name of the shortcut.
- Finally, click on Finish to create the new shortcut.
Control Panel All Tasks alternative methods
Method 1: Using File Explorer navigation
If you don’t want a shortcut to the Control Panel All Tasks folder lying around the Desktop, consider opening it manually via File Explorer.
- Open File Explorer and enter or paste in the address bar:
- shell:::{ED7BA470-8E54-465E-825C-99712043E01C}
- Tap Enter to view the All Tasks folder.
Method 2: Pinning the shortcut to Start or Taskbar
If you enable the shortcut, you can pin it to the Start menu or Quick Access to keep it within reach. To do this, just right-click the shortcut and select Pin to Start or Pin to Quick Access.
Troubleshooting Control Panel All Tasks shortcut
Issue: Shortcut not working
Check if the folder name or shortcut command input is correct. If you use a command-line tool to create the folder, ensure it’s an elevated Command Prompt.
Issue: Missing settings in “All Tasks”
If your device is part of a networked or managed environment, some options may be hidden due to user policies and access restrictions. If you notice more missing options, try updating to the latest Windows version.
Control Panel All Tasks (God Mode) FAQs
Will enabling “God Mode” harm my system?
Setting up God Mode will not harm your PC or limit its performance.
However, the setup is more suited for IT administrators and advanced users who are somewhat familiar with the settings within the master list. After all, most end users will have no practical use for most of these configurations.
Does this work on Windows 11?
Yes. The methods used in this guide will work on a Windows 11 device.
Can I delete the shortcut after creating it?
Yes. You can safely delete the folder or shortcut if it’s no longer needed.
Summing up the Control Panel All Tasks shortcut
Control Panel All Tasks or God Mode is a great utility tool with a very straightforward purpose. It sounds a bit intimidating, but it’s quite easy to set up or revert if you no longer need the shortcut.
With that said, we only recommend it for users who have an advanced understanding of Windows or practical use for this arrangement. Making this change for an untrained user may lead to unwanted changes that can compromise or expose the system to vulnerabilities.


