

In Windows 11, the user account display name is the name shown on the sign-in screen, Start menu, and various system settings. This differs from your username, which is used for login purposes and file paths. Changing the display name can help with personalization, maintain naming consistency across shared or work devices, or correct naming errors. The process for changing it depends on the type of account you’re using, whether you’re using a Microsoft or a local account.
One thing to remember is that changing the display name doesn’t affect your user profile folder or your login credentials. This guide will walk you through the different methods to change the display name in Windows 11 based on your account type and Windows edition.
How to change the user display name in Windows 11
Before proceeding with the methods, here are a few essential points to consider:
- Ensure you have administrative privileges on the system, as changing display names requires elevated access.
- Identify whether the account is a Microsoft or local account since the steps vary depending on the type.
- While changing the display name is generally safe, it’s advisable to back up any important data before making system changes.
Method 1: Using Netplwiz (GUI)
This method is ideal for users who prefer a simple visual interface.
Note: This applies only to local accounts.
- Press Win + R to open the Run dialog box.
- Type netplwiz and click Enter to open the User Accounts.
- In the Users tab, select the account whose display name you wish to change.
- Click Properties.
- In the General tab, enter the new display name in the Full name field.
- Tap OK to apply changes.
- Sign out and back in to see the updated display name.
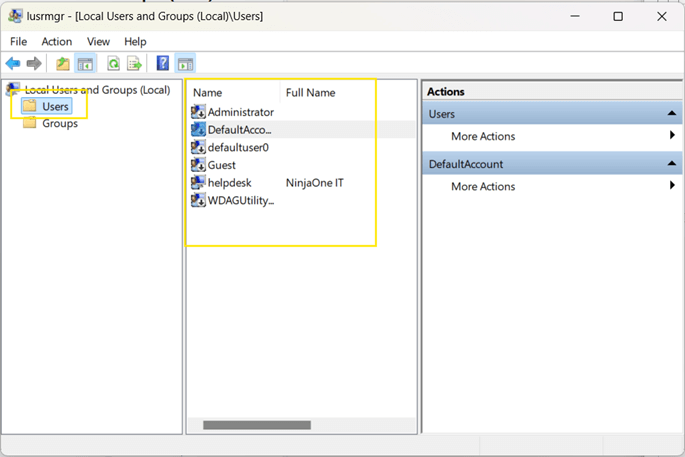
Method 2: Using Local Users and Groups (GUI)
This approach offers more administrative control and is great for managing multiple users or advanced settings.
Note: This method is available only in Windows 11 Pro, Enterprise, and Education editions.
- Press Win + R to open the Run dialog box.

- Type lusrmgr.msc and click Enter to open the Local Users and Groups.
- In the left pane, click on Users under Local Users and Groups.
- In the middle pane, double-click on the account whose display name you want to change.
- In the General tab, go to the Full name field.
- Enter the new display name you want to use.
- Click OK to apply the changes.
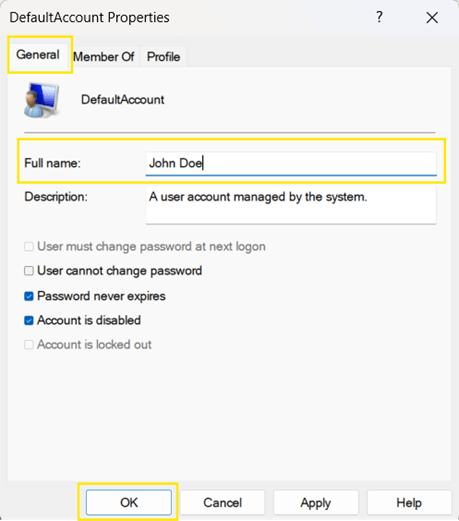
- Sign out and back in to see the updated display name.
Method 3: Using Command Prompt (CMD)
This method is quick and scriptable, ideal for power users and IT professionals.
Note: Works with local accounts only and must be run as an administrator.
- Press Win + S to open the search bar.
- Type cmd and right-click Command Prompt from the search results.
- Select Run as administrator.
- To check current user accounts and their full names, run the following command:
- wmic useraccount get name,fullname
- This will display a list of all local user accounts on your system.
- To change the display name, run the following command:
- wmic useraccount where name=”CurrentUsername” call rename “NewDisplayName”
- Replace CurrentUsername with the existing username and NewDisplayName with your desired display name.
- Restart your computer to apply the changes.
Method 4: Using PowerShell
This method provides a powerful way to manage display names, perfect for those comfortable with scripting or automating account changes.
Note: Works with local accounts only and must be run as an administrator.
- Press Win + S to open the search bar.
- Type powershell and right-click Windows PowerShell from the search results.
- Select Run as administrator.
- To check current user accounts, run the following command:
- Get-LocalUser
- This will display a list of all local user accounts on your system.
- To change the display name, run the following command:
- Rename-LocalUser -Name “CurrentUsername” -NewName “NewDisplayName”
- Replace CurrentUsername with the existing username and NewDisplayName with your desired display name.
- Sign out and back in, or restart your computer to see the updated display name.
Method 5: Using Microsoft Account settings (for Microsoft Accounts)
This is the only supported method for Microsoft accounts to change your display name. Changes made here will sync across all Microsoft services and devices linked to the account.
Note: Changes may take some time to propagate across all Microsoft services.
- Open a web browser and go to https://account.microsoft.com (Microsoft Account page)
- Sign in with your Microsoft account.
- Click on Your Info at the top of the page.
- Select Edit name under your current display name.
- Enter your desired first and last name.
- Complete the CAPTCHA and click Save.
- Sign out and back in to see the updated display name.
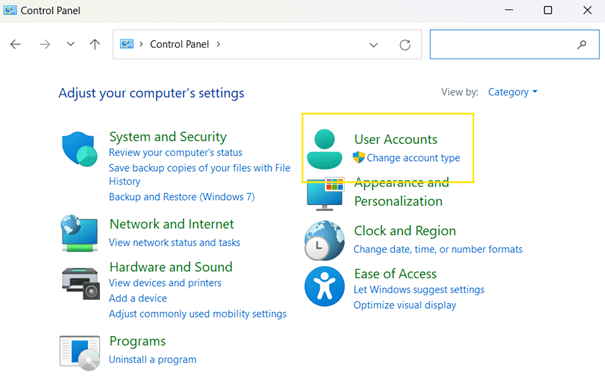
Method 6: Using Control Panel (for Local Account)
This legacy method is one of the most user-friendly options for casual users.
Note: This only applies to local accounts.
- Press Win + S to open the search bar.
- Type control panel and click Enter once found.
- Go to User Accounts > User Accounts.

- Select Change your account name.
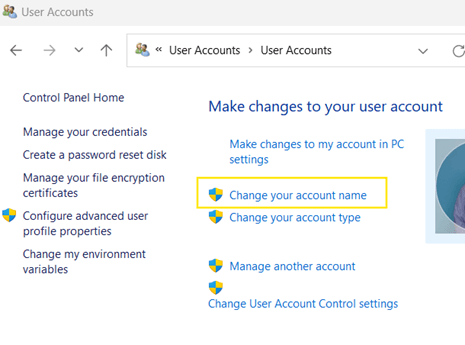
- Enter the new name you want to use.
- Click Change Name to save it.
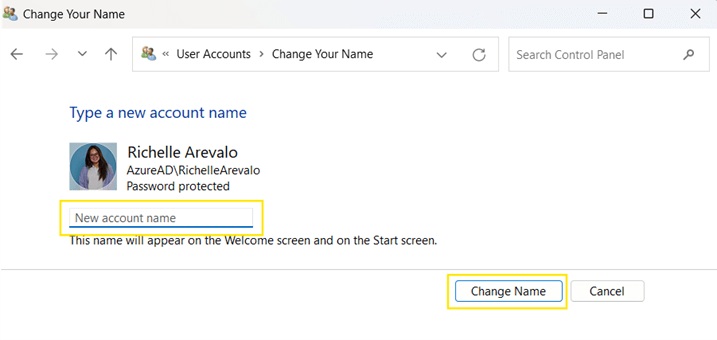
- Restart your computer to apply the changes.
Additional considerations when changing an account’s display name
Keep the following technical and administrative points in mind before changing a user’s display name in Windows 11:
User profile folder
Changing the display name does not rename the user’s profile folder located in C:\Users\. This folder is tied to the original username created during account setup. Renaming it requires additional steps, such as registry edits, account migration, or creating a new user account, which is beyond the scope of this guide.
Group Policy
There are no direct Group Policy settings for changing user display names. However, administrators can manage user accounts in domain environments and enforce naming conventions through scripts, provisioning tools, or account management policies.
System impact
Some systems may rely on consistent usernames or display names in enterprise environments for identification, permissions, or auditing. Before making changes, ensure that changing the display name doesn’t conflict with internal policies or software that relies on specific user naming conventions.
Change display name in Windows 11 safely and effectively
Changing the display name in Windows 11 is both easy and convenient, especially for users seeking personalization, improved privacy, or a more professional presentation, such as on shared or work devices. The method you use depends on your account type and Windows edition.
Tools like netplwiz, lusrmgr.msc, and the Control Panel provide direct ways to change display names for local accounts. For Microsoft accounts, you’ll need to update your name through the Microsoft Account website, where updates sync across devices. Moreover, Command Prompt and PowerShell offer script-based solutions for more advanced or automated changes.
Remember, the display name is different from the username, which Windows uses for file paths and sign-ins. Finally, in organizational environments, always make sure that changes align with IT policies and system dependencies to avoid disruptions.


