

The “Open with” context menu item lets users browse apps in the Microsoft Store for other compatible tools. While additional options can be beneficial, standardizing apps strengthens your security policy while removing a step from complex workflows.
This article explores advanced methods for turning the “Browse apps in the Microsoft Store” on or off, covers important questions, and lists the best deployment strategies.
Control when users look for an app in the Microsoft Store
These processes involve advanced tools that can modify important computer settings. Be mindful of your company’s technical constraints, scope, and contingencies when selecting a method below.
📌 Prerequisites:
- Windows 11 operating system
- Administrator privileges (For registry and GPO changes)
📌 Recommended deployment strategies:
Click to Choose a Method | 💻 Best for Individual Users | 💻💻💻 Best for Enterprises |
| Method 1: Registry Editor | ✓ | |
| Method 2: Command Prompt | ✓ | |
| Method 3: PowerShell | ✓ | ✓ |
| Method 4: Local Group Policy | ✓ | |
| Method 5: .reg file | ✓ |
Method 1: Using Registry Editor
Manage in-context menu items within a workstation by editing its registry.
⚠️ Important: This method only works on older builds. If your device is operating on Windows 11 build 25206 or later, these methods won’t work.
📌 Use Cases: Manually testing or applying per-user or system-wide UI changes.
Steps:
- Press Win + R, type regedit, and press Ctrl + Shift + Enter.
- Navigate to: HKLM\SOFTWARE\Policies\Microsoft\Windows\Explorer
- Look for the NoUseStoreOpenWith key.
- If you don’t see it, you can enable the “Browse apps in Microsoft Store” submenu by manually adding the key:
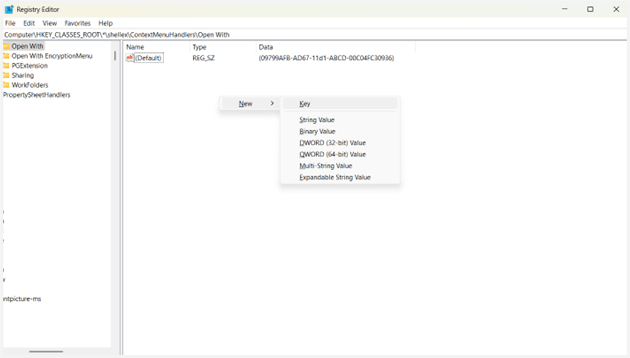
- Right-click Open With.
- Select New > Key
- Name it NoUseStoreOpenWith
- Press OK.
- If you don’t see it, you can enable the “Browse apps in Microsoft Store” submenu by manually adding the key:
- To disable the Microsoft Store lookup, delete NoUseStoreOpenWith.
- Close the Registry Editor.
- Restart Explorer to apply your changes.
- To verify, right-click a file to confirm the submenu update.
- If your changes aren’t reflecting, restart Explorer or log out and back in.
Method 2: Using Command Prompt
Apply registry changes through a lightweight command-line shell found on any Windows 11 edition.
⚠️ Important: This method only works on older builds. If your device is operating on Windows 11 build 25206 or later, these methods won’t work.
📌 Use Cases: Quick scripted changes or local batch file deployments.
Steps:
- Press Win + R, type cmd, and press Ctrl + Shift + Enter.
- To disable the “Open with” app store option, run the following:
reg add “HKLM\SOFTWARE\Policies\Microsoft\Windows\Explorer” /v NoUseStoreOpenWith /t REG_DWORD /d 1 /f - For per-user deactivation, run the following:
reg add “HKCU\SOFTWARE\Policies\Microsoft\Windows\Explorer” /v NoUseStoreOpenWith /t REG_DWORD /d 1 /f ⚠️ Important: This might not be respected by all builds.
- To enable the “Look for app in store” submenu, run the following:
reg delete “HKLM\SOFTWARE\Policies\Microsoft\Windows\Explorer” /v NoUseStoreOpenWith /f - For per-user deactivation, run the following:
reg delete “HKCU\SOFTWARE\Policies\Microsoft\Windows\Explorer” /v NoUseStoreOpenWith /f ⚠️ Important: This might not be respected by all builds.
- Restart Explorer to apply your changes.
Method 3: Using PowerShell
Leverage PowerShell’s integration with deployment tools to easily send out patches within your organization.
⚠️ Important: This method only works on older builds. If your device is operating on Windows 11 build 25206, these methods won’t work.
📌 Use Cases: Scripted automation across your enterprise.
Steps;
- Press Win + R, type powershell, and press Ctrl + Shift + Enter.
- To disable Microsoft Store search for an app in the store, run the following:
Set-ItemProperty -Path “HKLM:\SOFTWARE\Policies\Microsoft\Windows\Explorer” -Name “NoUseStoreOpenWith” -Value 1 -Type DWord - For per-user deactivation, run the following:
Set-ItemProperty -Path “HKCU:\SOFTWARE\Policies\Microsoft\Windows\Explorer” -Name “NoUseStoreOpenWith” -Value 1 -Type DWord ⚠️ Important: This might not be respected by all builds.
- To enable the “Browse apps in the Microsoft Store” submenu option:
Set-ItemProperty -Path “HKLM:\SOFTWARE\Policies\Microsoft\Windows\Explorer” -Name “NoUseStoreOpenWith” -Value 0 -Type DWord - For per-user activation, run the following:
Set-ItemProperty -Path “HKCU:\SOFTWARE\Policies\Microsoft\Windows\Explorer” -Name “NoUseStoreOpenWith” -Value 0 -Type DWord ⚠️ Important: This might not be respected by all builds.
- Verify removal or restoration by right-clicking a file.
- Restart Explorer to apply your changes.
Method 4: Using Local Group Policy
📌 Use Cases: Restrict “Open with” submenu accessibility on standalone workstations.
📌 Prerequisites: Windows 11 Pro and Enterprise editions
Steps:
- Press Win + R, type gpedit.msc, and press Ctrl + Shift + Enter.
- Navigate to: Computer Configuration > Administrative Templates > System > Internet Communication Management > Internet Communication settings
- In the right pane, double-click Turn off access to the Store.
- To allow users to browse apps in the Microsoft Store:
- Click Not configured.
- Click Apply, then OK.
- To disable the “Open with” app store option:
- Click Enabled.
- Click Apply, then OK.
Method 5: Using a .reg file
⚠️ Important: This method only works on older builds. If your device is operating on Windows 11 build 25206 or later, these methods won’t work.
📌 Use Cases: Deploy, create backups, or distribute registry changes via email, USB, and logon scripts.
Steps:
- Press Win + S, type Notepad, and press Enter.
- To remove a user’s ability to browse apps in the Microsoft Store from the “Open with” submenu, paste the following:
Windows Registry Editor Version 5.00 [HKEY_CURRENT_USER\Software\Policies\Microsoft\Windows\Explorer]
“NoUseStoreOpenWith”=-
[HKEY_LOCAL_MACHINE\SOFTWARE\Policies\Microsoft\Windows\Explorer]
“NoUseStoreOpenWith”=dword:00000001
- To enable the “Look for apps in the store” function, paste the following:
Windows Registry Editor Version 5.00 [HKEY_CURRENT_USER\Software\Policies\Microsoft\Windows\Explorer]
“NoUseStoreOpenWith”=-
[HKEY_LOCAL_MACHINE\SOFTWARE\Policies\Microsoft\Windows\Explorer]
“NoUseStoreOpenWith”=-
- Save it as .reg and name it appropriately (e.g., “SearchMSStoreOption_ON.reg”).
- Double-click on the file to merge it with the device’s registry.
- When prompted by User Account Control (UAC), click Yes, then OK.
⚠️ Things to look out for
| Risks | Potential Consequences | Reversals |
| The wrong registry key was deleted | Unpredictable/broken context menu | Restore via .reg backup file |
| Overwriting sanctioned file associations with PowerShell | Incorrect app launches | Run Remove-Item or Set-ItemProperty to correct |
| Domain GPOs conflict | Erratic context submenu | Reset policy settings or use the Group Policy Editor to revert changes |
🛑 | Standardize extension-specific apps for consistent stability.
Read NinjaOne’s guide about changing file associations here.
Important considerations for “Browse apps in Microsoft Store” functionality
Use these key points to optimize deployments and troubleshoot any potential roadblocks involving the “Open with” submenu.
System-wide changes
Remember that your registry changes cover all users who log into a specific device. This is because the key that you modify exists in the HKEY_CLASSES_ROOT hive, which stores file extension association data.
No ADMX
As of this writing, no documented ADMX setting exists for the “Browse apps in the Microsoft Store” context menu option. As such, Microsoft highly recommends using Group Policy Preferences.
Stability is preserved
StoreLookup isn’t as consequential as most registry keys, and deleting it only removes the store link from your context menu.
Refresh Explorer for quicker changes
If your changes weren’t applied immediately, reboot Explorer or log back in. Explorer controls GUI processes (including the “Open with” submenu), and refreshing it will have it check for any flags that were recently added or removed.
Login scripts
Deploy your changes via startup or login scripts for a hands-free experience that helps eliminate IT heartburn.
Manage “Browse apps in the Microsoft Store” to streamline the user experience
Adding or removing the “Browse apps in the Microsoft Store” option involves registry changes that can be scripted for automated deployment or GPO rollouts to domain-joined workstations.
Always exercise caution when modifying low-level settings, and consider recruiting best-of-class monitoring software that allows IT pros to manage multiple endpoints safely and remotely.
Related topics:
- How to Reset and Restore Default Apps for File Types in Windows 11
- How to Change File Associations in Windows 10 and 11
- How to Create a Desktop Shortcut of Microsoft Store Apps in Windows 11
- What Are App Execution Aliases and How to Manage Them in Windows
- Automating IT: A Script to Disable the Microsoft Store Across Your Network


