

Adaptive brightness in Windows 11 is a quality-of-life feature that adjusts screen brightness based on ambient lighting conditions (if supported by your device) or battery-saving settings. While handy, this feature could interfere with preferences, especially when performing tasks that require a certain amount of brightness, like video editing or watching.
As such, some users and enterprises would rather turn off the feature. This article will walk you through the different methods to enable or disable adaptive brightness and provide other useful information regarding the process.
Different ways to turn on or off adaptive brightness in Windows 11
There are numerous ways to turn adaptive brightness on or off. Depending on your needs, you can use GUI methods like navigating the Settings and Control Panel or Registry methods like editing the Registry Editor or using a PowerShell script to manage screen brightness.
📌 Prerequisites:
- Windows 11 (any edition)
- Compatible display and light sensor for sensor-based adaptive brightness
📌 Recommended deployment strategies:
| Click to Choose a Method | 💻 Best for Individual Users | 💻💻💻 Best for Enterprises |
| Method 1: Via the Settings | ✓ | |
| Method 2: Using the Control Panel | ✓ | |
| Method 3: Configure with the Registry Editor | ✓ | |
| Method 4: Use a PowerShell script | ✓ | |
| Method 5: Create and modify a .reg file | ✓ | ✓ |
| Method 6: Create and modify a .BAT file | ✓ | |
| Method 7: Navigate the Intel Graphics Control Panel | ✓ | |
| Method 8: Navigate the AMD Radeon settings | ✓ |
Method 1: Via the Settings
You can navigate to your device’s Settings and manually turn off adaptive brightness. This is the most straightforward method since you don’t need to copy lines of scripts or have administrator rights.
📌 Use Case: Individual users looking for an easy and straightforward way to enable or disable adaptive brightness.
- Open Settings by pressing the Windows key + I.
- Click on System on the navigation pane on the left, then Display on the content pane on the right.
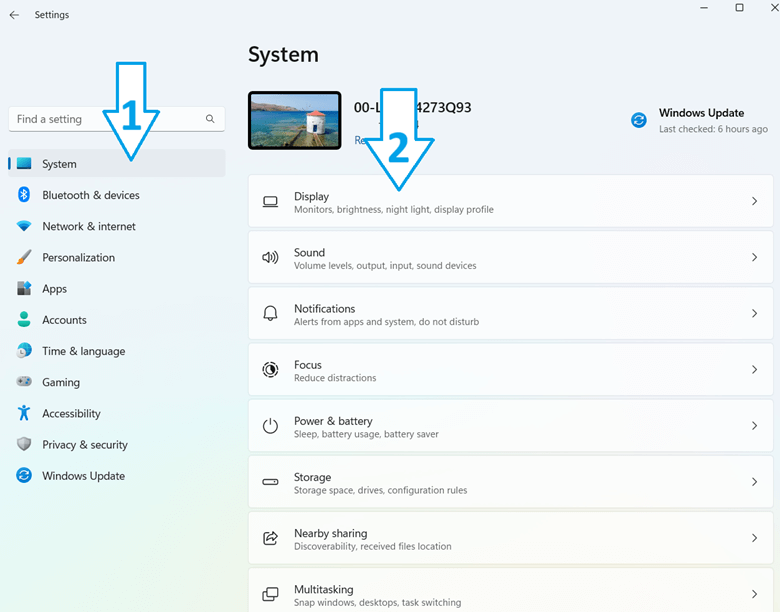
- Press Brightness to expand it.
- Check (turn on) or uncheck (turn off) Change brightness automatically when lighting changes, depending on your preference.
Method 2: Using the Control Panel
Using the Control Panel to enable or disable adaptive brightness is similar to method one. The main difference is that this method gives you more options for battery optimization.
📌 Use Cases: For IT admins who manage multiple power plans or needing fine-tuned control for battery optimization
- Press the Windows key, type Control Panel, and hit Enter.
- Click Hardware and Sound (ensure you’re viewing the Control Panel in Category mode), then Power Options.
- Select Change plan settings on the current power plan (it should be ticked), then press Change advanced power settings.
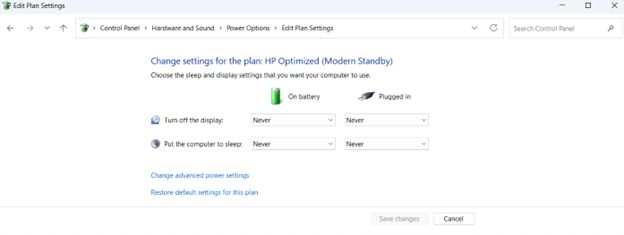
- Expand Display by clicking the plus button next to it, then press Enable adaptive brightness.
- Set values for On battery and Plugged in:
- On = Enable adaptive brightness
- Off = Disable adaptive brightness
- Click Apply, then OK.
💡Tip: On step three, you can modify other battery settings such as when to turn off display or put the computer to sleep.
⚠️ Warning: Make sure you’re following the steps properly to avoid power behavior issues. (For details, refer to Things to look out for.)
Method 3: Configure with the Registry Editor
Using the Registry Editor to enable or disable adaptive brightness is a little more advanced than the ones above, but it’s still home-user-friendly and lets you configure the registry for other users on the same device.
📌 Use Case: Individual users who want to enable or disable adaptive brightness for the entire computer, including other users
📌 Prerequisite: Administrator rights
- Press Win + R, type regedit, and press Enter
- Navigate to:
HKEY_LOCAL_MACHINE\SOFTWARE\Intel\Display\igfxcui\profiles\Media\Brighten Movie
(Or the corresponding OEM path if Intel/AMD/NVIDIA settings apply)
- Modify related ProcAmpBrightness or AdaptiveBrightness entries, or use:
HKEY_LOCAL_MACHINE\SOFTWARE\Microsoft\Windows\CurrentVersion\AutoBrightness
💡 Tip: You can copy and paste the path on the address bar to avoid clicking through folders. Doing it this way takes you straight to the BrightenMovie or AutoBrightness folder.
📌 Warning: Edit the correct key to avoid causing system-wide problems. (For details, refer to Things to look out for.)
Method 4: Use a PowerShell script
Using PowerShell to enable or disable adaptive brightness helps automate the deployment of your preferred configuration, ensuring consistency across different endpoints.
📌 Use Cases: IT administrators and enterprise environments where adaptive brightness settings need to be managed. This method also makes the registry change repeatable and scalable for deployment.
📌 Prerequisite: Administrator rights
- Press the Windows button, type PowerShell, right-click the app, and click Run as administrator.
- Copy and paste either of the commands below:
(a) Disable adaptive brightness (on all power modes):
powercfg /SETACVALUEINDEX SCHEME_CURRENT SUB_VIDEO ADAPTBRIGHTNESS 0
powercfg /SETDCVALUEINDEX SCHEME_CURRENT SUB_VIDEO ADAPTBRIGHTNESS 0
powercfg /SETACTIVE SCHEME_CURRENT
(b) Enable adaptive brightness:
powercfg /SETACVALUEINDEX SCHEME_CURRENT SUB_VIDEO ADAPTBRIGHTNESS 1
powercfg /SETDCVALUEINDEX SCHEME_CURRENT SUB_VIDEO ADAPTBRIGHTNESS 1
powercfg /SETACTIVE SCHEME_CURRENT
Method 5: Create and modify a .reg file
You can create and modify a .reg file to turn adaptive brightness on or off. This method lets you create your own toggle, so you won’t need to navigate the Settings or Control Panel or write scripts. IT administrators can also send the file to different endpoints, allowing users to independently turn adaptive brightness on or off.
📌 Use Case: IT admins looking to enforce registry changes but don’t have access to different endpoints.
- Press the Windows key, type Notepad, and tap Enter.
- Copy and paste the following into Notepad depending on your needs:
(a) To disable adaptive brightness
Windows Registry Editor Version 5.00
[HKEY_LOCAL_MACHINE\SOFTWARE\Microsoft\Windows\CurrentVersion\AutoBrightness]
"Enable"=dword:00000000
(b) To enable adaptive brightness
Windows Registry Editor Version 5.00
[HKEY_LOCAL_MACHINE\SOFTWARE\Microsoft\Windows\CurrentVersion\AutoBrightness]
"Enable"=dword:00000001
- Click File, then Save As.
- Set the file type to All Files, then name it disable_adaptive_brightness.reg and enable_adaptive_brightness.reg, depending on the file function.
- Click Save.
- Double-click the .reg file, then choose Yes.
⚠️ Warning: Copy and paste the codes properly to avoid system-wide issues. (For details, refer to Things to look out for)
Method 6: Create and modify a .BAT file
You can use a .BAT file to automate operations, such as file backups, system maintenance, software installation, etc. Of course, this also means you can use it to turn adaptive brightness on and off.
📌 Use Case: IT administrators who seek to automate and/or deploy the disabling and enabling of adaptive brightness
- Press the Windows key, type Notepad, and click Enter.
- Copy and paste the following into Notepad based on what you need:
(a) Turn on (on AC)
powercfg -setacvalueindex SCHEME_CURRENT 7516b95f-f776-4464-8c53-06167f40cc99 FBD9AA66-9553-4097-BA44-ED6E9D65EAB8 1
powercfg -SetActive SCHEME_CURRENT
(b) Turn on (on battery)
powercfg -setdcvalueindex SCHEME_CURRENT 7516b95f-f776-4464-8c53-06167f40cc99 FBD9AA66-9553-4097-BA44-ED6E9D65EAB8 1
powercfg -SetActive SCHEME_CURRENT
(c) Turn off (on AC)
powercfg -setacvalueindex SCHEME_CURRENT 7516b95f-f776-4464-8c53-06167f40cc99 FBD9AA66-9553-4097-BA44-ED6E9D65EAB8 0
powercfg -SetActive SCHEME_CURRENT
(d) Turn off (on battery)
powercfg -setdcvalueindex SCHEME_CURRENT 7516b95f-f776-4464-8c53-06167f40cc99 FBD9AA66-9553-4097-BA44-ED6E9D65EAB8 0
powercfg -SetActive SCHEME_CURRENT
- Click File, then Save As.
- Set the file type to All Files, then, depending on the function, name it:
- Turn_ON_Adaptive_brightness_on_AC.zip
- Turn_ON_Adaptive_brightness_on_battery.zip
- Turn_OFF_Adaptive_brightness_on_AC.zip
- Turn_OFF_Adaptive_brightness_on_battery.zip
- Right-click the file you want to use and press Extract All.
- Double-click the .BAT file to run it.
⚠️ Warning: Copy and paste the codes properly to avoid system-wide issues. (For details, refer to Things to look out for.)
Method 7: Navigate the Intel Graphics Control Panel
This method is only applicable if you have Intel graphics installed. Navigating Intel Graphics’ Control Panel also lets you change other settings, such as display, video, profile, and the like.
📌 Use Case: Integrated graphic users
📌 Prerequisite: Intel Graphics
- Open the Intel Graphics Control Panel by pressing the Windows key and searching for Intel Graphics Control Panel.
- Click on Power.
- Select On Battery or Plugged in, and select the plan to which you want to apply the change.
- Choose Enable or Disable under Display Power Saving Technology, then press Apply.
- Tap on Yes to confirm the change.
💡Tip: Press Yes immediately, since the changes will automatically revert after 15 seconds.
Method 8: Navigate the AMD Radeon settings
This method is only applicable if you have AMD graphics and drivers. Navigating AMD’s settings also lets you change other settings, such as display, video, hotkeys, and more.
📌 Use Case: AMD graphics users
📌 Prerequisite: AMD graphics and drivers
- Open AMD Radeon Settings by right-clicking on your desktop and selecting AMD Radeon Settings.
- Click on Display.
- Turn Vari-Bright On or Off.
- If you turned it on, adjust the slider to your desired brightness level.
💡 Tip: Choose the display number for which you want to change the brightness if you have multiple displays.
⚠️ Warning: This method could override changes made using methods one and six.
⚠️ Things to look out for when turning adaptive brightness on or off
| Risks | Potential Consequences | Reversals |
| Misconfiguring unrelated power settings | Misconfiguring unrelated power settings while navigating the Control Panel may lead to unintended power behavior affecting battery life. | To counteract this, you can restore the default settings in Power Options and re-try the method. |
| Editing incorrect key | Be careful when editing keys in the Registry Editor, since you could edit the incorrect one and cause a system-wide issue, or the brightness setting may not save. | It’s imperative to back up the .reg file by copying and pasting it before modification. |
| Incorrect .BAT and .reg codes | Copying and pasting incorrect .BAT and .reg file codes may result in system issues once you merge or run the files. | Copy the script correctly, or choose a different method if you’re uncomfortable doing this one. |
Information to keep in mind before turning adaptive brightness on or off
- Device Support: Adaptive brightness’s availability depends on light sensor hardware and driver support. Some devices won’t have the feature, so the methods above won’t work.
- Intel and AMD Control Panels: These methods may override Windows settings if vendor utilities are installed on the device.
Improve visibility consistency by managing adaptive brightness in Windows 11
Adaptive brightness is a useful feature that can quickly become exasperating once it interferes with brightness preferences. As such, some users turn the feature off entirely. There are different ways to turn off adaptive brightness, but the easiest is navigating the Display settings and toggling the feature there.
Do note that adaptive brightness is only available on devices with a compatible display or light sensor.
Related Topics:


