

The File Explorer’s Preview Pane allows you to glimpse at your files without having to open them. It makes your work much faster, but it can also risk exposing sensitive information or using resources unnecessarily.
Whether you need to enable it for efficiency, disable it for privacy or performance, or enforce a standard view across multiple PCs, managing this pane is essential. In this guide, you’ll learn simple ways to show or hide the Preview Pane using the mouse, keyboard shortcuts, or even the Registry for system-wide control.
Methods for managing the Preview Pane in File Explorer
Showing or hiding the Preview Pane in File Explorer is pretty straightforward, regardless of the methods you use below. All the approaches below apply to all Windows 11 editions.
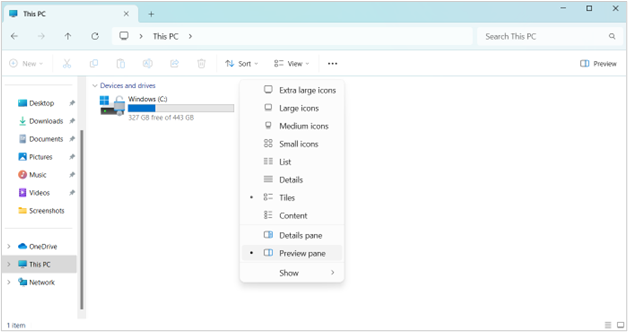
Method 1: Show or hide the Preview Pane via the File Explorer
This is the simplest way to toggle the Preview Pane directly within Windows 11’s interface.
- Press Win + E or click the folder icon in the taskbar to open File Explorer.
- Click the View tab.
- Find this tab in the top ribbon menu.
- If you don’t see it, maximize File Explorer’s window. The ribbon tends to collapse when the window is too narrow.
- Click the Preview pane in the selection.
- If there is a dot next to the option, it means that the Preview pane is enabled.
- This will show live previews of select files on the right side.
- If there is no dot next to the option, the Preview pane is disabled.
- The pane will be hidden immediately.
- When the pane is enabled, a button will show on the rightmost part of the ribbon menu that says Preview. You can click it to show the Preview Pane.
Method 2: Use the keyboard shortcut
The keyboard shortcut is another simple approach to showing or hiding the Preview Pane.
- Open File Explorer (press Win + E).
- Press Alt + P:
- First press: Shows the Preview Pane instantly (if hidden)
- Second press: Hides it immediately (if visible)
This is an instant control way to show or hide the Preview Pane.
Method 3: Modify the Preview Pane via Registry Editor
The registry method enforces Preview Pane settings across all user profiles or deployed systems. This approach requires administrator access, so make sure your current user account has this privilege. Here are two ways you can do this approach.
Important: Editing the registry incorrectly can cause system instability. Always back up before proceeding. Watch How to Back Up and Restore Windows Registry for details.
A. Via manual edit
- Press Win + R to open Run. Type regedit, and then tap Enter to open the Registry Editor.
- Go to this address key:
HKEY_CURRENT_USER\Software\Microsoft\Windows\CurrentVersion\Explorer\Advanced - Double-click the ShowPreviewHandlers DWORD to modify.
- If it does not exist, right-click an empty space in the pane, then select New > DWORD (32-bit) Value.
- Name the new value as ShowPreviewHandlers.
- In the value data, input 1 to enable preview handlers or 0 to disable them.
B. Export or import via .reg file
- Set a baseline system with the Preview Pane as desired (show or hide it using method 1 or method 2).
- Press Win + R to open Run, type regedit, then press Enter to open the Registry Editor.
- Go to this address key:
HKEY_CURRENT_USER\Software\Microsoft\Windows\CurrentVersion\Explorer\Modules\GlobalSettings - Right-click GlobalSettings > Export, then save as a .reg file (e.g., PreviewPane_Enabled.reg).
- Double-click the .reg file, then select Yes to merge.
- Restart File Explorer.
Method 4: Scripted toggle with PowerShell
This scripted approach enforces Preview Pane settings. Keep in mind that Microsoft doesn’t provide native PowerShell cmdlets for Preview Pane control, so recommend these workarounds.
Option 1: Registry import
- Create a .reg file (see method 3).
- Press Win + X, then select Terminal (Admin).
- Run this PowerShell script to deploy:
regedit.exe /s “C:\Path\to\PreviewPane_Enabled.reg“
Replace C:\Path\to\PreviewPane_Enabled.reg with the actual path to the .reg file. Then, run the next script to restart the File Explorer.
Stop-Process -Name explorer -Force; Start-Process explorer
Option 2: Keystroke simulation
- Click Start, then search and open the built-in Power Automate tool.
- On the left panel of the Power Automate window, click Flows > New Flow.
- Name your flow (e.g., Toggle Preview Pane), then click Create.
- A new window will open for the new Flow.
- In the Actions panel on the left, search for Run application.
- Drag the Run application action to the main workspace, then input the following:
- Application path: explorer.exe
- Command line arguments: <Leave it blank>.
- Working folder: <Leave it blank>.
- Window style: Select Normal
- After application launch: Select Wait for application to load
- Search for the Focus window in the Actions panel, then drag it to the main workspace. Configure the following:
- Window title: File Explorer
- Windows class: <Leave this blank>.
- Match exact title: Ensure this is checked.
- Search for Send keys in the Actions panel, then drag it as in the previous steps. Configure the following:
- Text to send: &p
- Click on Save, then select Run to execute the Flow.
- Optional: Run the program at startup:
- Open File Explorer, then type shell:setup in the address bar.
- Create a shortcut for your Flow, then move it to the Startup folder. Read Guide: How to Check and Manage Windows Startup Programs for more details.
Key considerations when modifying File Explorer’s preview pane
Here’s what every Windows 11 user should know to optimize the Preview Pane, whether enabling it for efficiency or disabling it for control.
Performance impact
The Preview Pane renders live content (images, videos, documents) on demand. On older PCs or in large folders, this can cause the File Explorer to lag when scrolling, high CPU/memory usage during previews, or delays loading thumbnails.
Use the methods above to disable the pane and regain responsiveness.
File Support & Missing Previews
The preview pane usually shows files like images (e.g., JPG, PNG), documents, and media. However, some file types will not be shown, like raw photos, code files, and specialized formats (e.g., .psd, .dwg).
Security and privacy
In some scenarios, it is recommended to disable this feature. For instance, in shared workstations, disabling it helps prevent accidental exposure of sensitive data. When on kiosks or display screens, you can use method 3 to disable it.
Folder template independence
The pane visibility setting applies across all folder views (e.g., Documents, Downloads). To override, open a folder, then select View > Options > Reset Folders.
Quick-Start Guide
NinjaOne offers various Windows management scripts that could potentially help with system configurations.
1. “Enable or Disable Show File Extensions” – Helps with File Explorer settings2. “Enable or Disable Show Hidden Files or Folders” – Another File Explorer configuration script
For the Preview Pane specifically, you might need to:
– Use Windows native settings– Create a custom registry script– Use Group Policy
Take control of your Preview Pane
The File Explorer Preview Pane is a powerful Windows 11 feature. Use it to boost efficiency or protect your privacy. Simple clicks, shortcuts, or scripts let you customize it for any need.
For quick changes, toggle it with View > Show > Preview Pane or press Alt + P in File Explorer. IT teams can enforce settings via registry edits or .reg files for consistency at scale.
In daily work, every second matters. Enable it to speed up file checks, disable it to secure sensitive data, or deploy it to minimize distractions. The choice is yours.


