

Dynamic lock is a feature in Windows 11 that locks a device when a Bluetooth-paired device, usually a smartphone, goes out of range. It allows users to protect sensitive data and reduce the risk of unwarranted access in shared environments.
Windows’ Dynamic lock feature offers system admins and IT professionals a straightforward and automated method of securing workstations. It’s pretty valuable for multi-user environments, like office spaces and remote work setups, where leaving devices unattended can be risky.
This guide will present several ways to enable or disable Dynamic lock. We will use several methods, including Windows Settings, the Registry Editor, Command Prompt, PowerShell, and Group Policy.
Ways to enable or disable Dynamic lock in Windows 11
📌 Prerequisites:
- These apply to all Windows 11 computers.
- You will need admin privileges for methods involving the Command Prompt, PowerShell, Registry Editor, and Group Policy.
- For the Dynamic lock to function correctly, you need a Bluetooth-enabled smartphone paired with a Windows 11 PC.
- Both devices must be discoverable via Bluetooth and be near one another.
📌 Recommended deployment strategies:
| Click to Choose a Method | 💻 Best for Individual Users | 💻💻💻 Best for Enterprises |
| Method 1: Windows Settings | ✓ | x |
| Method 2: Registry Editor | ✓ | ✓ |
| Method 3: Command Prompt | ✓ | ✓ |
| Method 4: PowerShell | ✓ | ✓ |
| Method 5: Group Policy Editor | x | ✓ |
Method 1: How to turn Dynamic lock on or off using Windows Settings
This is the fastest and easiest way to enable or disable Windows Dynamic lock. It uses Windows Settings and won’t require scripting or other advanced tools.
📌 Use Cases:
- This is best for individual and unmanaged devices, not for mass deployment.
- IT admins and power users can activate this prior to deployment to test it out.
- Suitable for laptops and tablets used in shared spaces.
📌 Prerequisite:
- Before performing this step, connect your device to your chosen Bluetooth smartphone.
Check out these steps to enable or disable Dynamic lock in Windows 11 using Settings:
- Open Settings by pressing the Win + I shortcut.
- Head to Accounts > Sign in options.
- Scroll down and locate Dynamic lock. Click on it to expand the options.
- To enable, select the checkbox for “Allow Windows to automatically lock your device when you’re away.” To disable, clear the checkbox.
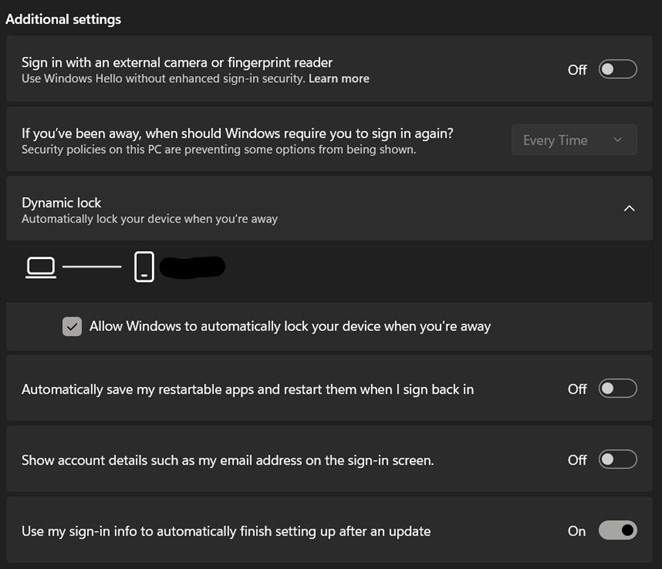
💡 Note: If the paired device goes out of range or disconnects, Windows will lock the screen after a short delay.
Method 2: How to use the Registry Editor to enable or disable Dynamic lock
Users can edit the registry to set Dynamic lock. This is crucial for environments where Group Policy is not available, or if you are planning to enforce the setting in a user account.
📌 Use Cases:
- Best for Windows 11 Home, an edition that lacks the Group Policy Editor.
- This is an excellent option for advanced users or IT admins who want to apply the settings manually or via script.
📌 Prerequisite:
- This method requires administrator privileges.
⚠️ Warning: This step involves editing the registry, which may have unintended consequences. It would be best to back up the registry beforehand before making changes.
Here’s how to use the Registry Editor to toggle Dynamic lock.
- Open the Registry Editor.
- Use the Win + R shortcut to open the Run dialog.
- Type regedit and press Enter.
- Navigate to this key:
HKEY_CURRENT_USER\Software\Microsoft\Windows NT\CurrentVersion\Winlogon - Next, double-click the EnableGoodbye key. If it doesn’t exist, create it via these steps:
- On the right-hand pane, right-click and select: New > DWORD (32-bit) Value.
- Name the value: EnableGoodbye.
- Set the EnableGoodbye key’s Value data (Decimal) to:
- 1 = This enables Dynamic lock
- 0 = This disables Dynamic lock
- Click OK, then close the Registry Editor
- Restart your computer for the changes to take effect.
Method 3: How to use Command Prompt to toggle Dynamic lock
This lets you enable or disable Dynamic lock by also editing the registry key. However, this time, you will do this via the Command Prompt.
📌 Use Cases:
- This method is excellent for quickly applying the setting across multiple computers.
- Excellent for IT admins planning to deploy this setting through batch scripts.
📌 Prerequisites:
- You need to possess administrator privileges.
- Group Policy settings should not override the registry behavior.
Here’s how to make tweaks to Dynamic lock using Command Prompt:
- Open Command Prompt (Administrator).
- Run this command if you want to enable Dynamic lock:
reg add"HKCU\Software\Microsoft\Windows NT\CurrentVersion\Winlogon"/v EnableGoodbye /t REG_DWORD /d1/f
- Meanwhile, to disable Dynamic lock, use this code:
reg add"HKCU\Software\Microsoft\Windows NT\CurrentVersion\Winlogon"/v EnableGoodbye /t REG_DWORD /d0/f
- Close the Command Prompt and restart your computer for the changes to take effect.
Method 4: Using PowerShell to enable or disable Dynamic lock
Like in Method 3, this method allows you to edit the Registry to make changes to the Dynamic lock settings. However, this uses PowerShell instead of Command Prompt.
📌 Use Cases:
- Ideal for login scripts, automatic deployment like in Intune, and tweaking settings remotely.
- Good for applying changes to a fleet of computers.
📌 Prerequisites:
- You need admin privileges to use an elevated version of PowerShell.
- Be sure no Group Policy settings override registry behavior.
Here’s how to activate and deactivate Dynamic lock using PowerShell:
- Open PowerShell (Administrator).
- Enable Dynamic lock using this command:
Set-ItemProperty -Path "HKCU:\Software\Microsoft\Windows NT\CurrentVersion\Winlogon" -Name "EnableGoodbye" -Value 1
- To disable it, run:
Set-ItemProperty -Path "HKCU:\Software\Microsoft\Windows NT\CurrentVersion\Winlogon" -Name "EnableGoodbye" -Value 0
Method 5: Configure Dynamic lock via Group Policy Editor
You can configure Dynamic lock using the Group Policy Editor for multiple devices, especially in enterprise environments.
📌 Use Cases:
- This method is excellent for enterprise and school environments that require strong security.
- Good for domain-joined systems managed through Active Directory.
- You can use this method if you plan to standardize Dynamic lock across a managed environment.
📌 Prerequisites:
- Your computer needs to run Windows 11 Pro, Enterprise, and Education editions. This isn’t available on the Home edition.
- This requires administrator privileges to execute.
Here’s how to use Group Policy to enable or disable Dynamic lock:
- Open the Group Policy Editor.
- Press Win + R to open the Run dialog.
- Type gpedit.msc, and press Enter.
- In the left pane, navigate to this path:
Computer Configuration > Administrative Templates > Windows Components > Windows Hello for Business - Next, in the right-hand pane, double-click Configure dynamic lock factors.
- In its policy settings window, configure Dynamic lock:
- Enabled = Dynamic lock is allowed and available to users
- Disabled = Dynamic lock is turned off and unavailable (grayed out) in Windows Settings.
- Not Configured = The system will follow the default behavior, leaving it to users to manually enable or disable Dynamic lock.
⚠️ Things to look out for
| Risks | Potential Consequences | Reversals |
| Incorrect Registry path and key | Dynamic lock won’t work, or incorrect changes might affect other settings. | Double-check the key or correct the entry. |
| The Bluetooth device is not paired. | Dynamic lock will fail to trigger when you step. | Pair the smartphone again via Settings > Bluetooth & devices. |
| Users having trouble with Dynamic lock | Users might fail to set it up or utilize it. | Be sure to provide tutorials and documentation to users, especially in managed environments, on how to set up and utilize Dynamic lock. |
Additional considerations when tweaking Dynamic lock
Turn on Bluetooth
For Dynamic lock to work, the Bluetooth device must be constantly connected and within range when in use. This means both the smartphone and the computer’s Bluetooth must always be on.
It should not replace standard security and authentication methods
Consider Dynamic lock as an additional way to secure your devices. In managed and enterprise environments, emphasize the need for strong passwords and authentication methods (like authenticator apps) to employees.
Test first, deploy later
Before deploying it, ensure you’ve tested how Dynamic lock works in Windows 11. Find out if it is compatible with your organization’s needs and won’t interfere with employee workflows.
Troubleshooting Dynamic lock issues
Dynamic lock isn’t working
Make sure the Bluetooth device is paired and connected to the Windows 11 PC. Also, verify that Bluetooth is enabled on both devices and that the device remains within range.
Registry changes are not applying
Be sure you have navigated to the correct path (HKEY_CURRENT_USER\Software\Microsoft\Windows NT\CurrentVersion\Winlogon) and entered the key (EnableGoodbye) correctly.
Also, make sure the value is set correctly. 1 enables it, and 0 disables it.
Tweaking Group Policy doesn’t work
If making changes via Group Policy does not work, you can fix it by forcing an update via the Command Prompt. Run this command to do so:
gpupdate /force
Enhancing device security with Dynamic lock
Dynamic lock is an excellent feature. It lets you secure various endpoints in a managed environment by adding another layer of protection to computers. By ensuring a device is locked when users step away, sensitive files and proprietary information will be protected. By using the abovementioned methods, IT admins can control this feature and align (or even enhance) organizational and business security requirements.
Related topics:


