

The Windows taskbar provides quick access to your most-used apps and tools, improving user efficiency and reducing navigation overhead. While Microsoft restricts direct pinning of some items (e.g., files, folders), there are reliable workarounds that let you go beyond standard app shortcuts.
In this guide, you’ll learn multiple ways to pin items to the taskbar in Windows, including how to add apps, files, folders, and websites.
Note: The methods in this guide apply to both Windows 10 and Windows 11. While the visual design and taskbar layout may differ slightly, the core steps and functionality for pinning apps, files, folders, and websites remain the same across both versions.
How to pin to the taskbar in Windows for quick access
Keep the following in mind before proceeding:
- Administrator rights are required for scripting or large-scale deployment.
- Pinning behavior may vary between consumer and enterprise builds.
- Websites must be opened in supported browsers (e.g., Edge or Chrome) to enable pinning.
- Some items must be converted into shortcuts for taskbar compatibility.
Method 1: Pin an app from the Start or Search GUI
This is the simplest and most user-friendly way to pin apps to the taskbar.
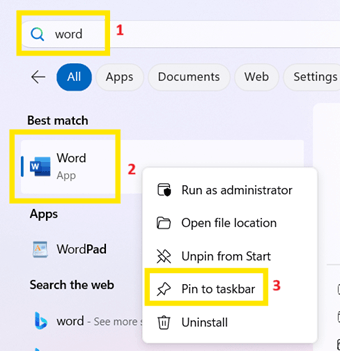
- Click the Start button or press the Windows key.
- Search for the app you want to pin.
- Right-click the app in the search results.
- Select Pin to taskbar to successfully pin the shortcut to the taskbar in Windows.

Alternative method
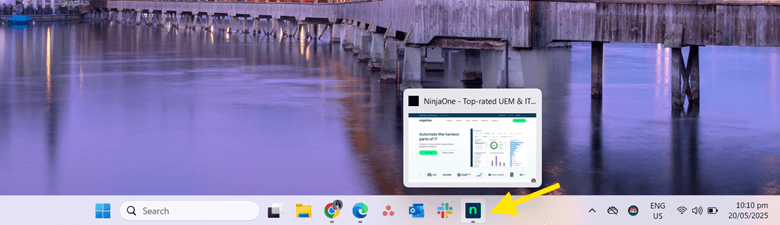
You can also pin apps while they’re open:
- Launch the app you want to pin.
- Right-click its icon on the taskbar.
- Select Pin to taskbar.

Method 2: Pin a website to the taskbar via Microsoft Edge
If you frequently visit a specific website, you can pin it directly to your taskbar for one-click access. Microsoft Edge makes this easy by turning websites into Progressive Web Apps (PWAs), allowing them to behave like standalone apps.
- Open Microsoft Edge.
- Go to the website you want to pin.
- Click the three-dot menu (•••) in the top-right corner.
- Hover over More tools > Pin to taskbar.

- A shortcut with the web icon will now be available on your taskbar.
Method 3: Pin a file, folder, or drive to the taskbar (via shortcut workaround)
Windows 11 doesn’t support direct taskbar pinning for files, folders, or drives, but there’s a workaround. You can create a custom shortcut that launches File Explorer and points to your target location.
- Right-click on your desktop and select New > Shortcut.
- In the location field, enter this format: explorer.exe “C:\Path\To\Your\Folder”
For example: explorer.exe C:\Users\YourName\Pictures - Click Next, name the shortcut, and click Finish.
- Right-click the new shortcut and choose Properties.
- Under the Shortcut tab, click Change icon.
- Select your desired folder icon, then click OK.
- Click Apply > OK.
- Right-click the new shortcut again, choose Show more options, then click Pin to taskbar.
Method 4: Use PowerShell to pin apps to the taskbar (scripted deployment)
PowerShell doesn’t provide a built-in command to pin apps to the taskbar for existing users. However, you can use a layout XML file with PowerShell to define a taskbar layout that applies to all new user accounts on the device.
This method is ideal for IT administrators, system admins, or anyone deploying standardized Windows environments.
Step 1: Pin apps for reference
- Click the Start button.
- Search for the app you want to pin.
- Right-click the app > More > Pin to taskbar.
- Repeat for each app you’d like to include in your layout.
This step helps you identify the shortcut names or AppUserModelIDs (AUMIDs) needed for your XML file.
Step 2: Get app shortcut paths or app IDs
For classic desktop apps:
- Press Win + R to open the Run Dialog box.
- Type %APPDATA%\Microsoft\Windows\Start Menu\Programs.
- Click Enter to open the Start Menu Programs folder in File Explorer.
- Locate the .lnk shortcut for the app. If the app is in a subfolder, open that folder.
- Right-click the file, then select Properties.
- Confirm the Type of file is Shortcut (.lnk)
- Copy the full name (e.g., Notepad.lnk)
For Microsoft Store (UWP) apps:
- Open PowerShell.
- Run: Get-StartApps
- Find your app and copy its AppUserModelID
For example: Microsoft.MicrosoftEdge_8wekyb3d8bbwe!MicrosoftEdge
Step 3: Create the XML File
- Press Win + S to open the Search.
- Type notepad and open the Notepad app.
- Paste the following XML code:
<LayoutModificationTemplate xmlns=”http://schemas.microsoft.com/Start/2014/LayoutModification”
xmlns:defaultlayout=”http://schemas.microsoft.com/Start/2014/FullDefaultLayout”
xmlns:taskbar=”http://schemas.microsoft.com/Start/2014/TaskbarLayout”
Version=”1″>
<CustomTaskbarLayoutCollection PinListPlacement=”Replace”>
<defaultlayout:TaskbarLayout>
<taskbar:TaskbarPinList>
<!– Classic desktop app example –>
<taskbar:DesktopApp DesktopApplicationLinkPath=”%APPDATA%\Microsoft\Windows\Start Menu\Programs\Notepad.lnk” />
<!– App in a subfolder –>
<taskbar:DesktopApp DesktopApplicationLinkPath=”%APPDATA%\Microsoft\Windows\Start Menu\Programs\Microsoft Office\Excel.lnk” />
<!– Microsoft Store (UWP) app –>
<taskbar:UWA AppUserModelID=”Microsoft.MicrosoftEdge_8wekyb3d8bbwe!MicrosoftEdge” />
</taskbar:TaskbarPinList>
</defaultlayout:TaskbarLayout>
</CustomTaskbarLayoutCollection>
</LayoutModificationTemplate>
- Click File > Save as.
- Set Save as Type to All Files.
- Name the file: TaskbarLayout.xml
- Save it to a known folder. For example: C:\Layout
Step 4: Apply the layout using PowerShell
- Press Win + S to open the Search.
- Type powershell, then right-click Windows PowerShell from the results.
- Select Run as administrator.
- In the PowerShell window, run this command: Import-StartLayout -LayoutPath “C:\Layouts\TaskbarLayout.xml” -MountPath $env:SystemDrive\
- Restart your PC to apply the changes.
Group Policy/MDM considerations for taskbar pinning
As mentioned, Windows 11 allows administrators to enforce a custom taskbar layout using a layout XML file. This can be done through Group Policy (GPO) or MDM tools, which are ideal for managing Windows 11 devices, especially in an enterprise or education environment.
Option 1: Enforcing taskbar pinning via Group Policy (GPO)
- Press Win + R to open the Run dialog box.
- Type gpedit.msc and click Enter to open the Local Group Policy Editor.
- Navigate to: User Configuration > Admin Templates > Start Menu and Taskbar
- Double-click the policy Start Layout.
- Set it to Enabled.
- In the Start Layout File field, enter the full network path to your XML layout file.
For example: \\SERVER\Share\TaskbarLayout.xml - Click OK to save.
Option 2: Enforcing taskbar pinning via Intune/MDM
For cloud-managed or hybrid environments, you can use any MDM solution that supports OMA-URI policies. Use the following settings:
- MDM setting: StartLayoutFile
- OMA-URI: ./Vendor/MSFT/Policy/Config/Start/StartLayoutFile
This is best used for large-scale, image-based deployments where consistency is required.
Additional considerations
When deploying a taskbar layout, a few important factors must be considered to ensure compatibility and control.
App compatibility
Universal Windows Platform (UWP) and traditional Win32 apps can be pinned to the taskbar, but their pinning behavior may differ.
- Win32 apps – These are classic desktop apps, such as Notepad and Microsoft Office, that are pinned using their .lnk (shortcuts) files.
- UWP apps – These are modern apps, such as Microsoft Edge and Mail, that must be pinned using their AppUserModelID.
User lockdown
Admins can also prevent users from modifying the pinned apps on the taskbar by combining AppLocker or Shell restrictions.
- AppLocker –Enables admins to create rules that allow or block specific apps from running.
- Shell restrictions – Lock down access to UI elements, like the desktop, Start menu, and taskbar, to prevent users from unpinning or adding items.
Edge vs. Chrome
Microsoft Edge and Google Chrome allow you to pin a website taskbar in Windows 11. While Microsoft Edge allows a direct Pin to Taskbar option, Google Chrome has a slightly different way:
- Open the website.
- Click the three-dot menu (⋮) in the top-right corner.
- Depending on your Chrome version:
Select More tools > Create Shortcut.
or
Select Cast, save, and share > Create Shortcut. - Check the box Open as window, then click Create.
The shortcut is now in the Start Menu and can be pinned to the taskbar. - Open the Start Menu.
- Search for the shortcut by name.
- Right-click the shortcut, then select Pin to taskbar.
Pin websites, folders, files, and apps to the Windows taskbar
Windows 11 provides flexible ways to customize the taskbar to suit your workflow. With proper tools and techniques, you can pin almost any resource, making it just as effective for personal setups as it is for organization-wide deployments.
Use explorer.exe shortcuts to pin folders and drives, and use Edge or Chrome to pin websites as taskbar apps. In enterprise or education settings, taskbar layouts can be deployed using JSON/XML and managed at scale using Group Policy or Intune. Always test your XML layout and shortcuts on a reference machine before rolling them out. This helps avoid broken pins, user confusion, and incomplete setups.


