

If you’re struggling to quickly access the hidden system folders, such as AppData, in Windows 11, learning how to use the shell apps folder command allows you to instantly navigate to critical locations, eliminating the hassle of browsing through multiple layers in File Explorer.
In this guide, we will help you learn practical techniques to leverage shell shortcuts to improve efficiency in your workflow.
📌 Skip to the recommended deployment strategies:
Click to Choose a Method | 💻 Best for Individual Users | 💻💻💻 Best for Enterprises |
| Method 1: Execute shell commands locally | ✓ | |
| Method 2: Create shortcuts using shell commands | ✓ | |
| Method 3: Automate with scripts or batch files | ✓ | |
| Method 4: Deploy shell command shortcuts via Group Policy | ✓ |
Understanding shell commands
Think of shell commands as secret passcodes to Windows 11’s most important folders. These simple shortcuts (shell:<FolderName>) instantly reveal system locations such as your Downloads, Documents, or hidden shell apps folders.
Shell commands can be used across Windows 11 tools, like the Run dialog (Win + R), File Explorer address bar, Desktop shortcuts, and Scripts.
For instance, typing commands like shell:Startup in Run helps you instantly access the startup folder to manage applications that launch automatically at boot, or shell:AppData to access your Roaming application data, making it perfect for troubleshooting app settings.
Common shell folder commands
Shell shortcuts turn complex folder paths into one-click destinations across Windows 11. Here are essential commands for daily use:
| Shell commands | Destination | Used for |
| 1. shell:Startup | User’s Startup folder | Adding/removing auto-launch apps |
| 2. shell:AppData | Roaming AppData folder | Backing up app settings (cloud-synced) |
| 3. shell:Local AppData | Local AppData folder | Clearing app caches or temp files |
| 4. shell:Downloads | Downloads folder | Quick access to recent files |
| 5. shell:Personal | Documents folder | Opening work files instantly |
| 6. shell:Desktop | User’s Desktop | Cleaning up desktop clutter |
| 7. shell:Fonts | Fonts directory | Installing/removing typefaces |
| 8. shell:SendTo | “Send To” menu items | Customizing right-click options |
| 9. shell:Recent | Recent file history | Finding recently edited documents |
| 10. shell:Programs | Start Menu Programs folder | Pinning apps to the Start Menu |
| 11. shell:My Pictures | User’s Pictures folder | Photo management |
| 12. shell:Common AppData | System-wide ProgramData folder (all users) | Sysadmins: deploying global settings |
How to use shell commands for folder shortcuts
As mentioned, these shell commands allow you to have a one-step navigation system across Windows 11’s most critical files, like buried folders in File Explorer.
📌 Use case: Using these commands makes it easier for the IT team to script mass deployments, fix user profiles faster, and have consistent paths in code. This also makes troubleshooting much easier, automates cleanups, and customizes user environments.
📌 Prerequisites: Shell commands work on all Windows 11 editions (Home/Pro/Enterprise). No admin rights are needed for local execution, like opening your shell apps folder, but deploying them via Group Policy requires administrator privileges. Experience with shortcuts, scripts, or GPO helps, but even beginners can start with simple commands immediately.
We recommend reviewing the ⚠️Things to look out for table below before proceeding.
Method 1: Execute shell commands locally
Need instant access to a system folder? Running shell commands locally is Windows 11’s fastest solution.
📌 Use case: This method is ideal for quick troubleshooting, like deleting corrupted app cache via shell: Local AppData, or quickly navigating to folders for one-time tasks.
- Press Win + R to open Run.
- Type your command (e.g., shell:Startup) as shown in the common shell commands table above.

- Press Enter, and the folder opens immediately.
💡 Note: Alternatively, you can use File Explorer (input command in the address bar) or Command Prompt/PowerShell (via start explorer shell:<FolderName>).
Method 2: Create shortcuts using shell commands
Transform frequently accessed folders into one-click desktop icons with permanent shell shortcuts.
📌 Use Cases: This method is ideal when you want to pin the shell commands on your taskbar for one-click navigation. It’s great for going to hidden folders, like AppData, without revealing its manual directory navigation. This is a useful element when you want to deploy standardized shortcuts via Group Policy (refer to Method 4).
- Right-click your desktop, then select New > Shortcut.

- In the location field, type: explorer shell:<FolderName> (e.g., explorer shell:AppData)
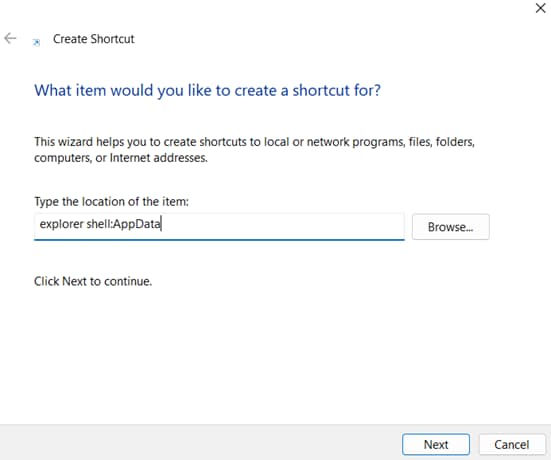
- Click Next, then name the shortcut (e.g., AppData Shortcut).
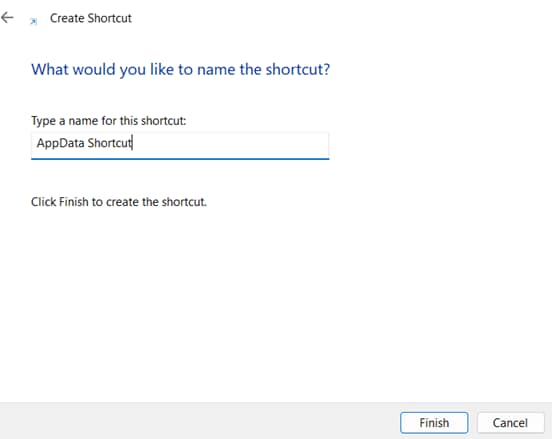
- Click Finish.
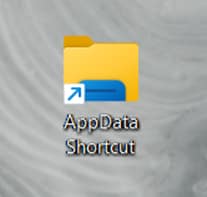
There should now be a folder shortcut that will immediately bring you to the file of your choosing.
Method 3: Automate with scripts or batch files
Embed shell commands in scripts to automate folder access across Windows 11 devices.
📌 Use Cases: This method is ideal when you are onboarding a new hire on their setups via the shell:Common AppData command. IT teams can also use this for maintenance by automating monthly cleanups, and distributing shell apps folder shortcuts via login scripts.
- Open Notepad (Search via the taskbar, then type Notepad).
- Write your script.
- For batch files (.bat):
@echo off
start explorer shell:Recent :: Recent files
start explorer shell:Startup :: Startup folder
timeout /t 5 :: Optional 5-second delay - For PowerShell (.ps1): Start-Process “explorer.exe” -ArgumentList “shell:Personal”
- For batch files (.bat):
- Save with the correct extension:
- Click File > Save As, then make sure the file type is set to All Files.
- Name the folder accordingly, such as <FileName>.bat (for batch) or <FileName>.ps1 (for PowerShell).
- Run securely:
- For batch: Double-click the .bat file.
- For PowerShell: Right-click the .ps1 file, then select Run with PowerShell.
- If blocked:
- Open PowerShell by pressing Win + X, then select Terminal (Admin).
- Run this command: Set-ExecutionPolicy RemoteSigned -Scope CurrentUser
- If blocked:
Method 4: Deploy shell command shortcuts via Group Policy
Scale shell shortcuts across your entire organization with Windows 11’s Group Policy for enterprise-grade consistency.
📌 Use Cases: This method is ideal for rolling out shell shortcuts to company-wide uniformity in devices, granting secure access to local AppData without exposing system paths, and updating numerous devices instantly.
💡 Note: This method requires Active Directory domain services and Windows 11 Pro/Enterprise.
- Press Win + R to open Run.
- Type gpmc.msc, then press Enter to open Group Policy Management.
- Navigate to User Configuration > Preferences > Windows Settings > Shortcuts.
- Right-click an empty area, then select New > Shortcut.
- Configure the following:
- Action: Create
- Target Type: File System Object
- Target Path: explorer shell:<Command>
- Location: Desktop or Start Menu
- Name: for example, Company <Shell Folder>
- Link the GPO to the relevant organizational units.
⚠️ Things to look out for
This section highlights potential challenges to keep in mind while following this guide.
Risks | Potential Consequences | Reversals |
| 1. Making typos in commands | Opens the incorrect folder or error dialog | Verify commands using shell:Quick Access test runs first. |
| 2. Accidentally deleting system files | App crashes or OS instability | Restore files from the Recycle Bin (shell:RecycleBinFolder) or use backups. |
| 3. GPO misconfiguration | Shortcuts are deployed to the wrong user groups | 1. Backup GPO registry keys (in the address: HKCU\Software\Microsoft\Windows\CurrentVersion\ 2. Unlink/recreate GPO with correct OU targeting. |
| 4. Wrong PowerShell execution risks | Malicious script execution | Set ExecutionPolicy to RemoteSigned (never Unrestricted). |
Troubleshooting shell commands for folder shortcuts
If the shell shortcuts encounter errors, here are fixes that you can do to resolve them quickly.
Invalid command errors
This issue usually happens when there are typos in the shell commands, language barriers (since these commands are English-only), or the command used has been removed (e.g., shell:Games has been removed since Windows 10).
To fix this, verify the correct spelling of the shell command via PowerShell:
| Get-ChildItem “HKLM:\SOFTWARE\Microsoft\Windows\CurrentVersion\Explorer\FolderDescriptions” | ForEach { $_.GetValue(“Name”) } |
You can also use fallback GUIDs like shell:::{645FF040-5081-101B-9F08-00AA002F954E}, which is the Recycle Bin. Checking for the correct letter case can also help; for instance, if SHELL:downloads fails, use shell:Downloads.
No response when executing the command
This happens when the target folder does not exist (possibly deleted or corrupted paths). It can also be caused by conflicts in File Explorer when its processes freeze.
To resolve this, you can force a folder creation via mkdir %userprofile%\Recent in Command Prompt (Admin). You can also create a .reg file with the code:
| Windows Registry Editor Version 5.00 [HKEY_CURRENT_USER\Software\Microsoft\Windows\CurrentVersion\Explorer\User Shell Folders] “Recent”=”%%USERPROFILE%%\\Recent” |
If the problem is in File Explorer, open Task Manager (Ctrl + Shift + Esc), then end Windows Explorer task > go to File > run a new task > select explorer.exe.
Access denied errors
These errors occur when the folder is admin-restricted (like shell:Common AppData), requiring you to use an elevated tool like Command Prompt (Admin), or you need to have administrative privileges to access it. If you experience them in an enterprise workstation, Group Policy may have blocked access to these folders.
For personal devices, users can run PowerShell (Admin) or Command Prompt (Admin), then retry the shell command there. If the cause is due to permissions, run:
icacls “your_folder_path” /reset /T
Enterprises can use Group Policy to configure this in Computer Configuration > Windows Settings > Security Settings.
Quick-Start Guide
NinjaOne provides several scripts that can help with creating shortcuts and managing shell folders:
1. Desktop Shortcut Creation:
- Create Desktop Shortcut – RDP: Creates RDP desktop shortcuts
- Create Desktop Shortcut – URL: Creates URL desktop shortcuts
- Create Desktop Shortcut – EXE: Creates desktop shortcuts for executable files
2. Shell and Folder Management Scripts:
- Set Desktop Wallpaper: Sets desktop wallpaper for users
- Set Lock Screen Wallpaper: Sets lock screen wallpaper
- Set Default Filetype Associations: Sets default applications for file extensions
- Enable or Disable Show File Extensions: Toggles file extension visibility
- Enable or Disable Show Hidden Files or Folders: Manages visibility of hidden files/folders
Instantly access critical folders with shell commands
Windows 11’s shell commands transform tedious folder navigation into instant access, whether you’re troubleshooting app settings or deploying enterprise-wide shortcuts. By utilizing the methods in this guide, you’ll make workflows more streamlined for all users.
Start implementing these shell folder commands to save hours of manual browsing and create more resilient Windows environments.
Related topics


