

If preferred, the mouse pointer in Windows can have a subtle drop shadow beneath the cursor. This enhances visibility and adds a polished, modern appearance. It also supports accessibility by making the pointer easier to locate, which is helpful for users with visual impairments. In enterprise settings, enabling the shadow helps maintain a consistent user experience across devices.
However, there are also valid reasons to disable the pointer shadow. Some users prefer a cleaner, more minimal interface without extra visual elements. Disabling it can also help reduce distractions or slightly optimize performance on older, low-spec, or virtual machines where every resource counts.
This guide will show you how to enable or disable mouse pointer shadow in Windows.
📌 Recommended deployment strategies:
Click to Choose a Method | 💻Best for Individual Users | 💻💻💻Best for Enterprises |
| Method 1: Enable or disable via Control Panel (Mouse Properties) | ✓ | |
| Method 2: Enable or disable via Performance Options | ✓ | |
| Method 3: Configure via Registry Editor | ✓ | |
| Method 4: Automate Mouse Pointer Shadow via PowerShell | ✓ |
Guide to managing the mouse pointer shadow in Windows
These methods apply to all editions of Windows 10 and Windows 11, with only minor differences in the user interface. Changes typically take effect immediately without requiring a reboot.
Method 1: Enable or disable via Control Panel (Mouse Properties)
📌 Use cases:
- You want a quick visual tweak with minimal steps.
- You’re managing your own device.
- You don’t need automation or scripting.
This is the most user-friendly method. It requires no administrative privileges and applies the change immediately to the current user session.
- Press Win + R to open the Run dialog box.
- Type main.cpl and click Enter to open the Mouse Properties.
- In the Mouse Properties window, click the Pointers tab.
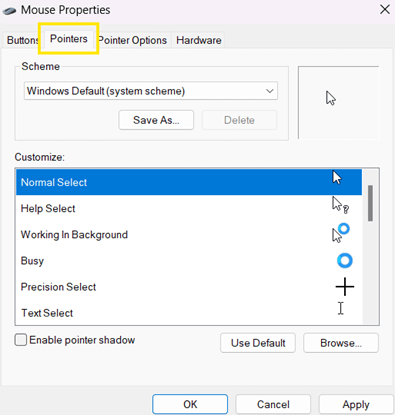
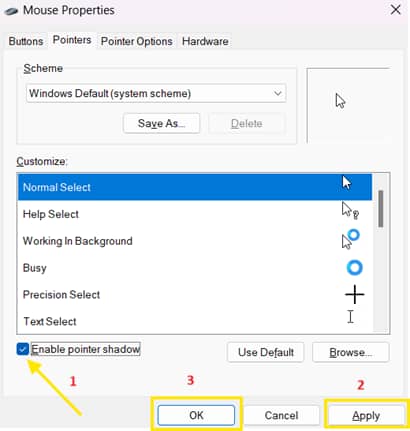
- Select or deselect the Enable pointer shadow checkbox based on your preference.
- To enable: Mark the checkbox.
- To disable: Unmark the checkbox.
- Click Apply, then OK.
Method 2: Enable or disable via Performance Options
📌 Use this when:
- You’re adjusting multiple visual effects at once.
- You’re optimizing for performance or minimalism.
- You’re already customizing animation and appearance settings.
This method allows you to manage visual effects more broadly.
- Press Win + R to open the Run dialog box.
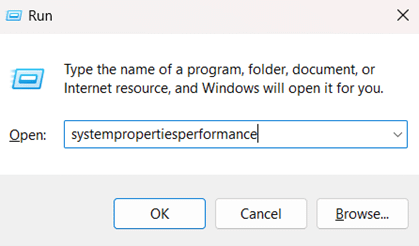
- Type SystemPropertiesPerformance and click Enter to open the Performance Options.
- Under the Visual Effects tab, see Show shadows under mouse pointer toggle.
- Select or deselect the checkbox based on your preference.
- To enable: Mark the checkbox.
- To disable: Unmark the checkbox.
- Click Apply, then OK.

Method 3: Configure via Registry Editor
📌 Use cases:
- You’re configuring the setting for users via login scripts or deployment tools.
- You need to enforce UI consistency across user sessions.
- You’re applying settings outside the GUI context.
This method offers granular control at the registry level. Administrator privileges may be required depending on policy enforcement.
⚠️ Warning: Editing the registry may cause serious system issues if done incorrectly. Always back up your registry or create a system restore point before making changes.
- Press Win + R to open the Run dialog box.
- Type regedit and click Enter to open the Registry Editor.
- Navigate to: HKEY_CURRENT_USER\Control Panel\Desktop
- Locate or create a String Value (REG_SZ) named PointerShadow.
- Double-click on it and set the value to:
- 1 – Enable shadow
- 2 – Disable shadow
[Refer to #1 in ⚠️ Things to look out for.]
- Sign out and back in or restart explorer.exe to apply the change.
Method 4: Automate the mouse pointer shadow via PowerShell
📌 Use this when:
- You’re configuring multiple systems or user profiles.
- You’re deploying settings via a script, GPO, or MDM.
- You need repeatable or remote execution.
This method is ideal for automation, remote deployment, or bulk configuration. It’s fast, scriptable, and suited to managed environments.
- Press Win + S to open Search.
- Type Powershell and right-click Windows PowerShell from the results.
- Select Run as administrator.
- Run one of the following commands based on your preference: [Refer to #2 in ⚠️ Things to look out for.]
Enable pointer shadow:
Set-ItemProperty -Path "HKCU:\Control Panel\Desktop" -Name "PointerShadow" -Value "1"
Stop-Process -Name explorer -Force
Disable pointer shadow:
Set-ItemProperty -Path "HKCU:\Control Panel\Desktop" -Name "PointerShadow" -Value "0"
Stop-Process -Name explorer -Force
⚠️ Things to look out for
Risks | Potential Consequences | Reversals |
| Editing the wrong registry key or value | The pointer shadow may not behave as expected, or other UI settings may be affected. | Correct or delete the PointerShadow value and restart explorer.exe, or sign out and in. |
| Mistyped PowerShell command or force-stopping the wrong process | Temporary UI disruption, failed script execution, or unresponsive desktop | Restart explorer.exe manually using Start-process explorer.exe or reboot the system. |
Additional considerations
Here are a few key considerations to keep in mind when managing mouse pointer shadow settings in Windows:
Per-user setting
The mouse pointer shadow setting is stored under the HKEY_CURRENT_USER (HKCU) registry hive, which applies individually to each user profile. Changes made by one user will not affect others on the same device, so this setting must be configured separately for each user account.
No GPO setting
Windows currently doesn’t offer a native Group Policy Object (GPO) setting for managing the mouse pointer shadow. Organizations looking to enforce this setting at scale should use deployment tools, PowerShell scripts, or direct registry changes within the user context.
Performance
Disabling the pointer shadow may offer slight performance improvements on older or low-spec systems. While the gain is minimal, turning off visual effects like this can help streamline performance, especially on machines with limited GPU acceleration or in virtual desktop environments.
Accessibility impact
The pointer shadow adds contrast beneath the cursor, helping it stand out against varying backgrounds. The shadow can be especially useful for users with visual impairments or on high-DPI displays, as it improves pointer discoverability and reduces eye strain during prolonged use.
Manage mouse pointer shadow in Windows for a tailored experience
Managing the mouse pointer shadow in Windows is a simple yet effective way to personalize the user experience or enforce consistency across systems. You can enable or disable it easily through the Mouse Properties GUI or automate the change using registry edits if managing multiple devices or user profiles.
If you choose to edit the registry, be sure to back it up or create a system restore point beforehand. Doing so ensures you can easily recover your system if anything goes wrong, keeping your customization process safe and stress-free.
Related topics:
- What Is WIMP (Windows, Icons, Menus, and Pointing Device)?
- How to Disable Touchpad When a Mouse is Connected in Windows 10
- How to Turn On or Off Mouse ClickLock in Windows
- How to Enable or Disable Mouse Pointer Indicator in Windows 11
- How to Change the Color of Mouse Cursor in Windows 11
Quick-Start Guide
To change the mouse pointer shadow in Windows 11, users would typically:
1. Go to Windows Settings > Accessibility > Mouse Pointer
2. Toggle the “Shadow” option on or off
If you need to do this via script or for multiple devices, you could create a custom script that modifies the relevant registry key. The specific registry path for this setting is:
HKEY_CURRENT_USER\Control Panel\Desktop
You would look for or create a value named MouseShadow and set it to:
– 1 to enable the shadow
– 0 to disable the shadow
NinjaOne offers script creation capabilities, so you could develop a custom script to manage this setting across devices if needed. For the most precise and up-to-date method, we recommend consulting the latest Windows 11 documentation or creating a custom script tailored to your specific requirements.


