

Key points:
- Mobile devices in Windows include USB (MTP), Bluetooth, Wi-Fi, and sync services for phones/tablets.
- Prerequisites: Ensure proper device connection, apply changes locally, and back up if managing multiple endpoints.
- How to enable or disable: Use Local Group Policy Editor, Registry Editor (block MTP/Sync), or Device Manager.
- Why disable mobile devices in Windows: Prevent unauthorized access, reduce malware risks, and improve overall security.
- Troubleshooting: Check cables/drivers if devices don’t show, use Device Manager or Hardware Troubleshooter, and confirm MTP/permissions if phones aren’t detected.
- Enterprise considerations: Combine MTP blocking with USB restrictions, manage device classes, apply across roaming profiles, and layer security.
- Best practices: Enable only when needed, use trusted connections, verify drivers, and review Startup Apps.
- Goal: Strengthen endpoint protection, ensure compliance in BYOD setups, and balance security with productivity.
Mobile devices boost the productivity of end users, especially those who use them for file transfers, tethering, and app syncing in BYOD environments. Windows streamlines connectivity by further integrating mobile device support into its system, allowing different modes of connection via USB, Bluetooth, or Wi-Fi.
If you want to configure your Windows mobile device settings to fit your environment’s requirements, you’re in the right place. This guide will walk you through several ways to manage mobile device connectivity, along with optional steps to automate this change and additional considerations for deployment.
What are mobile devices in Windows?
Before we explore the methods in managing mobile devices on Windows, let us first define what mobile devices mean in the context of the Windows operating system. Many may associate the term “mobile device” with typical cellular phones, but for Windows, it goes beyond that.
Mobile devices in Windows refer to external devices connected via USB (MTP), Bluetooth, or Wi-Fi, and sometimes Windows services that sync with phones. It can also include certain Windows services that sync with phones or tablets. These connections create additional endpoints where credentials or sensitive data might be exposed, which is why proper enforcement of device policies is essential.
Consolidate all your tools for managing Windows systems and mobile devices into a single dashboard.
Prerequisites before enabling or disabling mobile devices in Windows
To ensure trouble-free management of mobile devices, make sure that the following prerequisites are met:
- Elevated privileges. Implementing device-level changes on a local machine—particularly through the Local Group Policy Editor, Device Manager, or Registry Editor—requires administrative privileges.
- Device connection. When targeting specific mobile devices via the Device Manager, ensure they’re properly connected or recognized for the change to take effect.
- Backup. Before making this change for multiple endpoints, creating a system restore point is crucial to ensure easy rollback in case a configuration goes wrong.
Steps in enabling or disabling mobile devices in Windows
Method 1: Manage Windows mobile device settings via Local Group Policy Editor
Using the Local Group Policy Editor effectively targets specific mobile devices and prevents their installation during future sessions. When applied, administrators can leverage this method to limit the installation of unauthorized mobile devices on local machines.
💡 Remember: The Local Group Policy Editor is only accessible using Windows 10/11 Pro, Enterprise, and Education editions. If you meet this requirement, it’s advisable to create a backup of your Local Group Policy Editor settings so you can easily revert to your original settings in case something breaks.
- Press Win + R, type gpedit.msc, and then simultaneously press Ctrl + Shift + Enter.
- Follow the path outlined below: Computer Configuration > Administrative Templates > System > Device Installation > Device Installation Restrictions
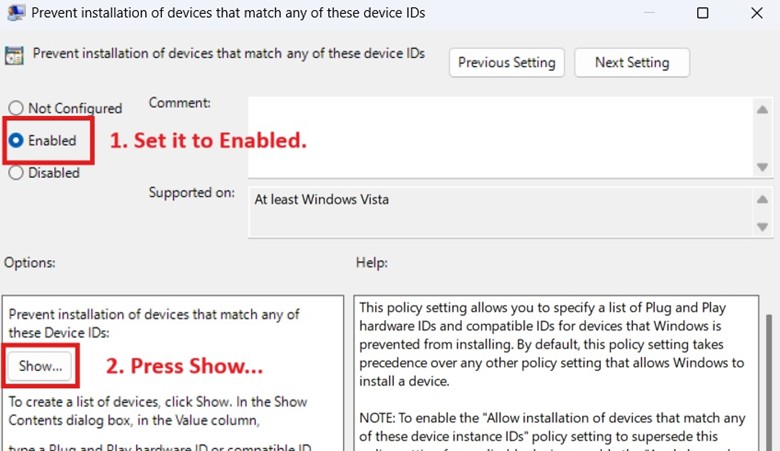
- Double-click Prevent installation of devices that match any of these device IDs.
- Set the policy to Enabled and then click the Show button below.
- Add the vendor IDs of the mobile device manufacturer you want to prevent from connecting.
- You can find the vendor IDs of popular mobile device manufacturers below:
List of Vendor ID
Device manufacturer
USB\VID_05AC Apple USB\VID_04E8 Samsung USB\VID_18D1 Google (Pixel) USB\VID_12D1 Huawei USB\VID_2717 Xiaomi USB\VID_1004 LG USB\VID_0FCE Sony USB\VID_22B8 Motorola USB\VID_2A70 OnePlus USB\VID_17EF Lenovo ⚠️ Warning: Making a blanket ban using vendor IDs can result in overblocking of legitimate devices. For example, iPhones and iPads can be blocked, but peripheral devices made by the same vendor like Apple keyboards are also blocked. If you require a more granular approach, consider inputting a device’s HWID instead.
- You can find the vendor IDs of popular mobile device manufacturers below:
- Once you’re done adding the target HWIDs, press OK.
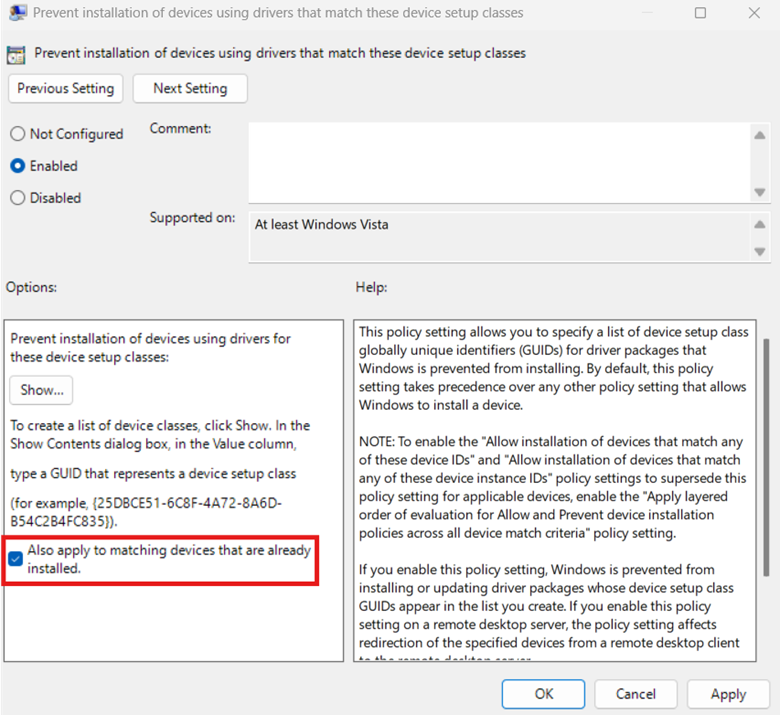
- Optionally, you can mark the check box beside Also apply to matching devices that are already installed to uninstall the target HWIDs.
- Press Apply, OK, and then reboot your PC.
Method 2: Block Media Transfer Protocol (MTP) and Mobile Sync via Registry Editor
You can leverage the Registry Editor if you manage an environment that requires airtight data protection policies. This method also prevents unauthorized data exfiltration and mobile device syncing and is useful for kiosks and public devices that require these specific restrictions.
⚠️ Warning: When done incorrectly, changes in the Registry can cause system issues, which may lead to system instability or failure. It’s recommended that you create a registry backup before proceeding.
- Press Win + R to open Run, type regedit, and press Enter.
- Navigate the following path: HKEY_LOCAL_MACHINE\SOFTWARE\Policies\Microsoft\WindowsPortableDevices
- If WindowsPortableDevices doesn’t exist, follow the steps below to manually create it:
- Right-click Microsoft on the left pane, then select New > Key.

- Name the new key WindowsPortableDevices.
- Right-click Microsoft on the left pane, then select New > Key.
- Inside WindowsPortableDevices, find the DisableWPDDevices DWORD value.
- If it doesn’t exist, right-click WindowsPortableDevices on the left pane.
- Select New > DWORD (32-bit) Value and name it DisableWPDDevices.
- Change the value data inside DisableWPDDevices to match the behavior you prefer:
- Set the value data to 1: This setting completely blocks mobile device connection.
- Set the value data to 0: This allows mobile devices to connect with the device.
- Once done, select OK, close the Registry Editor, and reboot your PC.
💡Note: This method is fully supported on both Windows 10 and Windows 11. It blocks mobile devices that use the MTP protocol via Registry, but does not prevent connections through other methods like Bluetooth or Thunderbolt.
Optional: Use PowerShell to manage Windows mobile device settings
You can use PowerShell to automate the Windows Registry change outlined above. This method is applicable if you want to disable portable devices for multiple endpoints without manually configuring this for all endpoints in your environment.
- Press Win + R, type PowerShell, and press Ctrl + Shift + Enter.
- Enter the command that fits the action you want to perform:
- To block MTP protocol and mobile sync:New-Item -Path “HKLM:\SOFTWARE\Policies\Microsoft\WindowsPortableDevices” -ForceSet-ItemProperty -Path “HKLM:\SOFTWARE\Policies\Microsoft\WindowsPortableDevices” `-Name “DisableWPDDevices” -Value 1
- To allow MTP protocol and mobile sync:
Set-ItemProperty -Path
“HKLM:\SOFTWARE\Policies\Microsoft\WindowsPortableDevices”
-Name “DisableWPDDevices” -Value 0
- Close the Registry Editor and reboot the system.
Note: This method works the same on both Windows 10 and Windows 11. PowerShell 5.1 and later support the commands used for registry configuration.
Method 3: Configure Windows mobile devices via Device Manager
By leveraging the Device Manager, administrators can easily configure the drivers of existing mobile device connections. Depending on the change made, administrators can allow or prevent these devices from being detected and connecting for future sessions.
- Press Win + X to open the Windows-X menu and click Device Manager.
- Click the dropdown beside Portable Devices and Universal Serial Bus controllers.
- Find and right-click the mobile device you want to manage.
- In the resulting pop-up menu, select Disable device.
- To reverse this, right-click the device again and select Enable device.
- Repeat steps 3 and 4 for all the mobile devices you want to manage.
- Exit the Device Manager window.
📝 Take Note: This method works on both Windows 10 and Windows 11. It disables currently connected mobile devices for all users, but does not prevent new devices from being installed. For stronger enforcement, pair this with the Local Group Policy method to block future connections.
Why disable mobile devices in Windows
Administrators typically disable external device connections in airtight environments for the following reasons:
- Prevention from unauthorized access: IT administrators configure mobile devices on Windows primarily to prevent unauthorized data exfiltration, which may cause disruptive issues across the IT environment.
- Protection against malware attacks: Disabling mobile devices if needed can also help mitigate risks from malware-infected devices.
- Overall security: Having tighter mobile device management policies in Windows environments helps enforce endpoint security, particularly in public, shared, or kiosk systems.
Additionally, having tighter mobile device management policies in Windows environments helps enforce endpoint security, particularly in public, shared, or kiosk systems.
⚠️ Troubleshooting mobile device configuration in Windows
| Risks | Potential Consequences | Reversals |
| Mobile devices not showing | Users may not be able to connect phones or tablets for syncing, charging, or file transfer. | Check USB cables/ports, restart the device, or reinstall drivers. |
| Device not detected in Device Manager | Windows cannot communicate with the mobile device, blocking updates, data transfer, or tethering. | Use Device Manager to update/reinstall drivers, enable the device, or run Windows Hardware Troubleshooter. |
| Phone not showing in File Explorer (MTP blocked) | Prevents file transfer between PC and phone, disrupting workflows. | Enable Media Transfer Protocol (MTP), install phone companion software, or check permissions on the mobile device. |
| Startup Apps entry confusion (“Mobile Devices” service) | Users may mistake it for malware or unnecessary bloat, potentially disabling it and causing sync issues. | Clarify its function, disable only if unneeded, or re-enable through Startup Apps/Services. |
Additional considerations for enterprise-level deployment
Limitations of disabling the MTP protocol
Disabling the MTP via Registry Editor or PowerShell will stop mobile devices from accessing files and syncing on a local system. However, this will not disable other forms of connection, like Bluetooth-based connections through the Phone Link app. If your environment requires tighter connectivity policies, consider managing Bluetooth functionality separately.
USB restrictions
Configuring the MTP and mobile device sync doesn’t completely disable USB drive functionality. To ensure a robust data protection policy for your environment, you can combine the methods in this guide with USB blocking policies.
Device classes
Instead of manually locating HWIDs or broadly banning vendor IDs to manage Windows mobile devices, administrators can opt to manage the entirety of a device setup class, such as Windows Portable Devices (WPD), for simpler policy enforcement.
Here’s how you do it:
- Open the Local Group Policy Editor.
- Go to Computer Configuration > Administrative Templates > System > Device Installation > Device Installation Restrictions.
- Double-click Prevent installation of devices that match any of these device IDs.
- Set the policy to Enabled and click the Show button.
- Inside the Show Contents window, input the device setup class GUID you want.
- To find a device’s setup class GUID, run the Device Manager as an administrator.
- Right-click the device you want to manage and select Properties.

- Select Details and choose Class Guid within the Property dropdown menu.
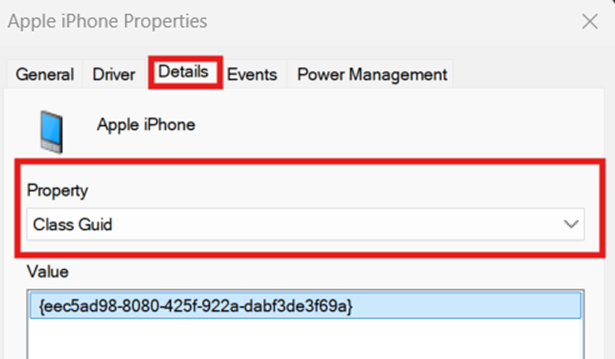
- Copy the Class Guid under Value and paste it on the field found in Step 5.
- Apply the changes to the policy and exit the Local Group Policy Editor.
- Alternatively, you can enter gpupdate /force via Command Prompt to apply the changes without restarting.
Roaming profiles
If your environment employs roaming profiles, ensure that the changes you make are replicated across all devices. This ensures uniform and consistent mobile device configurations for all end users regardless of their account preferences and settings.
Best practices in enabling and disabling mobile devices in Windows
An effective mobile device management in Windows prioritizes the balance between convenience and security. To implement this, you can follow these best practices in enabling and disabling mobile devices in Windows.
- Enable only when needed: Keep mobile device services enabled only if you actively transfer files or sync data. Disabling them when not in use reduces background processes and potential vulnerabilities.
- Verify device drivers: Ensure that USB, Bluetooth, and Wi-Fi drivers are current. Outdated drivers can cause devices not to show up in Device Manager or File Explorer.
- Use trusted connections: Connect only via trusted USB ports and cables to avoid data theft or malware injection from compromised hardware.
- Check Startup Apps before disabling: If you notice a “Mobile Devices” entry in Startup Apps, confirm its purpose before turning it off. Disabling the wrong service may prevent file transfers or syncing.
- Test after changes: After disabling or re-enabling mobile device features, test file transfer and syncing to confirm everything still works as expected.
Leverage NinjaOne MDM’s full control and visibility to safeguard your mobile workforce.
➤ Get started with a NinjaOne MDM free trial or watch a demo.
Manage Windows mobile device settings to secure endpoints
Proper mobile device management for Windows environments is essential to strike a balance between productivity, security, and data standard compliance. This change determines how end users connect external mobile devices to their system and how administrators restrict data flow for endpoint protection. You can manage mobile devices in Windows in three ways, and choosing which method to employ will depend on the scope of the change you want.
You can use the Local Group Policy Editor to prevent the installation of specific mobile devices; however, this doesn’t include installed devices. Leveraging the Registry Editor allows you to disable Windows’s MTP and Mobile Sync features, stopping mobile devices from transferring files or syncing with a local device. Lastly, the Device Manager is ideal for manually disabling currently connected mobile devices.
Use all three primary methods outlined in this guide to reinforce data protection and prevent unauthorized mobile device syncs. Consider combining these methods with USB and Bluetooth restrictions to further tighten your environment’s endpoint security.
Quick-Start Guide
NinjaOne offers several options for managing mobile devices and Windows updates:
1. Windows 11 Upgrade Management:
– You can prevent Windows 10 devices from automatically upgrading to Windows 11 by:
– Using a registry script to lock the target release version
– Configuring patch management settings in NinjaOne
– Selecting “Stay on Windows 10 for now” in local Windows Updates
2. Patch Management Features:
– In the Windows Patches settings, you can:
– Reject feature updates to block Windows 11 upgrade
– Approve updates manually
– Set different approval levels for patches
3. Scripts and Tools:
– NinjaOne provides scripts like:
– “Block Windows 10 to 11 Upgrade”
– “Update Windows 10 to Windows 11”
– “Check Windows 11 Upgrade Compatibility”
4. Agent Compatibility:
– The NinjaOne agent is compatible with Windows 11
– Tested on both new and upgraded Windows 11 installations
Specific script to prevent Windows 11 upgrade:
reg add HKLM\SOFTWARE\Policies\Microsoft\Windows\WindowsUpdate /f /v TargetReleaseVersion /t REG_DWORD /d 1
reg add HKLM\SOFTWARE\Policies\Microsoft\Windows\WindowsUpdate /f /v TargetReleaseVersionInfo /t REG_SZ /d 22H2
reg add HKLM\SOFTWARE\Policies\Microsoft\Windows\WindowsUpdate /f /v ProductVersion /t REG_SZ /d “Windows 10”


 and SCIM")


