

Key Points
- Windows Search Indexer Backoff is a feature that slows or pauses indexing during active use to reduce system performance impact.
- Disabling indexer backoff ensures real-time file indexing but may increase CPU, disk usage, and battery drain.
- Use the Local Group Policy Editor to configure indexer backoff in Windows 10/11 Pro, Enterprise, and Education editions.
- Use Registry Editor and create the DisableBackoff DWORD (set to 1) to disable indexer backoff on all editions, including Home.
- Automate changes with PowerShell commands to enable or disable backoff via registry updates.
- Verify configuration by checking registry values with PowerShell or viewing indexer status in the Control Panel > Indexing Options.
This tutorial demonstrates how to configure indexer backoff in Windows 10 and Windows 11. It includes step-by-step instructions for using the Windows Registry, Local Group Policy Editor, and PowerShell to enable or disable Windows Search Indexing backoff, and an explanation of Windows search indexing and indexer backoff behavior.
What are Search Indexing and Indexer Backoff?
Search indexing is the Windows functionality that tracks your files and their contents so that they can be more quickly searched. The index it maintains includes metadata about files on your PC that helps locate them when you use the Windows search function.
For example, data about filenames, creation dates, and the author can be looked up to find files in different directories.
The index needs to be regularly updated as files are created, deleted, and edited, requiring a background service (SearchIndexer.exe) that runs periodically to inspect recent changes. However, indexing is often a resource-intensive process that can affect your device’s performance.
This is where indexer backoff comes in. This mechanism reduces or halts indexing when a user is actively using the device or when the unit is under heavy load, resulting in a faster functioning system. Inversely, this feature permits indexing to return to full speed when the device is idle.
Should I disable or enable search indexer backoff?
Whether to enable or disable search indexer backoff is a question of resources and device type.
On the one hand, keeping this feature enabled prevents indexing from impacting your system’s performance while you are using it, but it reduces search accuracy.
Thus, doing so is preferable for laptops and other mobile devices.
On the other hand, disabling it can improve the indexing process and keep the index up-to-date, but it requires more CPU and energy usage.
Hence, this option is applied on hardware such as file servers and developer machines.
How to enable or disable Windows search indexer backoff
There are multiple ways to configure the Windows search indexer backoff. Note that you will need to be logged in as an administrator for all of these methods. You should also take a backup of your Windows system before making any configuration changes, so that you can restore it if you make a change in error.
After making changes to the search indexer backoff behavior, reboot your PC to ensure the search service has been restarted and that the change has taken full effect.
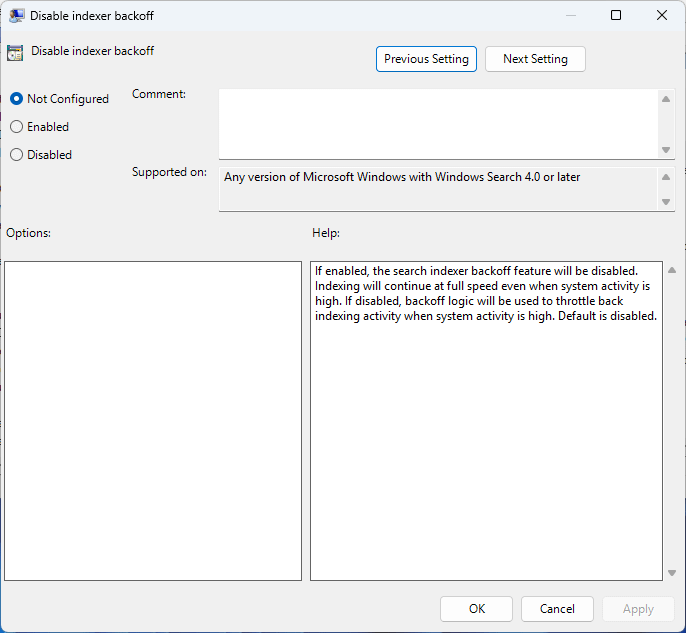
Using Local Group Policy Editor to configure indexer backoff
Note that the Local Group Policy Editor is only available in the Pro, Enterprise, and Education editions of Windows 10 and 11. You can back up your Local Group Policy settings before making changes.
- Open the Local Group Policy Editor
- Navigate to Computer Configuration\Administrative Templates\Windows Components\Search in the navigation tree in the left panel
- Locate Disable indexer backoff in the Settings list and double-click on it
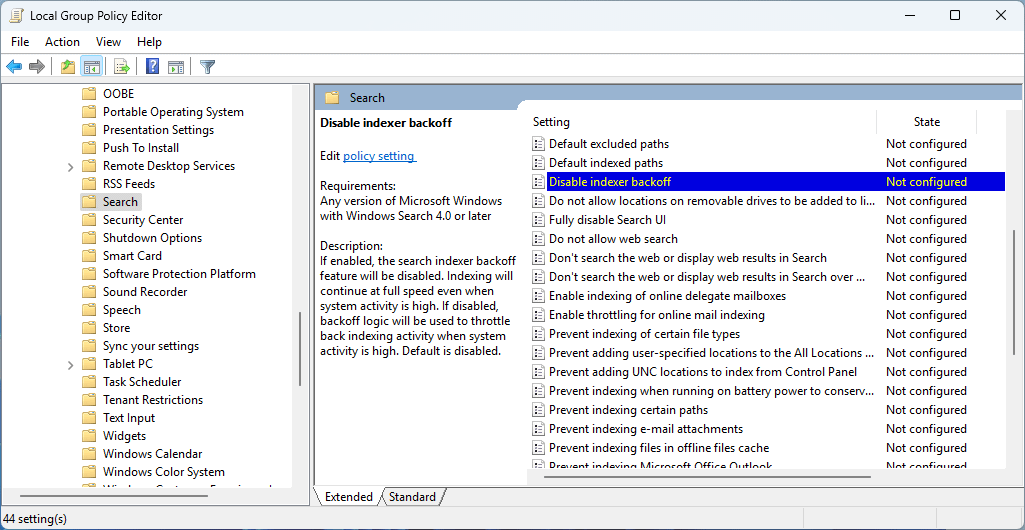
- Set the State to Enabled to disable indexer backoff, or to Not configured to leave it in its default enabled state
- Press OK to save the change
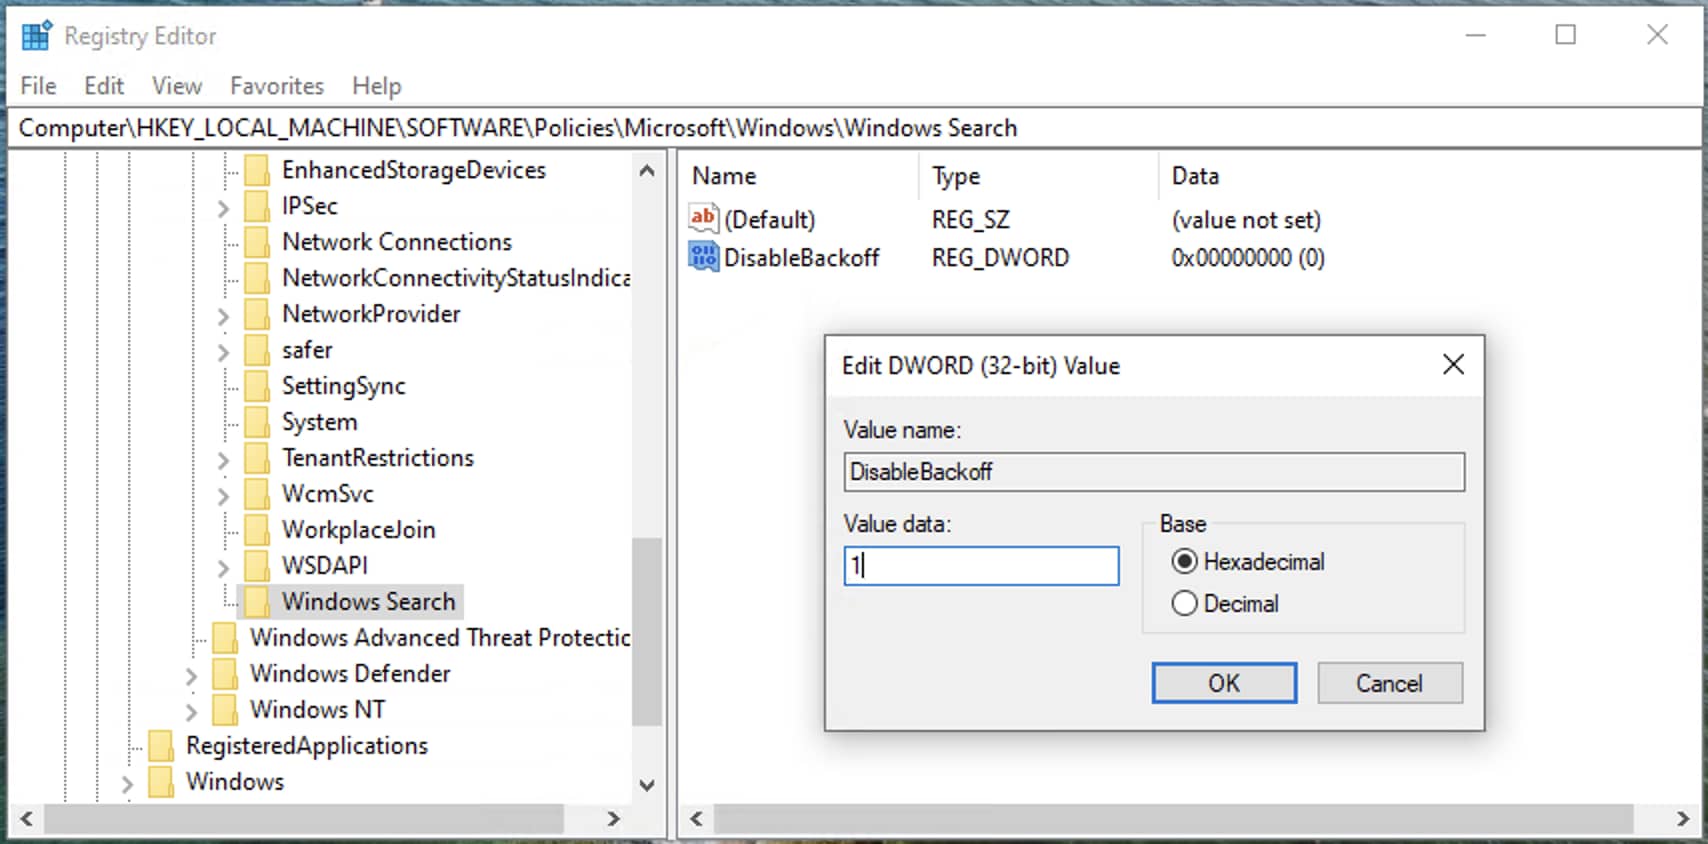
Using the Windows Registry Editor
You can also configure Windows search indexer backoff using the Registry Editor. Before making changes, make sure you back up your registry data. This method works for all versions of Windows 10 and Windows 11, including Home editions.
To disable indexer backoff using the Registry Editor, follow these steps:
- Open the Windows Registry Editor
- Navigate to Computer\HKEY_LOCAL_MACHINE\SOFTWARE\Policies\Microsoft\Windows in the Registry Editor (you can copy and paste this path into the navigation bar)
- If a key named Windows Search does not already exist at this location, select Edit > New > Key from the toolbar and name the new key Windows Search
- While in the Windows Search key selected, select Edit > New > DWORD (32-bit) Value from the toolbar and name the new DWORD DisableBackoff
- Double-click on the new DisableBackoff DWORD and set its value to 1
- Click OK to save the change
To re-enable indexer backoff, right-click on the DisableBackoff DWORD and select Delete.
Using PowerShell to enable or disable indexer backoff
You can automate the creation and deletion of the above registry entry using PowerShell. You will need to open PowerShell as an administrator to run the following commands.
Use the following PowerShell command to update the Windows Registry to disable indexer backoff:
New-Item -Path “HKLM:\SOFTWARE\Policies\Microsoft\Windows\Windows Search” -Force | Out-Null; New-ItemProperty -Path “HKLM:\SOFTWARE\Policies\Microsoft\Windows\Windows Search” -Name “DisableBackoff” -Value 1 -PropertyType DWORD -Force
Use this PowerShell command to update the Windows Registry to re-enable indexer backoff:
Remove-ItemProperty -Path “HKLM:\SOFTWARE\Policies\Microsoft\Windows\Windows Search” -Name “DisableBackoff” -ErrorAction SilentlyContinue
How to verify changes to search indexer backoff
Once you have implemented changes to the search indexer backoff, you need to ensure that they function as they should. You can check these changes in two ways.
Method 1: PowerShell
You can check the current value of the DisableBackoff registry key value by running the following PowerShell Command:
Get-ItemProperty -Path “HKLM:\SOFTWARE\Policies\Microsoft\Windows\Windows Search” -Name “DisableBackoff” -ErrorAction SilentlyContinue
If a value of 1 is returned, the search indexer backoff is disabled. If a value of 0 or a blank response is returned (no configured value resulting in the default behavior), indexer backoff is enabled. If you encounter unexpected behavior after making changes to the registry, you should restore your registry settings from a backup.
Method 2: Control Panel
You can view the current state of Windows search indexing in the Control Panel:
- Right-click on the Start button and select Run
- Enter control in the Run dialog and press the Enter key
- In the Control Panel, ensure View By: is set to Large icons and then select Indexing Options
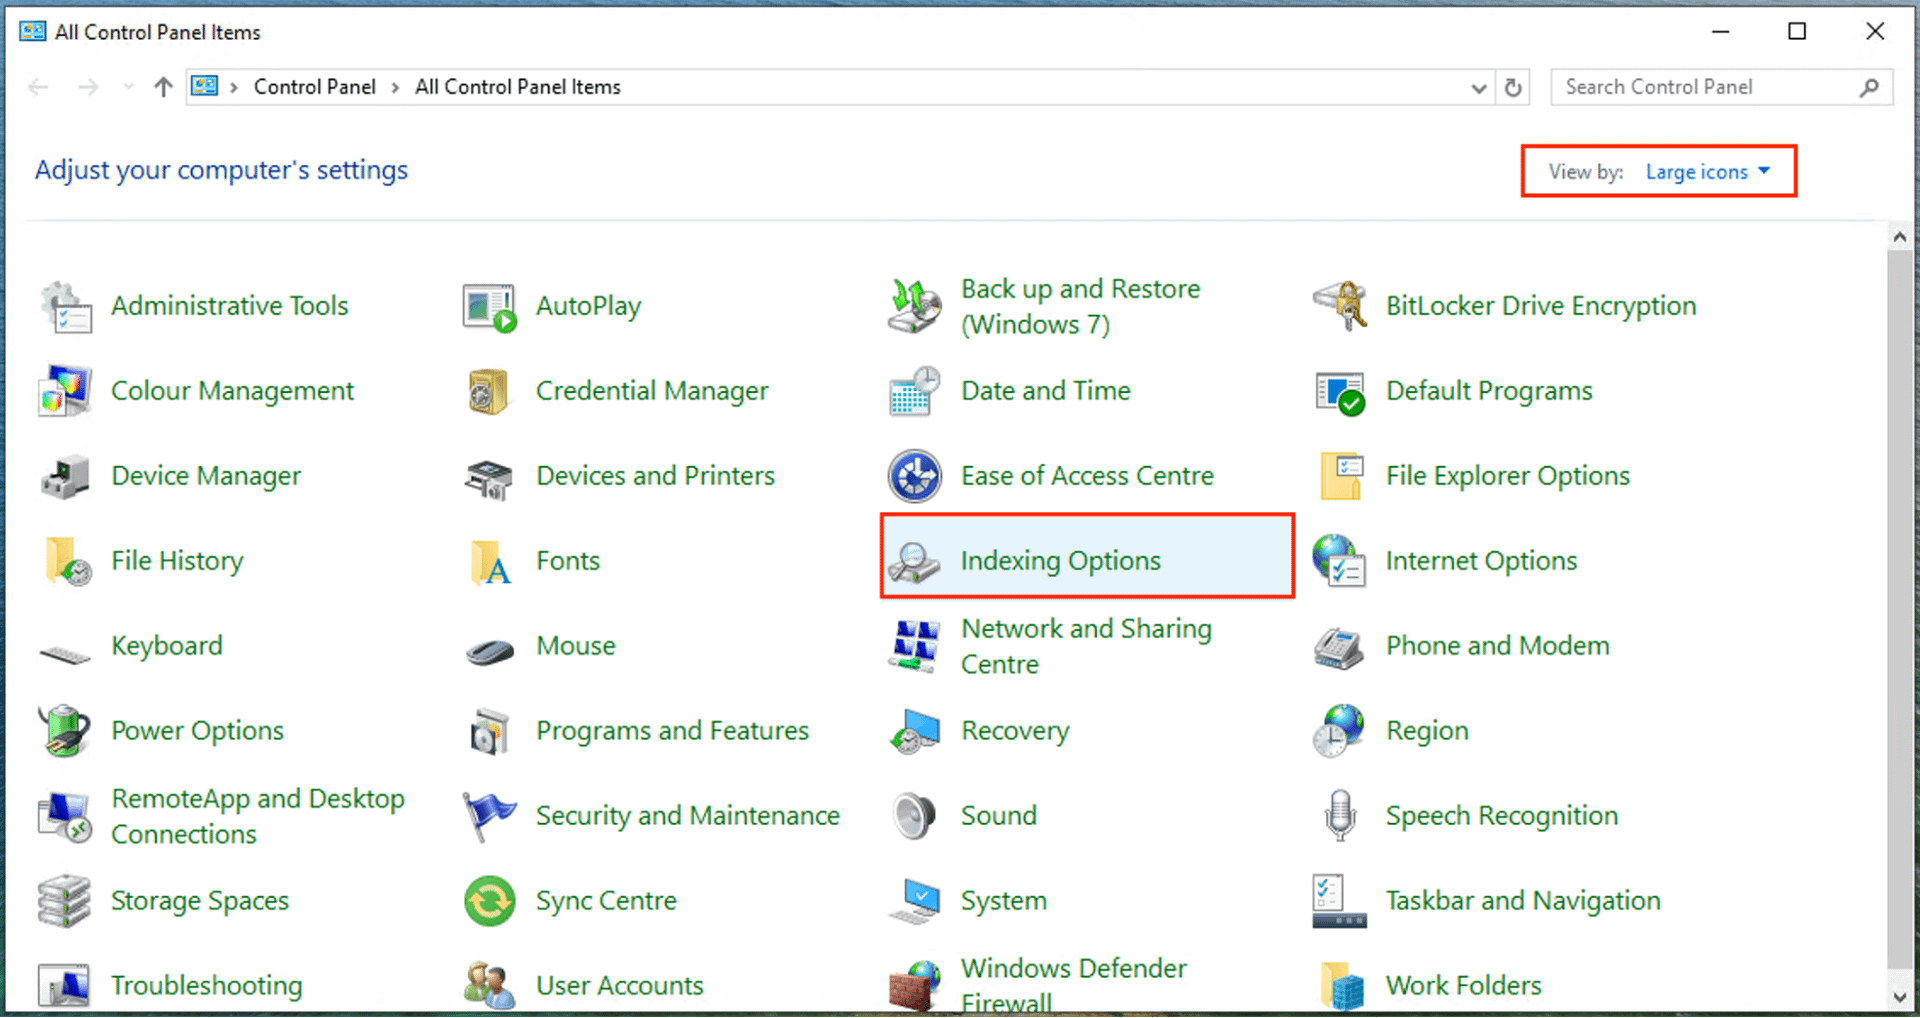
The current indexing status will be displayed in the Indexing Options window.
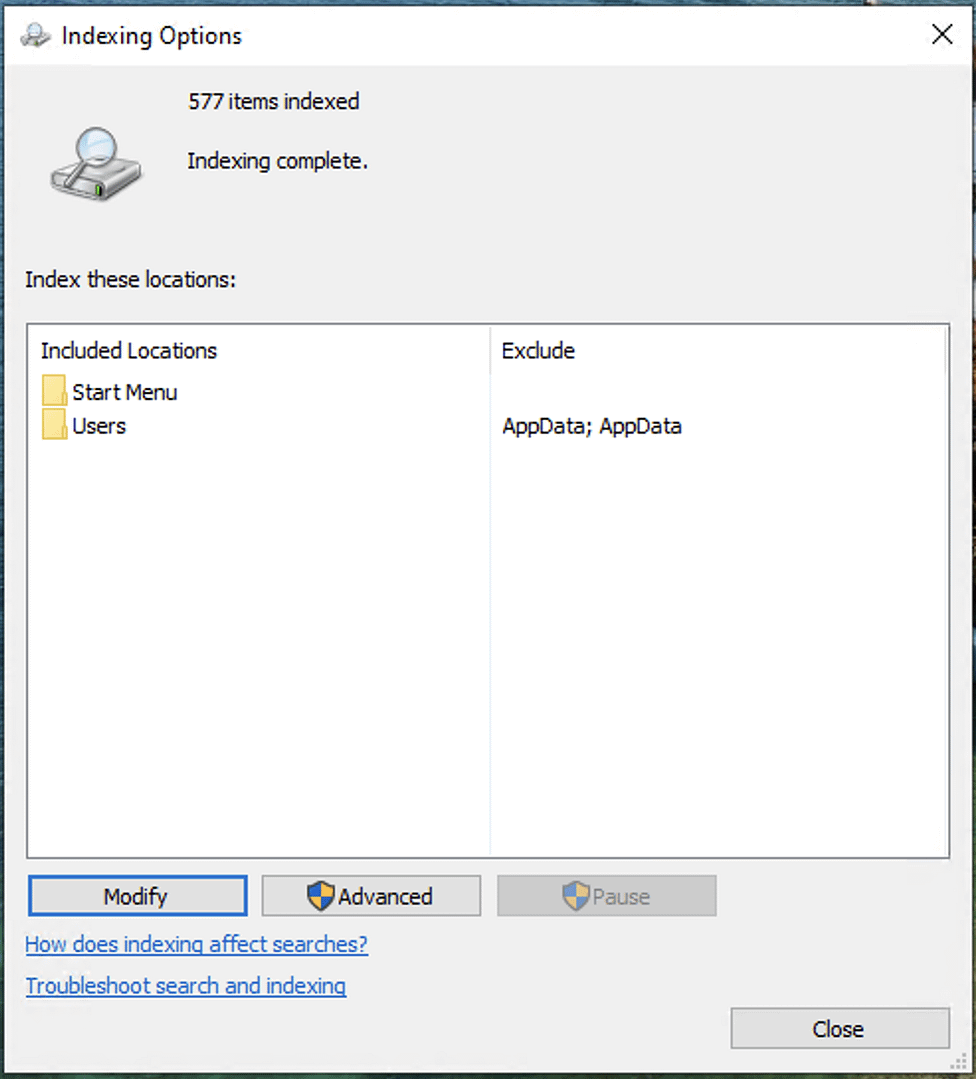
If indexing is currently being slowed so that it does not affect performance (because indexer backoff is enabled), the message “Indexing speed is reduced due to user activity” is displayed. Note that if search indexing backoff is configured both using Group Policy and in the Windows Registry, the Group Policy setting will take precedence.
Adjust Windows search indexing to match your usage and system capacity. Watch How to Enable or Disable Indexer Backoff in Windows.
Optimizing enterprise mobile devices for battery life and performance
Configuring search indexer backoff in Windows 10 and Windows 11 can improve the search experience for users with devices that have enough power to continuously index updated files while they are in use.
Remote monitoring and management (RMM) by NinjaOne gives you the tools to deploy Windows configuration changes to multiple devices remotely and monitor their performance impact. This allows you to enable and disable Windows features such as indexer backoff to optimize devices for your use case.


