

Windows supports built-in and external webcams for video conferencing, Windows Hello facial recognition, and app integration. However, in some cases, especially on shared, kiosk, or institutional devices, disabling the camera is necessary for privacy, security, or compliance.
Controlling camera access helps prevent unauthorized use, protects user data, and ensures adherence to organizational policies in environments like schools and testing centers. It can also help conserve system resources and battery life on portable devices. This guide will show you how to enable or disable camera in Windows using various methods.
How to enable or disable camera on Windows
Before you begin, make sure the following requirements are met:
- Administrator privileges are required when using Device Manager, Group Policy, or Registry Editor.
- These methods apply to all editions of Windows 10 and 11, except where noted (e.g., Group Policy is not available in Home editions).
- If you’re enabling the camera, ensure it is properly installed and recognized by the system.
Method 1: Enable or disable the camera via Settings (user-level GUI)
This is the easiest and most user-friendly way to manage camera access. It’s ideal for anyone who wants to quickly turn the camera on or off without dealing with technical tools.
- Press Win + I to open Settings.
- Go to Privacy & security.
- Under App permissions, click Camera.

- Toggle Camera access to On or Off depending on your needs.
- On = Enables camera access system-wide
- Off = Disables all apps from using the camera
 If you only want specific apps to use the camera, scroll down and toggle access for each app individually.
- For classic desktop (Win32) apps, toggle Let desktop apps access your camera as needed.
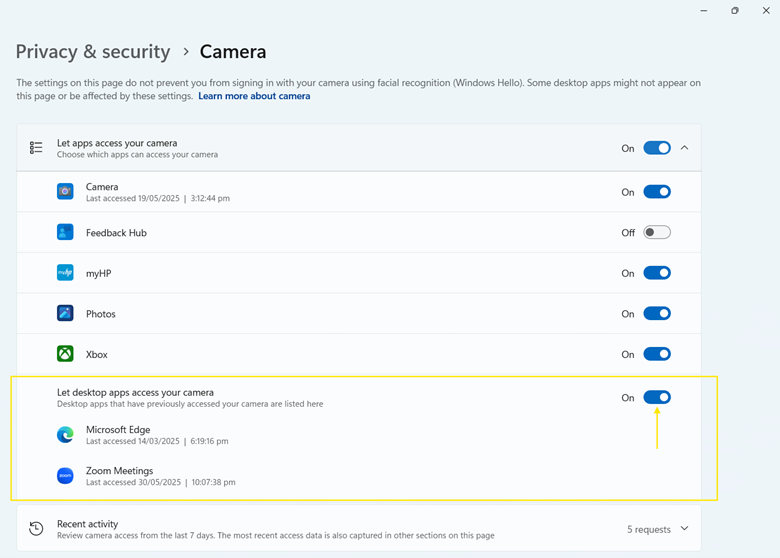
💡Note: This method is supported in Windows 10 under Settings > Privacy > Camera. The layout may differ slightly, but the toggle functionality is the same.
Method 2: Enable or disable the camera via Device Manager
This method disables the camera at the hardware level, meaning it’s turned off for all users on the device. It’s ideal when you want to completely block camera access, regardless of app or user settings.
- Press Win + X and select Device Manager.
- Expand the Camera or Imaging devices section.

- Right-click on your camera (e.g., “Integrated Camera”).
- Choose one:
- Select Disable device to turn off the camera.
- Select Enable device to turn it back on.
💡Note: Fully compatible with Windows 10. The steps to disable or enable the camera using Device Manager are identical.
Method 3: Disable the camera via Group Policy (enterprise use)
This method disables camera access system-wide and prevents users from re-enabling it. It’s ideal for shared, school, or corporate devices requiring stricter control.
💡Note: This method is only available on Windows 10/11 Pro, Enterprise, and Education editions.
- Press Win + R to open the Run dialog box.
- Type gpedit.msc and click Enter to open the Group Policy Editor.
- Navigate to Computer Configuration > Administrative Templates > Windows Components > Camera.
- Double-click Allow use of camera.
- Set to:
- Disabled = Completely disables the camera
- Enabled or Not Configured = Allows camera access
- Click Apply, then OK.
- Press Win + R again, type cmd, and click Enter to open Command Prompt.
- Run the following command: gpupdate /force
This enforces the policy immediately. Alternatively, you can restart your PC for the changes to take effect.
Method 4: Disable the camera via Registry Editor
This method is ideal for Windows 10/11 Home users who don’t have access to the Group Policy Editor but still want to apply system-wide camera restrictions.
⚠️Warning: Editing the Windows Registry can cause system issues if done incorrectly. Always back up your registry or create a system restore point before making any changes.
- Press Win + R to open the Run dialog box.
- Type regedit and click Enter to open the Registry Editor.
- Navigate to: HKEY_LOCAL_MACHINE\SOFTWARE\Microsoft\PolicyManager\default\Camera\AllowCamera
- If the Camera or AllowCamera key doesn’t exist:
- Right-click PolicyManager > New > Key. Then, name it Camera.
- Right-click Camera > New > Key. Then, name it AllowCamera.
- In the AllowCamera key:
- Right-click the right pane > New > DWORD (32-bit) Value > name it value.
- Double-click value and set the Value data to:
- 0 = Disable the camera
- 1 = Enable the camera
- Restart your PC to apply the changes.
PowerShell script example (optional automation)
You can also use PowerShell to enable or disable the camera programmatically. This method is ideal for automated scripts, Intune deployment, or remote administration.
Note: These commands must be run in PowerShell as Administrator.
- Press Win + S to open the search bar.
- Type powershell.
- Right-click Windows PowerShell from the search results and select Run as administrator.
- Run one of the following commands based on your preference:
To disable the camera device:
Get-PnpDevice -Class Camera | Disable-PnpDevice -Confirm:$false
To enable the camera device
Get-PnpDevice -Class Camera | Enable-PnpDevice -Confirm:$false
Additional considerations for managing the camera
Here are some crucial points to remember when enabling or disabling the camera in Windows.
Windows Hello
Windows Hello uses the camera for biometric authentication, allowing you to sign in using facial recognition. If you disable the camera, Windows Hello will stop working. You’ll need to use alternative sign-in methods, such as a PIN or password.
Kiosk mode
Kiosks are often public-access systems used in terminals, customer service booths, and similar environments. Disabling the camera helps protect user privacy by preventing unauthorized or unintended camera access.
External webcams
If multiple cameras are connected (e.g., built-in and external USB webcams), disabling one device doesn’t disable the others. Each camera must be disabled individually through Device Manager or PowerShell.
Event logs
Windows keeps a log of camera usage, which can be useful for security monitoring or audits. You can view these logs in Event Viewer under:
Applications and Service Logs > Microsoft > Windows > CameraFrameServer
Enable or disable the Windows camera app for better privacy and control
Windows provides flexible options to enable or disable the camera based on user preferences, privacy requirements, or organizational deployment needs. From quick toggles in Settings to complete lockdown through Device Manager, Group Policy, or PowerShell, administrators can tailor camera access to suit their environment.
Keep in mind that making changes via Device Manager, Group Policy Editor, Registry Editor, or PowerShell requires administrator privileges. It’s also recommended to back up your registry before making any changes to avoid potential system issues.


