

Windows Speech Recognition (WSR) allows users to control their PC using their voice. This is very helpful for users who rely on voice dictation and commands or use unique names, technical terms, or non-standard words in their vocabulary. WSR features a built-in Speech Dictionary that allows you to add or remove words for better voice recognition.
Managing your speech recognition dictionary improves dictation accuracy, removes incorrect words, and prevents unwanted modifications to custom words. This guide will show you how to add words to, remove words from, and manage your Speech Dictionary in Windows 10.
How to add words to the Speech Dictionary
Here’s how to use the Windows Speech Recognition settings to add words to the Speech Dictionary. If your Speech Recognition is already running, proceed to step 4. If not, begin with step 1.
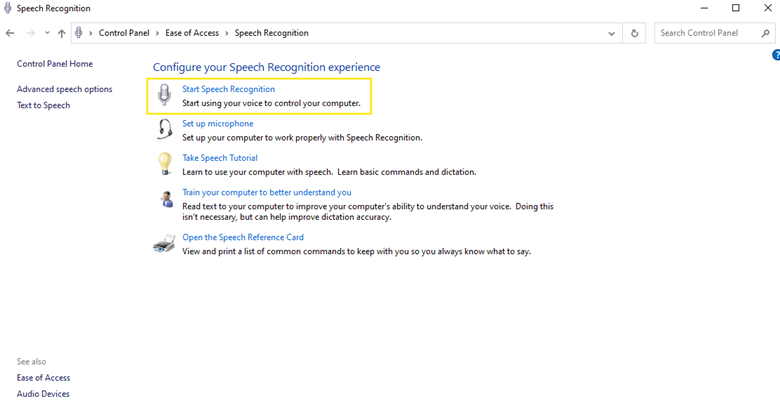
- Press the Windows key to open the Windows search bar, type Control Panel, and then hit Enter once found.
- Click Ease of Access, then select Speech Recognition.
- Tap Start Speech Recognition.
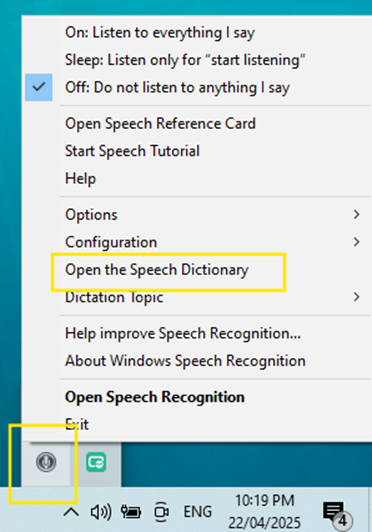
- Right-click the Speech Recognition toolbar or the Speech Recognition notification area icon in the taskbar.
- Click Open the Speech Dictionary.
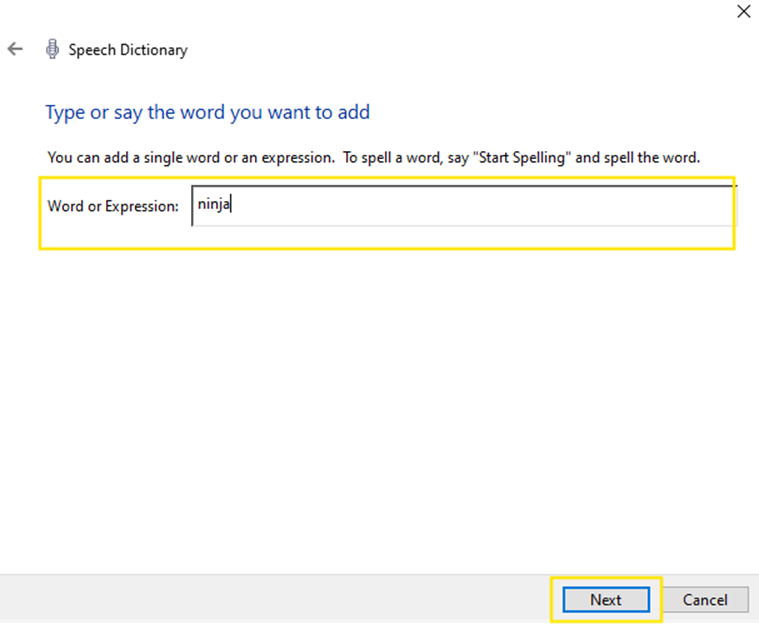
- Select Add a new word.

- Type the word or expression you want to add, then tap Next.
- If your Speech Recognition is listening, you can dictate the word or expression you want to add instead of typing it.
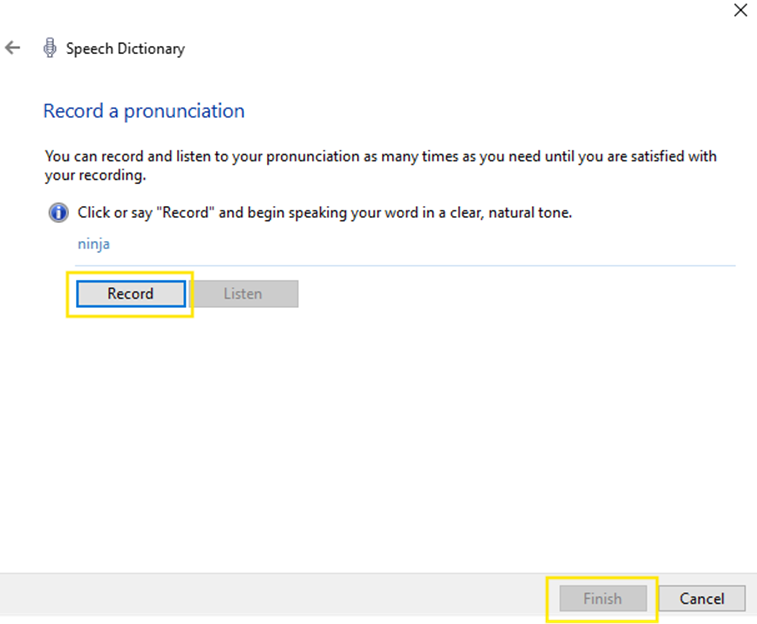
- You may tick the Record a pronunciation upon Finish box to improve the Speech Recognition accuracy.
- Hit Finish.

- Click the Record button and say the word out loud.
- Select Finish after recording.
How to delete words from the Speech Dictionary
Here is a guide for removing words from the Speech Dictionary via Speech Recognition settings:
- Right-click the Speech Recognition toolbar or the Speech Recognition notification area icon in the taskbar.
- Click Open the Speech Dictionary.
- Tap Change existing words > Delete a word.
- Select the word you want to delete, then click Next.
- Click Finish.
How to prevent editing of the Speech Dictionary
Make sure you have administrator privileges before proceeding to any of the following methods.
Method 1: Using Group Policy Editor (for Windows Pro and Windows Enterprise)
- Open Local Group Policy Editor (gpedit.msc) via the Windows search bar or press Windows + R > type gpedit.msc, then hit Enter.
- Navigate to: Computer configuration > Administrative templates > Windows components > Speech.
- Find and double-click Prevent Users from Adding Words to the Speech Dictionary.
- Set it to Enabled and apply changes.
Method 2: Using Registry Editor (For advanced users)
- Open Registry Editor using the Windows search bar. An alternative is to press Windows + R, type regedit, then hit Enter.
- Navigate to HKEY_LOCAL_MACHINE\SOFTWARE\Policies\Microsoft\Speech
- Create or modify a DWORD (32-bit) value named “DisableSpeechDictionaryChanges”.
- Set the value to 1 to prevent edits.
- Restart the system to apply changes.
No Speech key?
If the Speech key doesn’t exist, you’ll need to manually create it. Here’s how:
- Open Registry Editor using the Windows search bar. (Another way to do this is by pressing Windows + R, typing regedit, and then hitting Enter.)
- Navigate to HKEY_LOCAL_MACHINE\SOFTWARE\Policies\Microsoft
- Right-click on the Microsoft folder.
- Select New > Key.
- Type Speech to name the new key.
Troubleshooting Speech Dictionary issues
Speech Dictionary changes are not saving
When the changes you made in the Speech Recognition Dictionary are not saving, you must ensure Speech Recognition is Enabled. Open Control Panel > Ease of Access > Speech Recognition, then check if it’s turned on.
You may also check if the Group Policy settings aren’t restricting any speech editing. Here’s how:
- Press WIN + R > type gpedit.msc > Enter.
- Click Computer configuration > Administrative templates > Windows components > Speech.
- Check if the Prevent Users from Adding Words to the Speech Dictionary is Disabled.
Another way is checking if the Registry settings aren’t restricting any edits. To do this:
- Press Windows + R > type regedit, then hit Enter.
- Navigate to HKEY_LOCAL_MACHINE\SOFTWARE\Policies\Microsoft\Speech
- Check if “DisableSpeechDictionaryChanges” is set to 1.
- If yes, set the value to 0 to allow edits.
- Restart the system to apply changes.
Speech Recognition is not recognizing custom words
By default, the system does not recognize custom words. For better accuracy, try adding pronunciation as you add them.
- Tick the Record a pronunciation upon Finish checkbox, then click Finish.
- Click the Record button and say the word out loud.
Note: Maintain a proper distance from your microphone, and speak clearly.
- Hit Finish after recording.
You may also train Windows Speech Recognition via the Control Panel.
- Press the Windows key, then type Control Panel into the search bar.
- Hit Enter once you find it.
- Navigate to Ease of Access > Speech Recognition > Train your computer to better understand you, then follow on-screen instructions.
Why can’t I delete certain words?
Windows has system-reserved or built-in words that can’t be deleted. These command words, such as Start, Select, Delete, and Stop, are often used to control the operating system through voice commands.
However, if the words you want to delete aren’t system-reserved and you still can’t delete them, check if Group Policy restrictions are preventing deletion.
How do I add speech language to Windows?
To add a speech language:
- Press the Windows key, type Add a language into the search bar, hit Enter once Add a language to this device is found.
- Under Preferred languages, click Add a language.
- Search for and select the language you want to add, then tap Next.
- Check the language features you want to install, uncheck the features you don’t want to install, and hit Install.
How do I change the dictionary language in Windows 10?
To change the language on the Windows speech recognition dictionary, add the language and install its Speech Recognition first. (Refer to the instructions above for steps on how to do this.). Next:
- Go to the Control Panel > Ease of Access > Speech Recognition > Advanced speech options.
- Click the language dropdown menu under the Speech Recognition tab and select your preferred language.
- Hit OK.
Best practices for managing the Speech Dictionary
Regularly update the dictionary to improve recognition
Add words and phrases that the dictionary misinterprets or fails to recognize during use. Also, review the existing dictionary entries to ensure the spelling and formatting are accurate. Remove any entries that are incorrect or no longer needed. Regularly updating the dictionary will improve recognition even more.
Backup custom words before making major changes
Sometimes, custom words get lost after an update or reset. This can happen because updates or resets may overwrite user-specific settings, including custom dictionary entries. Therefore, it’s advisable to back up your custom dictionary, especially before making any significant changes to the system.
Train Windows Speech Recognition for better accuracy.
Train Windows Speech Recognition for better accuracy. Use the Speech Recognition Voice Training wizard to train your system to recognize your voice better.
Restrict editing if multiple users share the same PC
If multiple users share the same PC, it’s best to restrict editing to prevent unwanted changes. You can prevent unauthorized changes by using the Group Policy Editor or Registry Editor.
Frequently Asked Questions (FAQ)
Can I sync my Speech Dictionary across devices?
No. Each device has its own local speech dictionary. Some speech recognition settings may transfer if you’re using the same account across devices, but the Speech Dictionary, including custom words, won’t.
What happens if I disable the Speech Dictionary?
Once you disable the Speech Dictionary, you won’t be able to add, remove, or modify words anymore. The Speech Dictionary will rely on its built-in vocabulary.
Can I reset the Speech Dictionary to default?
Yes, you must open your File Explorer, copy and paste the location to the address bar (in this case: %AppData%\Microsoft\Spelling), and then hit Enter. Select the dictionary folder for the language you want to reset and delete the default.dic file.
Does modifying the Speech Dictionary improve Cortana’s voice recognition?
No, Cortana mainly relies on cloud-based AI, not the local Speech dictionary. Therefore, modifying the Speech Dictionary will only affect Windows Speech Recognition, not Cortana.
Can I add phrases instead of single words?
Yes, Windows 10 allows adding phrases to the Speech Dictionary. Adding phrases further improves the accuracy of specific commands and dictations.
Personalizing Windows 10 Speech Recognition Dictionary
Customizing the Windows 10 Speech Dictionary is a fast and effective way to improve voice command recognition and streamline your workflow. You can easily add and remove words using the Windows settings to ensure the system understands your unique vocabulary. For advanced users, tools like Local Group Policy Editor and Registry Editor let you prevent changes, ideal for shared devices. To make the most of this feature, regularly update your dictionary and back it up before making major system updates to avoid data loss.
Don’t be afraid to personalize your Windows 10 Speech Recognition for better productivity, accessibility, and the overall speech experience.


