

Key Points
- Saved Wi-Fi networks can be managed using Command Prompt, PowerShell, or the Windows Settings app under “Manage known networks.”
- PowerShell scripting can filter and output only Wi-Fi profile names for use in automation or bulk device management.
- Enterprise and MSP environments can use endpoint management platforms to deploy, manage, and secure Wi-Fi profiles at scale.
Windows devices store profiles for every Wi-Fi network it has connected to. Occasionally, you may need to access this list to reconnect to a hidden network, remove old profiles for security, or troubleshoot connection issues. This guide provides ways to view saved wireless network profiles using the Command Prompt, PowerShell, and Windows Settings.
Alternatively, you can view the How to See a List of Wireless Network Profiles in Windows 11 video for a visual presentation of this post.
Monitor network connectivity and WiFi performance of your Windows devices.
Understanding wireless network profiles in Windows
Wireless network profiles (or Wi-Fi profiles) are the configurations for each Wi-Fi network your device has connected to. When you join a wireless network, a profile is created that contains the network settings such as the SSID (service set identifier — the Wi-Fi network’s name), network key (the password required to join the network), and other information like IP address and DNS server information if those are manually set.
The purpose of wireless network profiles is to save all of this information so you don’t have to re-enter it each time you join a network. It’s also convenient: Windows can automatically connect to networks when you are in range of them.
Wi-Fi profiles also offer security benefits: profiles are stored securely by Windows, so you don’t need to keep your network credentials written down. This makes it harder for someone else to try to trick you into joining their network by naming it something similar to your own.
How to view wireless network profiles in Windows
You can list the wireless network profiles for your Windows 11 devices using a number of built-in tools. Step-by-step instructions are provided for each below.
Method 1: Show profiles using the Command Prompt
You can see stored Wi-Fi networks in Windows from the Command Prompt using the netsh command by following these instructions:
- Press Win + R, type cmd, and tap OK to open the Command Prompt.
- Run the netsh wlan show profiles command to display the list of network profiles.
As a reminder, you need to run CMD as an administrator to manage or delete profiles.
Method 2: List Wi-Fi network profiles using PowerShell
You can also use PowerShell to run the netsh command:
- Use Search 🔎 to open Terminal → PowerShell → Run as administrator.
- Run the netsh wlan show profiles command to display the list of network profiles.
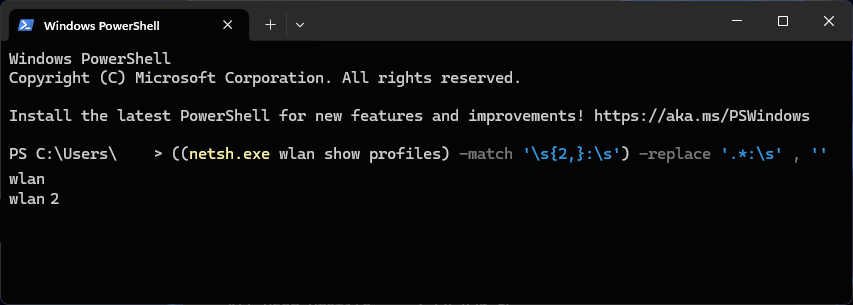
PowerShell is a much more powerful tool than CMD, providing more advanced tools for scripting. For example, you can use regular expressions to modify the output of netsh so that it only shows the Wi-Fi network names, with one on each line: ((netsh.exe wlan show profiles) -match ‘\s{2,}:\s’) -replace ‘.*:\s’ , ”.
Method 3: Use Windows Settings to view wireless network profiles
The Windows Settings App also lists Wi-Fi network profiles. You can view them by:
- Open Settings from Search 🔎 or press Win + I.
- Select Network & Internet from the navigation menu on the left.
- Find Wi-Fi from the list of settings on the right.
- Selecting Manage known networks.

From here, you can filter, list, and manage the settings for all the configured Wi-Fi network profiles on your Windows 11 PC.
If you have trouble following any of the methods above, you can also refer to our video, How to See a List of Wireless Network Profiles in Windows, for a visual walkthrough.
Troubleshooting Wi-Fi profile issues
All users on a Windows system should be able to list the configured Wi-Fi networks they have access to. However, restricted access may limit who can modify the network profiles. With that said, here are some basic troubleshooting workflows:
Issue | Cause | Solution | Note |
| Unable to modify Wi-Fi networks | Lack of administrative privileges | Log in as an Administrator to manage profiles | Standard users can only list profiles, not modify them |
| Connection issues with a network | Corrupted or outdated profile settings | Delete the profile and reconnect from scratch. Then, run this command: netsh wlan delete profile name=”ProfileName” | Replace ProfileName with the exact name of the network profile |
| Difficulty finding active networks | Too many unused or outdated profiles | Remove unused profiles to simplify the list and improve security | Helps avoid unintended connections to unsecured or outdated networks |
Consider removing unused profiles to make it easier to find and connect to active networks and improve security in managed environments.
Gain full control over your Windows devices and network to improve security and performance.
Managing Wi-Fi profiles for multiple devices in education and enterprise
In education and enterprise environments where multiple devices need to be configured to securely connect to numerous networks in different buildings, departments, and campuses, manually managing Wi-Fi networks is an almost impossible task.
Endpoint management by NinjaOne automates IT operations at scale, allowing you to remotely configure devices to only connect to vetted Wi-Fi networks, preventing misuse and cybersecurity issues caused when employees join insecure or malicious networks. NinjaOne provides full oversight over all devices and can remotely deploy new wireless profiles when you change or upgrade your network configuration, streamlining IT operations.
Related topics:


