

Many users are unsure whether their computer has successfully locked, particularly when the screen locks automatically or when they initiate the lock in haste. Windows allows you to play a sound when locking your computer, providing audible confirmation that it’s locked. This can serve as a useful custom alert or security measure.
This guide offers a detailed process on how to enable or change sound when locking computer via Task Scheduler and custom script, along with alternative methods.
How to play a sound when locking your computer
Method 1: Using Task Scheduler
Using this method to enable computer-locked sound is easy and convenient, as Task Scheduler is a built-in Windows tool that doesn’t require any additional software. It also provides greater control over setting up actions triggered by system events.
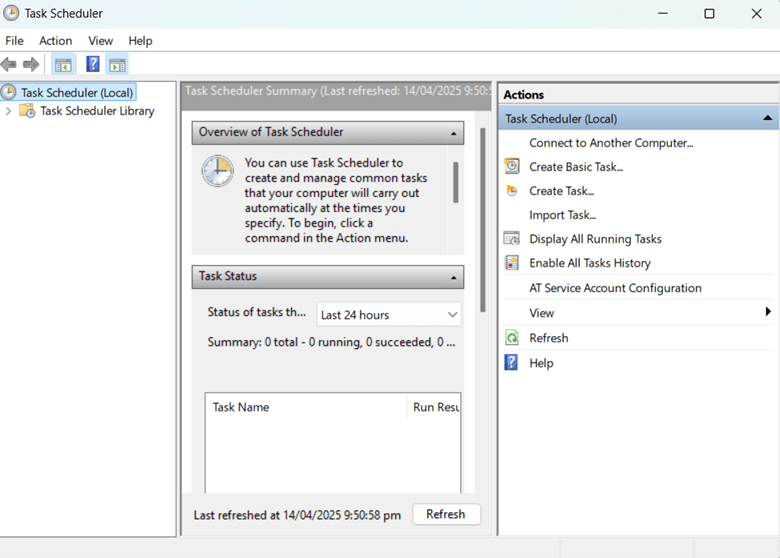
Open the Task Scheduler
- Press Win + R to open the Run Dialog.
- Type taskschd.msc and hit Enter to open the Task Scheduler.
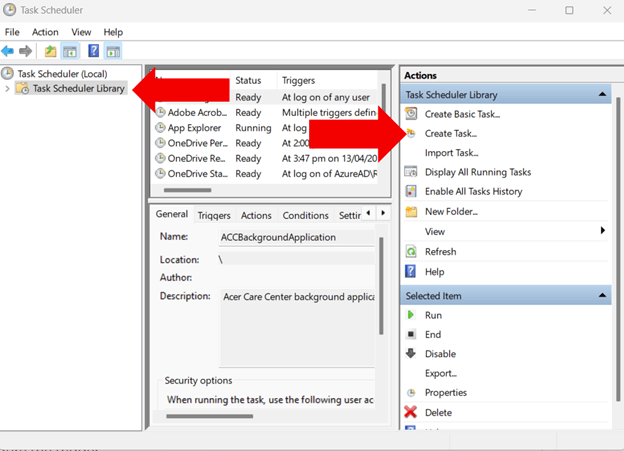
Create a new task
- Click the Task Scheduler Library.
- On the right pane, you will see the Actions section. Select Create Task.
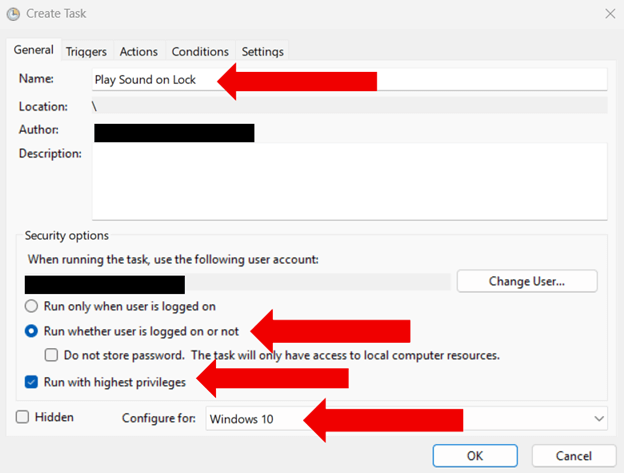
- In the General tab, type Play Sound on Lock in the Name field to name the task.
- Click (dot) the Run whether user is logged on or not.
- Tick the Run with highest privileges checkbox.
- Select Windows 10 (or your version) in the Configure for drop-down options.
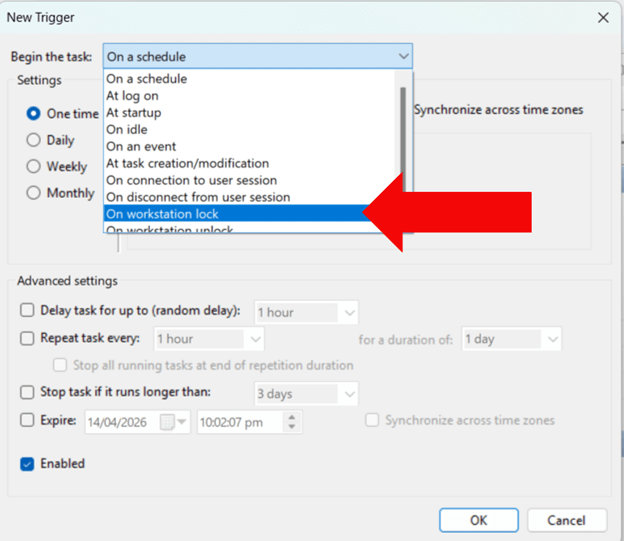
Configure the trigger
- Go to the Triggers tab and press the New button.
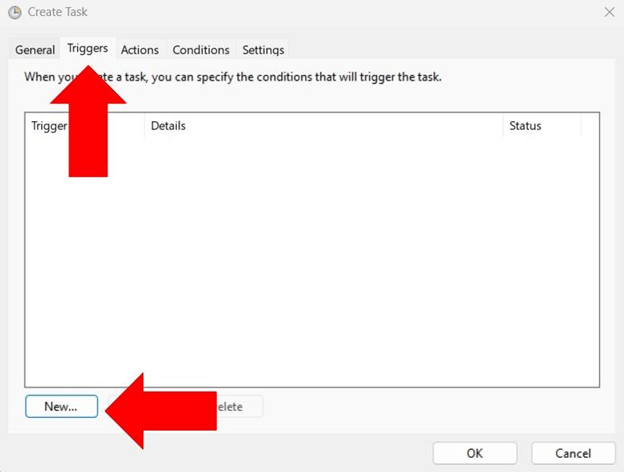
- Click the Begin the task drop-down and select On workstation lock > OK.
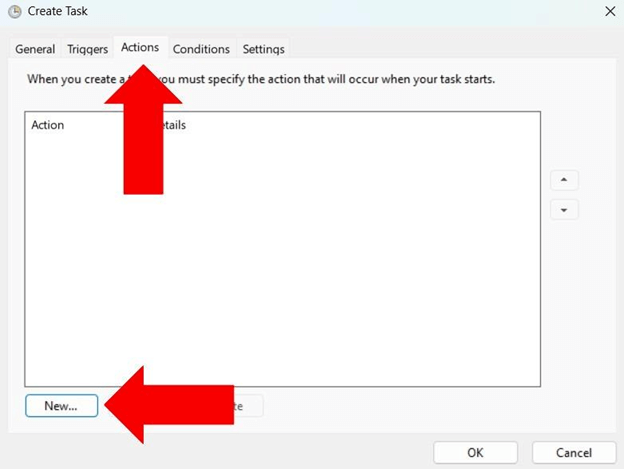
Set the Action to Play a Sound
- Go to the Actions tab and click New.
- Click the Action drop-down and select Start a program.
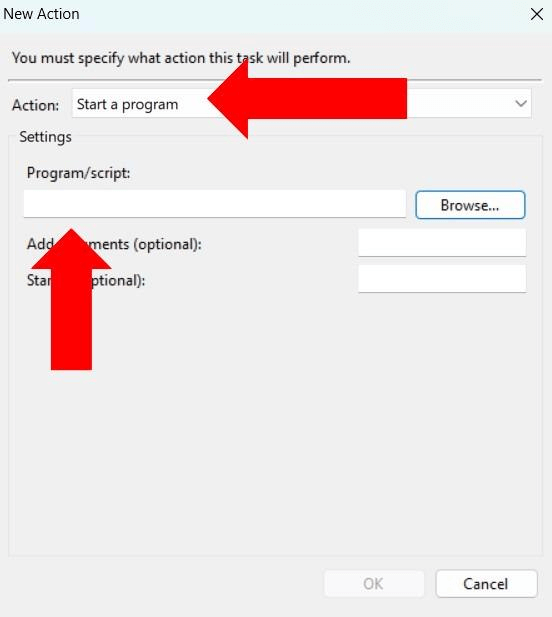
- Input powershell.exe in the Program/script field.
- In the Add arguments field, enter:
-c (New-Object Media.SoundPlayer ‘C:\Windows\Media\Windows Unlock.wav’).PlaySync();
If you want to play a sound of your choice, replace C:\Windows\Media\Windows Shutdown.wav with the path to your custom sound file.
- Hit OK.
Finalize and enable the task
- Go to the Conditions tab and uncheck the Start the task only if the computer is on AC power box.
- Click OK to save the task.
Test the task
- Press Win + L to lock your computer and check if the sound plays.
Method 2: Using a PowerShell Script with Task Scheduler
This method offers greater customization, as custom scripts lets you enhance functionality or add more tasks besides the computer making new lock sounds. It’s best suited for users who are comfortable with scripting and want to tailor the experience to their specific needs.
Prepare your .wav sound file
- If you have a .wav sound file ready, ensure that it’s in a folder you won’t move or delete (e.g., C:\Scripts\locksound.wav).
- If you don’t have a .wav sound file, you can either:
- Use built-in system sound in the C:\Windows\Media folder.
- Download .wav files from websites like pixabay.
Reminder: Note your sound file path.
Create a PowerShell script
- Press Win + R to open the Run Dialog box.
- Type notepad and hit Enter to open the Notepad.
- Copy and paste the following code:
$SoundFile = “C:\Path\To\Your\Sound.wav”
Add-Type -TypeDefinition @”
using System.Media;
public class SoundPlayer {
public static void PlaySound(string path) {
SoundPlayer player = new SoundPlayer(path);
player.PlaySync();
}
}
“@
[SoundPlayer]::PlaySound($SoundFile)
- Replace the “C:\Path\To\Your\Sound.wav” with the actual path to your .wav file.
- Click File > Save As and save it as locksound.ps1.
- Set Save as type to All Files.
- Save it in a secure location (e.g., C:\Scripts)
Allow PowerShell Scripts to run
- Press Win + S to open the Windows search bar.
- Search for PowerShell. Once found, right-click on it and select Run as administrator.
- Run the following command: Set-ExecutionPolicy RemoteSigned
- Hit Enter.
- If prompted, type Y to confirm and press Enter.
This will confirm to Windows that it’s okay to run scripts you create locally.
Test the Script
- If you exited Windows PowerShell after the previous step, open PowerShell as administrator once again.
- Run the following command to test if the script plays the sound:
powershell -ExecutionPolicy Bypass -File “C:\Scripts\PlaySoundOnLock.ps1”
- Replace the “C:\Scripts\PlaySoundOnLock.ps1” with the actual path to your script.
Schedule it in Task Scheduler
- Press Win + R to open the Run Dialog.
- Type taskschd.msc and hit Enter to open the Task Scheduler.
Create a new task
- Click the Task Scheduler Library.
- On the right pane, you will see the Actions section. Select Create Task.
- In the General tab, type Play Sound on Lock in the Name field to name the task.
- Click (dot) the Run whether user is logged on or not.
- Tick the Run with highest privileges checkbox.
- Select Windows 10 (or your version) in the Configure for drop-down options.
Configure the trigger
- Go to the Triggers tab and press the New button.
- Click the Begin the task drop-down and select On workstation lock > OK.
Set the Action to Play a Sound
- Go to the Actions tab and click New.
- Click the Action drop-down and select Start a program.
- In the Program/script field, type powershell.exe
- In the Add arguments (optional) field, type:
-ExecutionPolicy Bypass -File “C:\Scripts\locksound.ps1”
- Replace the “C:\Scripts\locksound.ps1” with the actual path to your PowerShell script.
- Tap OK.
Finalize and enable the task
- Go to the Conditions tab and uncheck the Start the task only if the computer is on AC power box (if you want it to work on battery).
- Go to the Settings tab and check the Allow task to be run on demand box.
- Check If the task fails, restart every: 1 minute.
- Press OK.
- If prompted, enter your user credentials.
Test the task
- Press Win + L to lock your computer and check if the sound plays.
Alternative methods
Using third-party software
Apart from the two methods mentioned above, you can also use apps like Soundplant or AutoHotkey to trigger sounds during key events. They’re ideal if you want additional customization, such as different sounds for different users.
Editing Windows System Sounds (Limited control)
You can also edit Windows system sounds. However, note that this option is limited to certain events, as Windows does not provide a direct option for lock sounds. You can, however, modify logon/logoff sounds instead. Here’s how:
- Prepare a .wav sound file.
- Press Win + R to open the Run Dialog.
- Type control mmsys.cpl sounds and hit Enter to open the Sound settings.
- Go to the Sounds tab.
- Under Program Events, select the event you want to change.
- Go to Sounds, click Browse, and select your .wav file.
- Tap Apply > OK.
How to enable Windows unlock sound
Now that you know how to play a sound when locking your computer, you might also want to add a sound for when it unlocks. You can do this by following the same steps as Method 1, create a new task in Task Scheduler with a name like Play Unlock Sound and set the trigger to On workstation unlock.
Troubleshooting & common issues
The task does not trigger
The task may fail to run if it doesn’t have sufficient permissions to execute the action. Check if the task is set to run under highest privileges. Here’s how:
- Press Win + R to open the Run Dialog.
- Write taskschd.msc and hit Enter to open the Task Scheduler.
- In the General tab, see if the Run with highest privileges checkbox is ticked.
You may also try running Task Scheduler as an administrator and test the task manually. Simply follow these steps:
- Right-click the Task Scheduler icon and tap Run as Administrator.
- Manually trigger the task by right-clicking it and tapping Run.
No sound plays
This issue can happen if the file is missing or altered and the scheduled task cannot locate and play the sound. Verify that the sound file isn’t moved, renamed, or deleted. Also, confirm if the Windows audio services are running. Here’s how:
- Press Win + R to open the Run Dialog box.
- Type services.msc and hit Enter to open the Services.
- Scroll down and locate Windows Audio.
- Check its status if it indicates Running. If not, right-click on it and select Start.
Sound plays with delay
A delayed sound can occur due to system performance issues. Large or compressed audio files may take longer to load or play. To avoid delays, try using a shorter or uncompressed audio file.
Frequently Asked Questions (FAQs)
Can I use any sound file?
Yes, you can use any computer lock screen beeping sound file, but it must be in .wav format. If you have other formats like .mp3, you’ll need to convert it to WAV. You can use online converters or software like Audacity.
Does this method work on Windows 11?
Yes, Task Scheduler works similarly in Windows 11. Just note that the appearance of the Control Panel may differ slightly, but the steps remain the same.
Why isn’t my sound playing?
There are several reasons your sound might not play. Make sure that the sound file path is correct, the Task Scheduler is enabled and running properly, and the volume is up and not muted.
Can I add a delay before the sound plays?
Yes, just modify the PowerShell script to include a delay:
Start-Sleep -Seconds 2; (New-Object Media.SoundPlayer “C:\Windows\Media\Windows Shutdown.wav”).PlaySync();
How do I turn off the lock sound?
You can either disable or delete the task you created in Task Scheduler.
Confirm your computer’s lock with a sound
Task Scheduler is a useful Windows feature that allows you to play a sound when locking your computer. Powershell scripts and batch files provide a simple and effective way to achieve this. Third-party software can also be used for more customization options. Just be sure to check file paths and permissions to avoid issues.


