

The taskbar is an important UI element that provides quick access to applications, widgets, notifications, and system settings. On multi-display setups, users can either hide or display the taskbar on all monitors. In this guide, we’ll show you ways to configure the taskbar, alongside precautions and solutions to common issues.
How to toggle displaying the taskbar on multiple monitors
Multiple displays can help boost productivity by allowing the taskbar to display across multiple screens. This improves accessibility to pinned apps, system tray, search bar, and the Start menu, optimizing UI navigation in multi-display setups.
However, the taskbar can clutter secondary monitors, particularly those that passively display logs, dashboards, and IT monitoring software. That said, managing the taskbar on multi-display setups is important to help it adapt to different needs.
📌 Prerequisites:
- Any Windows 11 system
- At least two connected display monitors
📌 Recommended deployment strategies:
| Click to Choose a Method | 💻 Best for Individual Users | 💻💻💻 Best for Enterprises |
| Method 1: Manage the taskbar on multi-display setups via Settings | ✓ | |
| Method 2: Editing the Registry to configure taskbar display for all monitors | ✓ | |
| Method 3: Automate the Registry change using Command Prompt | ✓ | ✓ |
| Method 4: Leverage PowerShell to modify the Registry | ✓ | ✓ |
| Method 5: Manage taskbar display on all monitors via Local Group Policy | ✓ | ✓ |
Method 1: Manage the taskbar on multi-display setups via Settings
The Windows Settings app provides user-friendly access to system settings, allowing quick management of taskbar settings with one click.
📌 Use Case: This method is ideal for per-user configuration of taskbar display behavior on multiple displays.
📌 Prerequisite: Windows Settings access.
- Press Win + I to open the Windows Settings app.
- Select Personalization on the left pane and then Taskbar on the right.
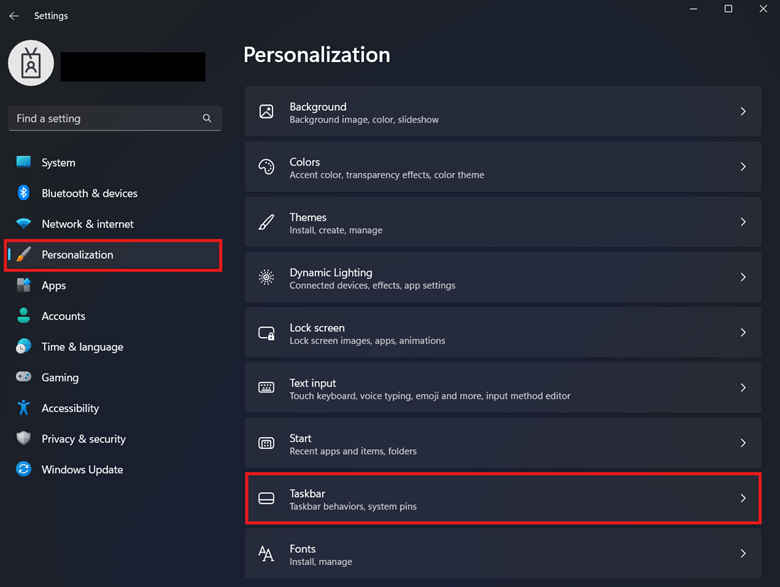
- Find and expand Taskbar behaviors, and look for Show my taskbar on all displays.
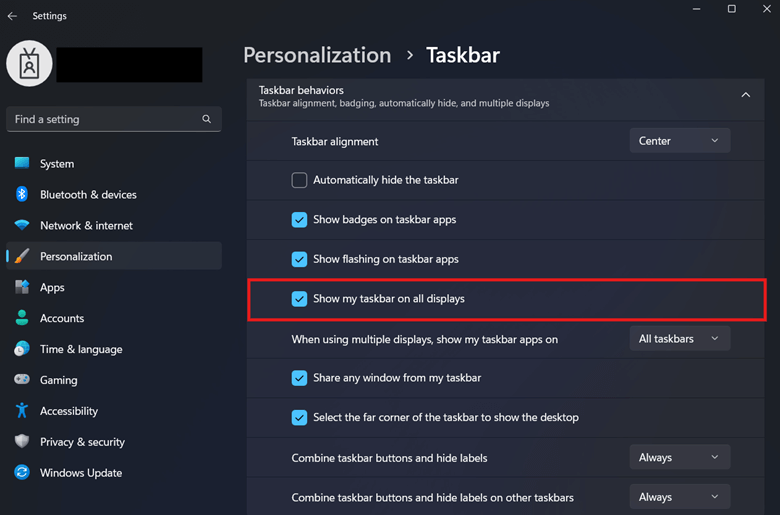
- Configure the checkbox beside Show my taskbar on all displays:
- Select the checkbox to show the taskbar on other displays.
- Clear the checkbox to hide the taskbar on other displays.

- Close the Windows Settings app.
💡 Note: This change applies instantly per user. Additionally, you can adjust the drop-down beside When using multiple displays, show my taskbar on to further customize the taskbar.
Method 2: Editing the Registry to configure taskbar display for all monitors
The taskbar display for multiple screen setups can be directly configured in the Registry.
⚠️ Warning: Manually editing the Registry can lead to hard-to-reverse misconfigurations, impacting system stability and functionality. (See ⚠️ Things to look out for.)
📌 Use Cases: Directly edit the Registry if the GUI toggles don’t work or Windows Settings is locked down. Additionally, this Registry process is scriptable, allowing administrators to embed the process into logon scripts or other scripts for deployment.
📌 Prerequisites: Windows Registry backup
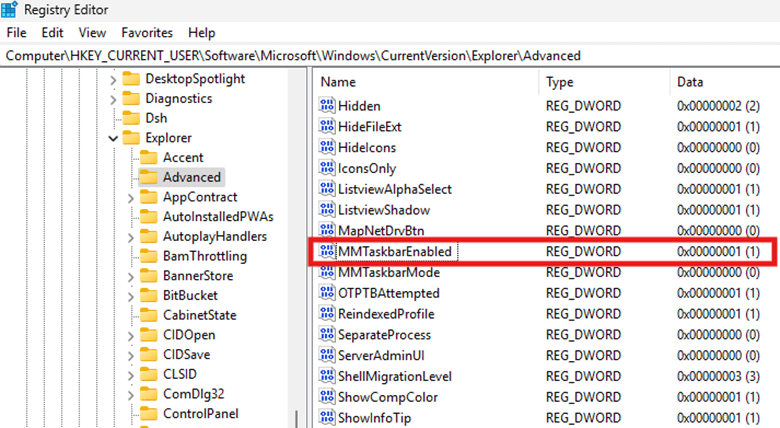
- Press Win + R, type regedit, then press Enter.
- Navigate the following path:
HKEY_CURRENT_USER\Software\Microsoft\Windows\CurrentVersion\Explorer\Advanced
- Find and double-click the MMTaskbarEnabled DWORD value.
- If it doesn’t exist, manually create the DWORD.
- Right-click Advanced and select New > DWORD (32-bit) value.
- If it doesn’t exist, manually create the DWORD.

- Name the DWORD MMTaskbarEnabled.
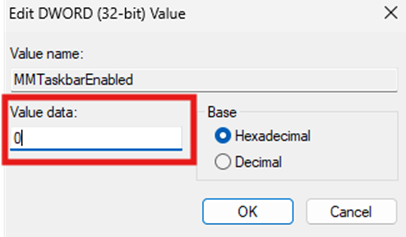
- Modify the value data inside the target DWORD:
- Value data = 1: Enables taskbar display on all monitors
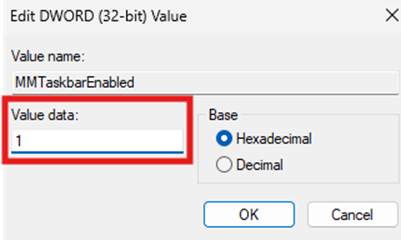
- Value data = 0: To disable taskbar display on all monitors
- Press OK and restart Windows Explorer or the device to apply the change.
Method 3: Automate the Registry change using Command Prompt
Manually editing the Registry can be slow, and as you apply it at scale, it gets more repetitive and error-prone.
📌 Use Cases: Leveraging the Command Prompt is ideal to avoid manually setting Registry values.
⚠️ Important: Consistent syntax is a must to avoid errors when scripting. (See ⚠️ Things to look out for.)
📌 Prerequisites: Windows Registry backup
- Press Win + R, type cmd, then press Enter.
- Execute the command that reflects the taskbar behavior you prefer:
- To enable the taskbar on all displays:
reg add "HKCU\Software\Microsoft\Windows\CurrentVersion\Explorer\Advanced" /v MMTaskbarEnabled /t REG_DWORD /d 1 /f
- To disable the taskbar on all secondary displays:
reg add "HKCU\Software\Microsoft\Windows\CurrentVersion\Explorer\Advanced" /v MMTaskbarEnabled /t REG_DWORD /d 0 /f
- Restart Windows Explorer or your device.
- Alternatively, you can execute the following command to automatically restart Windows Explorer:
taskkill /f /im explorer.exe >nul 2>&1start explorer.exe
💡 Tip: To automatically run the script at startup, save it as a .BAT file, then place it in the following path:
C:\Users\NAME\AppData\Roaming\Microsoft\Windows\Start Menu\Programs\Startup
Method 4: Leverage PowerShell to modify the Registry
📌 Use Cases: PowerShell scripts can automatically configure the Registry value that controls taskbar display across multiple monitors. Additionally, it can be deployed across multiple accounts using logon scripts or .reg files.
⚠️ IMPORTANT: Always test configurations locally before deployment. (See ⚠️ Things to look out for.)
📌 Prerequisites: Windows Registry backup.
- Press Win + R, type regedit, then press Enter.
- Enter the command that matches the taskbar behavior you prefer:
- Enable taskbar display for all screens:
Set-ItemProperty -Path "HKCU:\Software\Microsoft\Windows\CurrentVersion\Explorer\Advanced" -Name "MMTaskbarEnabled" -Value 1
- Disable taskbar display for secondary screens:
Set-ItemProperty -Path "HKCU:\Software\Microsoft\Windows\CurrentVersion\Explorer\Advanced" -Name "MMTaskbarEnabled" -Value 0
- Exit the PowerShell prompt.
- Restart the device or Windows Explorer to apply the change.
Method 5: Manage taskbar display on all monitors via Local Group Policy
Unlike the Registry, the Local Group Policy Editor provides a clear view of pre-defined templates that are easier to manage and roll back.
📌 Use Cases: Administrators can utilize the LGPE as an alternate method to Windows Settings when enforcing taskbar display on multiple monitors. Additionally, administrators can use the Group Policy Management Console (GPMC) to deploy this as a GPO across an environment.
📌 Prerequisites: Windows 11 Pro, Enterprise, or Education editions.
- Press Win + R, type gpedit.msc, and press Enter.
- Navigate the following path:
User Configuration > Administrative Templates > Start Menu and Taskbar
- Find and double-click Do not allow taskbars on more than one display.

- Modify the policy to match your preferred taskbar visibility across all displays:
- Disabled or Not Configured: Shows the taskbar on all displays.
- Enabled: Prevents the taskbar from appearing on secondary displays.
- Press Apply and OK, then close the Local Group Policy Editor.
- Open a PowerShell prompt and enter the following command:
gpupdate /force
💡 Note: Once Do not allow taskbars on more than one display is enabled, Methods 1 to 4 will be disabled.
⚠️ Things to look out for
| Risks | Potential Consequences | Reversals |
| Manually editing Registry values | Manual edits to the Registry are error-prone; one mistake can break system stability and functionality. | Always back up your Windows Registry before changing its keys and values. |
| Incorrect syntax when scripting using command line interfaces (CLIs) | Scripts require accurate syntax to avoid failures and errors. | Verify if your script’s syntax is correct before executing. Additionally, you can instead copy-paste the provided scripts to the appropriate CLIs. |
| Not testing before deployment | Misconfiguration can slip unnoticed, impacting multiple endpoints once deployed. | Test configurations on a local machine to verify its effects before deploying it across an environment or for other users. |
| Group Policy overrides user preferences | Setting configurations via LGPE can override and lock down GUI settings that control taskbar visibility on multiple displays. | Set Do not allow taskbars on more than one display to Not Configured and use an alternate method to manage the taskbar. |
Troubleshooting taskbar display issues on multiple monitors
Multiple things can go wrong when configuring how your taskbar appears on secondary monitors. This section will walk you through solutions to common issues encountered when making such a change.
Issue #1: Option greyed out in Settings

This Settings option is inaccessible if the system doesn’t detect at least two monitors. That said, verify the connection of all your monitors by going to Settings > System > Display. If multiple monitors are connected to the system, press Win + P and set the monitors to Extend.
Issue #2: Registry changes are not applying
When editing the Registry, verify if the value data inside MMTaskbarEnabled reflects the change you want. If changes were made after checking MMTaskbarEnabled, press OK to save the value data. Afterwards, restart the device or Windows Explorer to apply the change.
Issue #3: Local Group Policy settings are not applying
Many Local Group Policy settings take effect only during specific system events, including system startup and user logon. Additionally, Group Policy updates are not immediate, as they follow default refresh cycles approximately every 90 minutes. As a workaround, you can restart your device or open a PowerShell prompt and enter gpupdate /force.
Streamline the UI by configuring the taskbar for multi-display setups
If you use each display and need quick access to tools, consider enabling the taskbar for all monitors. Conversely, disable this if you want a clean, distraction-free secondary screen for monitoring non-interactive content.
End users can quickly configure this for their accounts through Windows Settings. Administrators can use the Registry for non-domain setups and automate the configuration through the Command Prompt or PowerShell. Lastly, the Local Group Policy Editor is ideal for enforcing consistent settings across domain-joined enterprise environments.
Related topics:
- Turn On or Off Ease Cursor Movement Between Displays in Windows 11
- How to Show All Open Windows on the Taskbar for All Desktops in Windows 11
- How to Close and Remove Multiple Desktops in Windows 11
- How to Change Settings and Layout for Multiple Displays in Windows 10
- How to Enable or Disable “Show Desktop” on the Taskbar in Windows 11


