

Key Points
- Understanding GPU Types
- Integrated GPU: Best for everyday tasks, low power use, longer battery life.
- Dedicated GPU: Needed for gaming, video editing, and 3D rendering.
- Choosing the right GPU impacts both performance and battery life.
- Setting a Preferred GPU in Windows 10
- Use Windows Graphics Settings (recommended method).
- Assign a high-performance GPU per application.
More reliable than older, legacy methods.
- Vendor-Specific Controls
- NVIDIA Control Panel and AMD Radeon Software: Allow app-specific GPU use.
- Provide granular, advanced controls for power users.
- Troubleshooting & Best Practices
- Keep GPU drivers updated.
- Regularly monitor GPU usage.
Fix issues when apps don’t use the correct GPU. - Remember: no universal default GPU and settings must be applied per app.
This guide shows you how to set a default GPU in Windows 10, a useful skill to learn if you use resource-intensive apps on your Windows laptop.
Before we begin, let’s first distinguish the two types of GPUs. The GPU that comes with your CPU is called the integrated GPU. It shares the same resources as your computer, as it is integrated with the motherboard. Meanwhile, a dedicated GPU is a separate component that you will need to purchase. The dedicated GPU is intended for more high-performance tasks, such as video editing or gaming. To simplify their distinctions:
- Integrated GPUs are best suited for lightweight applications.
- Dedicated GPUs are ideal for more intensive tasks.
⚠️ Note: Windows 10 does not allow you to set one global “default GPU” for all apps. Instead, you assign a preferred GPU per application. This guide will show you how.
💡 If you want a visual walkthrough of this process, check out this video guide: “How to Set the Default GPU in Windows 10.”
How to check your installed GPU
There are two ways to check which GPU is currently installed on your system:
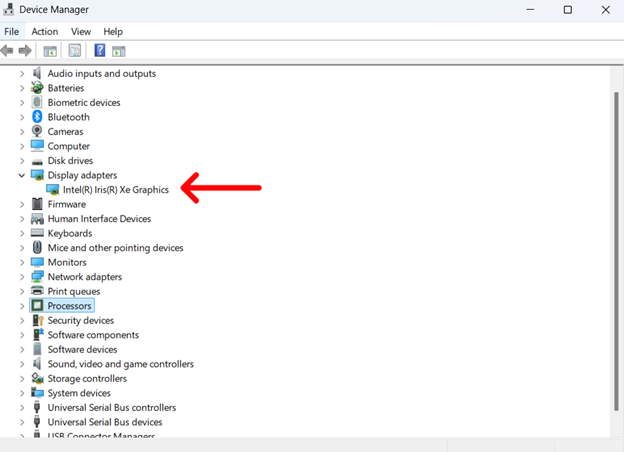
Option 1: Using Device Manager
- Search for “Device Manager” in the Start search button. In older Windows versions, you can go to Control Panel > Device Manager.
- Look for Display adapters and click the dropdown arrow to see the list of GPUs installed on your system. Two entries indicate you have an integrated GPU and a dedicated GPU. If you only see one entry, it is likely an integrated graphics card, except in desktops without integrated graphics.
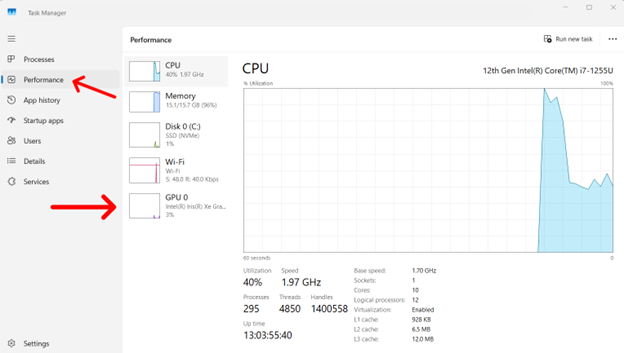
Option 2: Using Task Manager
- Open Task Manager. The simplest way to do this is by simultaneously pressing Ctrl + Shift + Esc and clicking on Task Manager.
- Navigate to the Performance tab and look for the GPU section to determine which one is currently active.
Step-by-step guide on how to set preferred GPU on Windows 10 laptop
You can control which GPU a specific app uses in three ways: Windows Graphics Settings (recommended), NVIDIA Control Panel, or AMD Radeon Settings.
Method 1: Using Windows Graphics settings (Recommended)
- Open Settings and go to System > Display.
- Scroll down and click on Graphics settings.
- Under Choose an app to set preference, select either:
- Desktop app (for installed programs) and click Browse to find the .exe file
- Microsoft Store app (for Windows Store apps) and select the app from the dropdown.
- Once added, click on the application and select Options.
- Choose one of the following options:
- Let Windows decide (default setting)
- Power saving (uses integrated GPU)
- High performance (uses dedicated GPU)
- Click Save, then restart the application for the changes to take effect.
Method 2: Using NVIDIA control panel (For NVIDIA GPUs)
- Right-click on the desktop and select NVIDIA Control Panel.
- Go to Manage 3D settings and navigate to the Program Settings tab.
- Select the application from the list (or click Add to browse for the .exe file).
- Under Select the preferred graphics processor, choose:
- Integrated Graphics for power saving.
- NVIDIA High-Performance GPU for high performance.
- Click Apply to save the changes.
Method 3: Using AMD Radeon settings (for AMD GPUs)
- Open AMD Radeon Settings.
- Navigate to System > Switchable Graphics.
- Locate the application from the list or add it manually.
- Assign a preferred GPU:
- Power Saving to use the integrated GPU.
- High Performance to use the dedicated GPU.
- Click Apply, then restart the application to apply changes.
Advanced Option (BIOS/UEFI): Some laptops let you disable the integrated GPU or select “Discrete GPU only” mode in the BIOS/UEFI menu. This forces all apps to use the dedicated GPU but reduces battery life. Use this only if you know your system supports it.
How to reset or change GPU preferences
After setting your preferred GPU in Windows 10, you may find yourself dissatisfied with the changes. To reset or change GPU preferences:
- Revisit Graphics Settings in Windows to select a different GPU.
- In NVIDIA Control Panel or AMD Radeon Settings, click on Restore default settings.
- If this does not work, you can try uninstalling and reinstalling the application to remove any custom GPU settings.
Troubleshooting GPU selection issues
Setting GPU drivers and preferences on a Windows computer should be relatively straightforward. Even so, you may encounter some problems, such as discussed below.
App still using the wrong GPU
This typically occurs when you do not restart the application or reboot your PC. If this occurs even after restarting, we recommend double-checking the application’s internal settings to see if it allows your GPU selection.
No option to assign GPU in Windows Graphics settings
Check if your current Windows version and GPU drivers are up to date. Keep in mind that older applications may not support your GPU selection through Windows.
Performance issues after changing GPU settings
This can occur for several reasons, including improper hardware, performance throttling, or even insufficient RAM. The simplest way to resolve this is to revert to your default settings (as instructed previously) and ensure your hardware can accommodate your GPU selection.
💡 Optimize the performance of your laptop by upgrading your RAM.
→ Read this guide, How to Upgrade RAM on Your Laptop or PC.
Best practices for managing GPU usage in Windows 10
To get the most out of your GPU, it’s important to balance performance, efficiency, and system health. The following best practices will help you optimize your setup, extend hardware lifespan, and ensure the right GPU is used for the right task.
- Use a dedicated GPU for resource-intensive tasks, such as video editing software or gaming.
- Use the integrated GPU for lightweight applications, such as web browsers and office apps.
- Keep GPU drivers updated to ensure stability.
- Regularly monitor GPU usage in Task Manager to ensure that the correct applications are using the correct GPU.
- Adjust Power Management Settings in the Control Panel to optimize GPU performance.
- Refrain from opening multiple tasks—even with a dedicated GPU—to prevent battery deterioration or overheating.
- Make sure to check individual application settings; some games and software allow direct GPU selection.
- Use a cooling pad for laptops to prevent overheating, especially when running demanding applications.
- Regularly clean your PC’s cooling system, especially if you own a pet, to ensure that it is not clogged. Clogged systems cause your laptop to use more resources to maintain the same efficiency.
Knowing how to set a default GPU
You may be searching for how to change your preferred GPU in Windows 10. Doing so helps optimize your computer’s performance and prevent unnecessary power consumption. The right GPU ensures that you have the best possible computing experience.
For businesses or IT professionals managing multiple devices, manually troubleshooting GPU issues can be a challenge. Using a dedicated IT Asset Management solution can provide a centralized platform to track, manage, and troubleshoot all your hardware and software assets. Find answers to common questions on the IT Asset Management FAQs page.
Quick-Start Guide
The NinjaOne platform offers flexibility through custom scripts and automations that could potentially help you achieve this goal.
To set the default GPU, you would typically need to:
- Use Windows’ built-in GPU settings or NVIDIA Control Panel
- Create a custom script to modify GPU settings
- Deploy the script through NinjaOne’s automation capabilities


