

Key Points
New User Guide: Core NinjaOne Ticketing Automations
- Track status changes through ticketing automation.
- Automatically organize tickets based on different criteria.
- Immediately route tasks to relevant technicians or specialists.
- Use NinjaOne for efficient ticketing and highly customizable service desk workflows.
Like all Ninja products, Ninja’s Ticketing System provides users with numerous opportunities to save time through automation. On that note, new users might feel like setting up NinjaOne automation against a blank slate is a daunting task. But it’s a lot less so, especially with this guide to help you gear up for further success.
Without further ado, let’s dive into five commonly used automations that will make ticketing a breeze for your business:
Ensure your ticketing operations are streamlined and organized with NinjaOne.
1) Use customizable ticketing boards to automate and organize tickets
In this example, we will walk through how to set up ticketing automation to organize and escalate tickets to two different ticketing boards: T2 Service Requests and T3 Service requests.
Use case: Automatically route a support ticket that requires more in-depth knowledge to the T2 ticket board. If that ticket requires a subject matter expert, this ticket can be escalated to the T3 ticket board. Finally, tickets can be auto-assigned to the T3 ticket board if they come from a certain support email (ex: [email protected]).
What is needed:
- Create two ticket boards, one each for Tier 2 technicians and Tier 3 technicians
- Create an event-based automation to detect relevant tags (T2 or T3) and to send notifications to the appropriate email address
- Create a specific email address that will receive all T3-level requests
How to set this up – Escalation to T2 board:
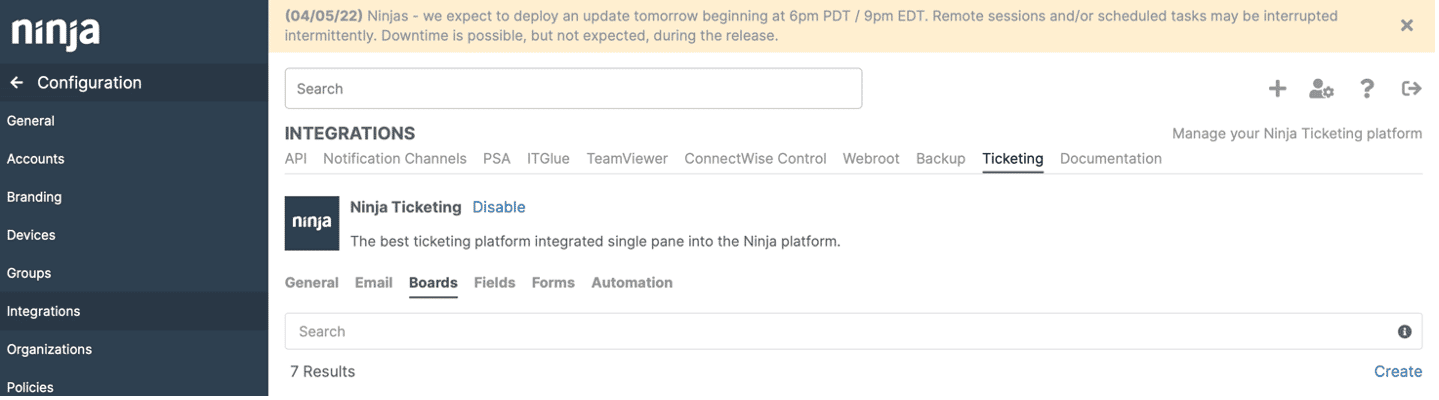
First, you need to set up the ticketing boards for T2 and T3 tickets. Each board only shows tickets a specific technician level should work on; for example, the T2 board will only show tickets that tier 2 technicians should be addressing. Ticketing board setup can be found under Configurations Integrations Ticketing Boards:
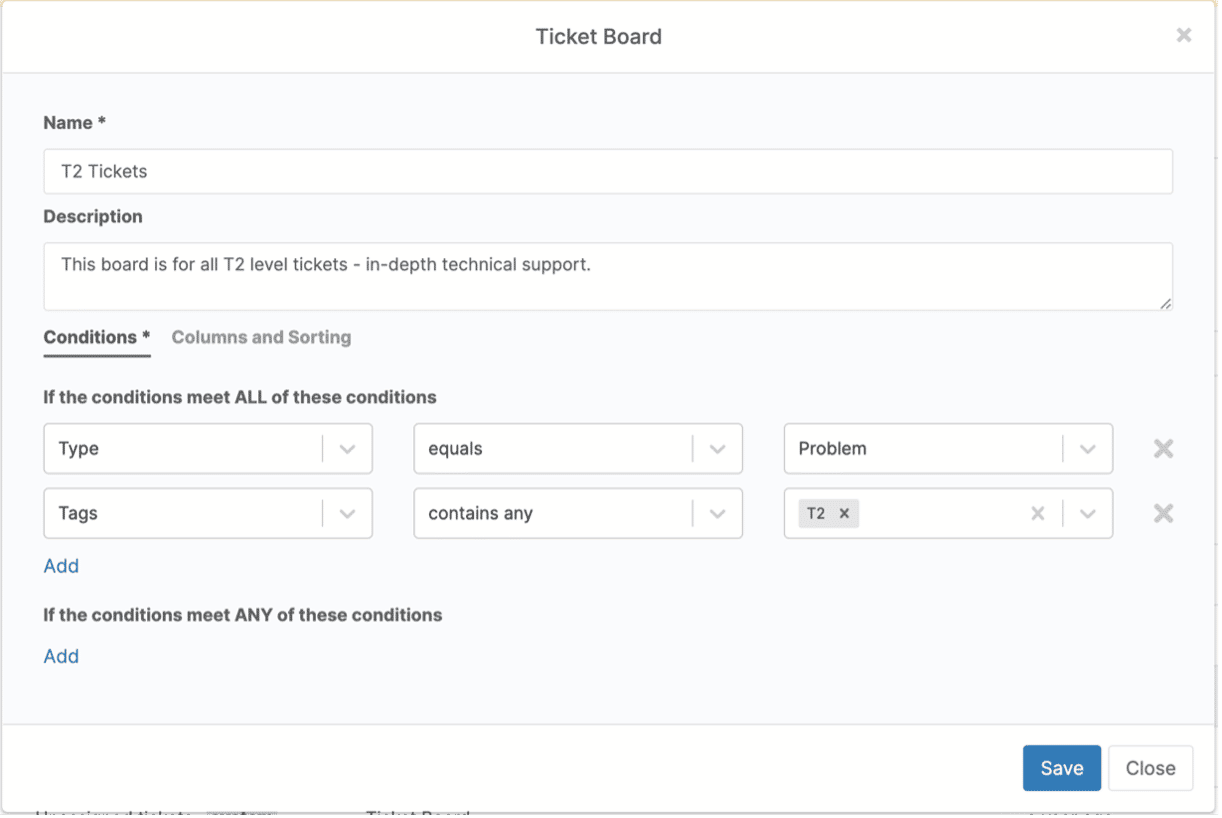
Once you navigate to the Boards section of ticketing, you must create your T2 and T3 boards with the conditions that best fit your business. In the image below, we set up the T2 board with conditions we felt could fit a standard T2 level of support:
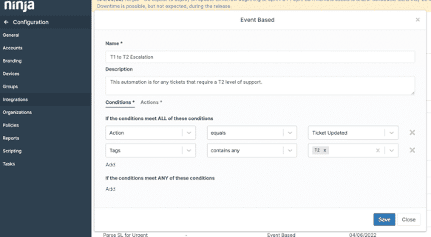
Next, we couple this board with an automation, found under Configurations ➡️ Integrations ➡️ Ticketing ➡️ Automation ➡️ Create. This automation is an event-based automation that will route any tickets that require a T2 level of support to the T2 ticket board after meeting all of the conditions that we set:
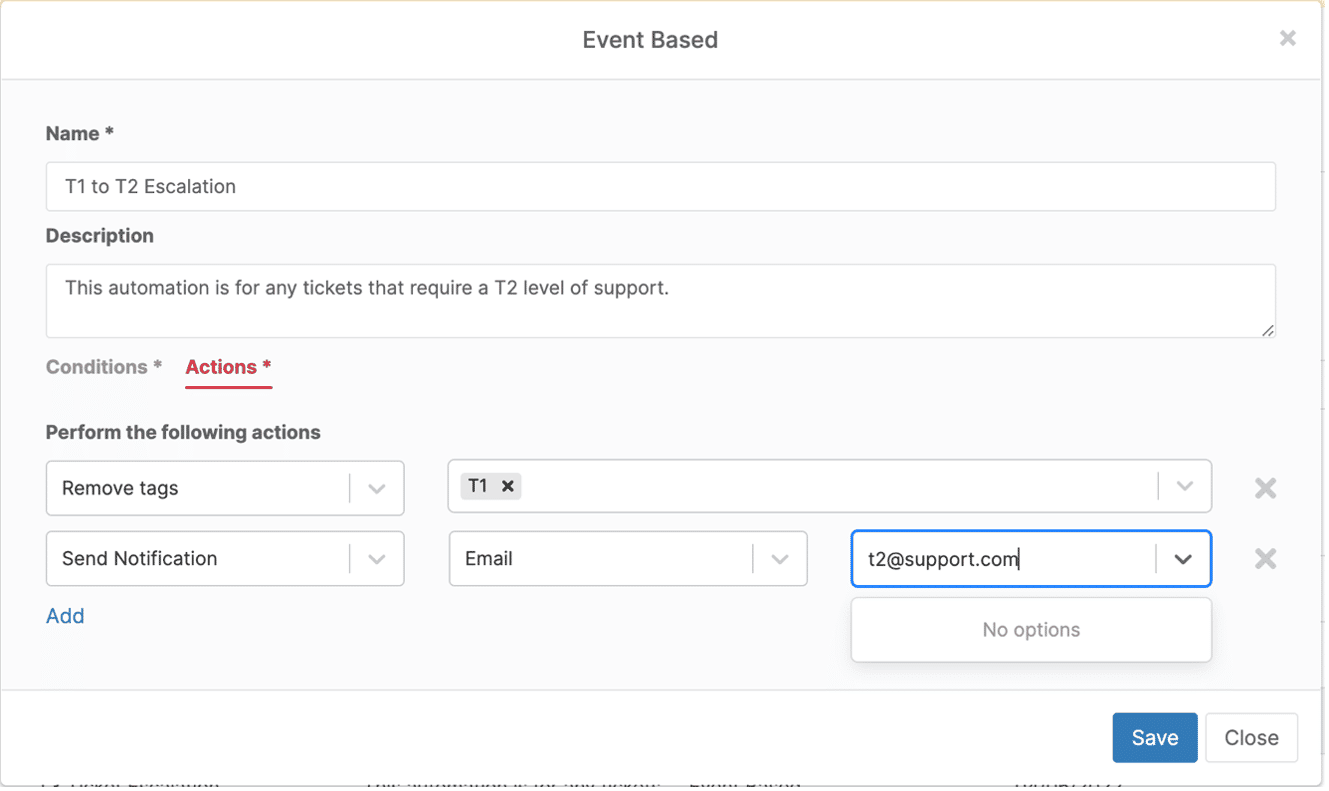
Finally, once those conditions are met, we selected the actions we want to be taken when a ticket is routed onto the T2 ticket board. The T2 tag will ensure the ticket is routed to the T2 board; we’ll also want to ensure the ticket is no longer on the T1 board, so we’ll remove the T1 tag. Finally, we want to make sure all the T2 techs are aware of the new ticket, so we’ll notify them by sending an email to their shared mailbox.
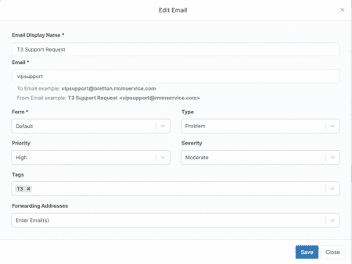
How to set this up – Escalation to T3 board from a certain email address:
The first step is to set up an email within the Ticketing section of Ninja’s platform. For this example, we created this email with the following settings. One way we set this up is to have an email sent to this address auto-tag it with T3:
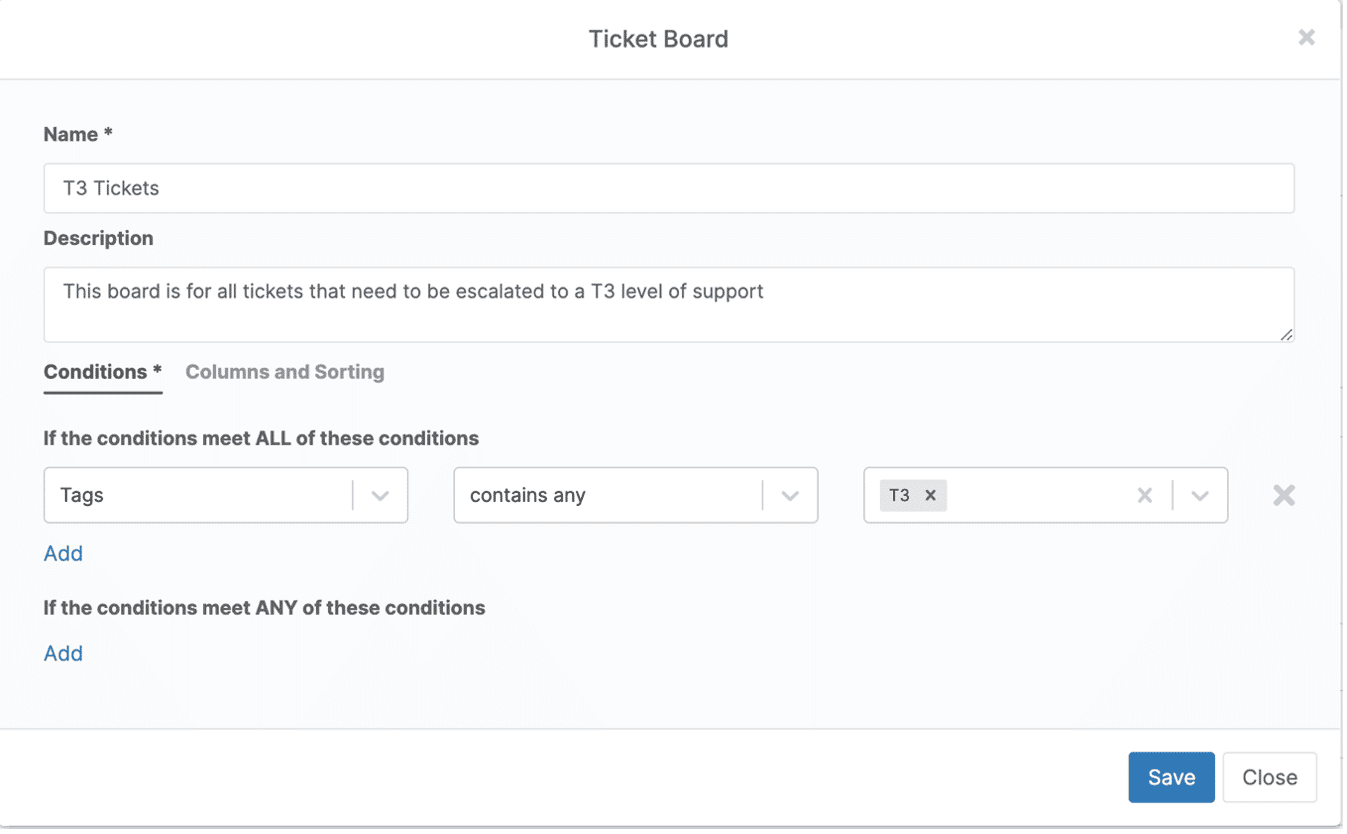
The next step is to set up the T3 Board, similar to setting up the T2 Board. The difference here is that we’re looking for any tickets that contain the “T3” tag:
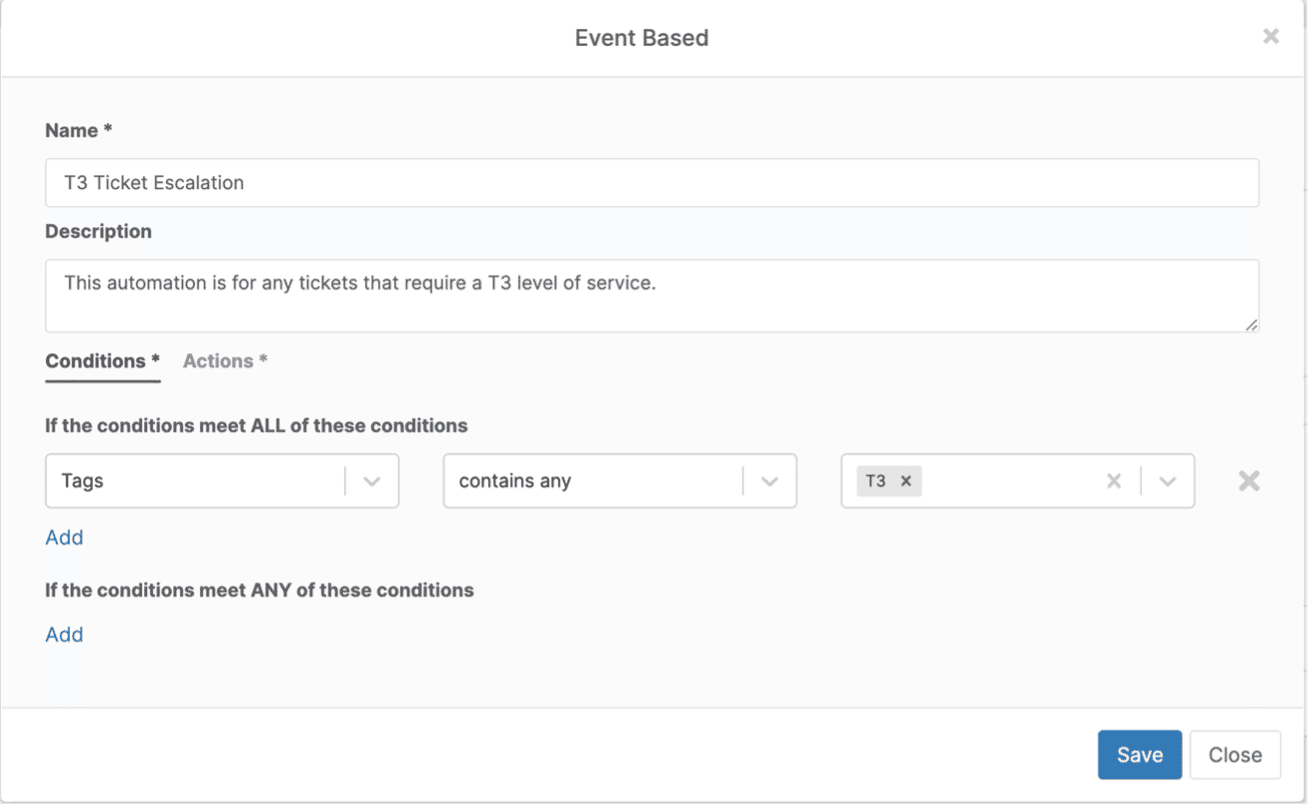
Next, the automations need to be set up for the T3 tickets with the conditions you want to take, similarly to the T2 ticket automations. However, in these conditions, we are looking for tickets that contain the “T3” tag:
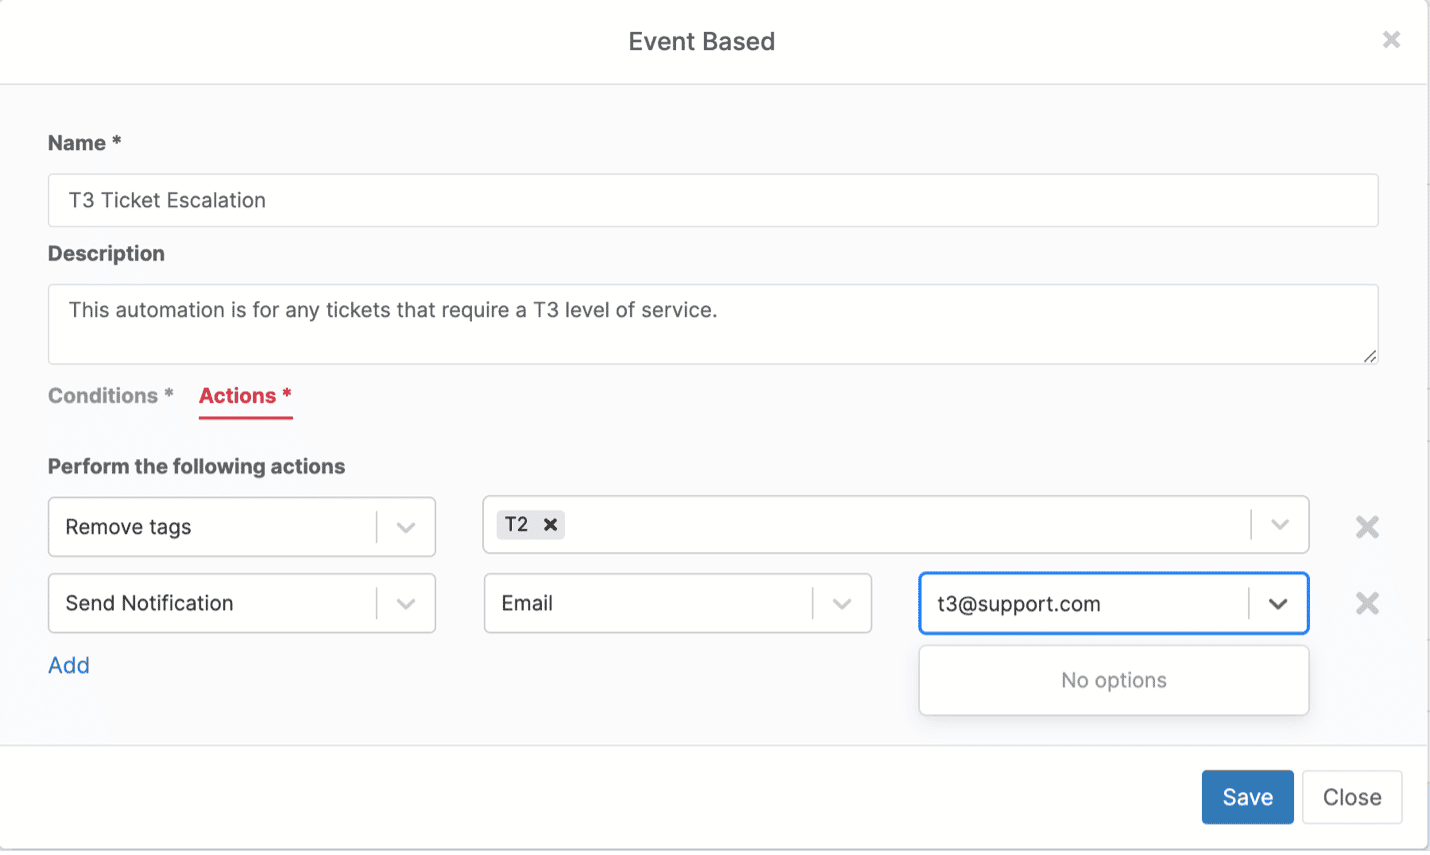
Finally, the actions you want to be taken based on this automation need to be configured. Finally, we’ll take the same actions for the T2 escalation automation: remove the T2 tag and notify the T3 team via email.
2) Track ticket status changes automatically
In this example, we will walk through how to set up automations to adjust the status of a ticket based on certain conditions and to deliver an email to the requestor if a certain period of time passes without any action.
Use case: Ticket status change automations assist technicians with adjusting tickets to represent where they are in the “ticket lifecycle.” If statuses are not changed manually, these automations will help ensure that tickets get moved to different boards, out of the current queue, or close themselves if no further actions are needed, allowing your technicians to focus on the current tasks.
In this example, we’ll automatically change a ticket from open to waiting when the requestor hasn’t responded to a technician for at least one hour.
What is needed:
- Create time-based automations to detect how much time has passed since a requestor has responded to a ticket
- Determination of specific ticket SLAs to build out the time-based automations (ex: moderate has a four-hour SLA, urgent has a one-hour SLA)
- Determine internal meanings of specific ticket statuses
How to set this up:
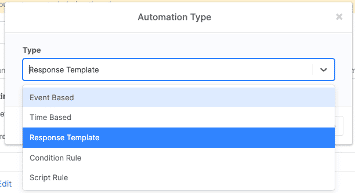
The first step here is to set up the correct automation type, which in this case will be a time-based automation. This can be done by going to Configurations ➡️ Integrations ➡️ Ticketing ➡️ Automation ➡️ Create ➡️ Time Based:

Next, we want to adjust the status of a ticket. In this example, we want only “Open” tickets to be automatically updated once a technician has responded, but the requestor hasn’t responded for at least an hour:
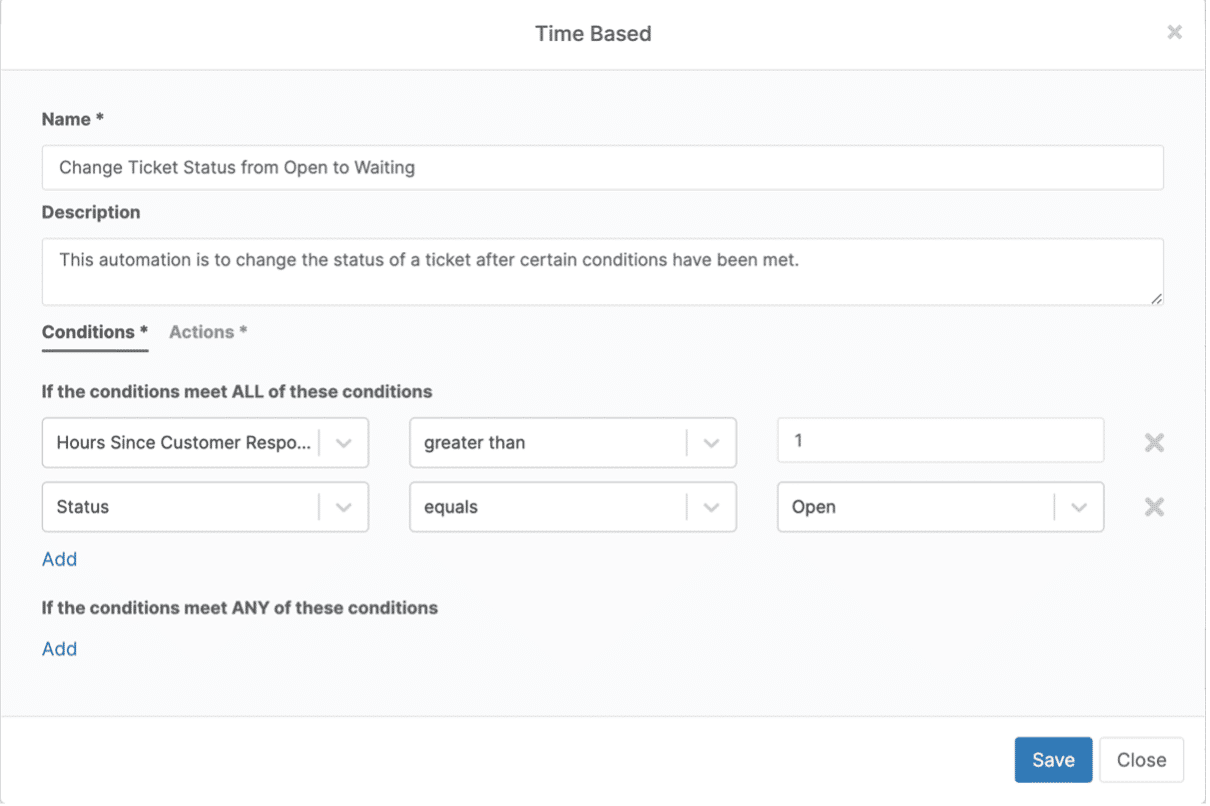
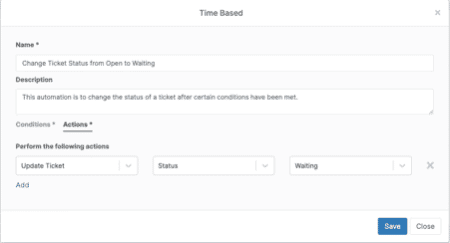
Once this condition is met, we want the “Open” ticket to be set to “Waiting.” This is achieved in the actions section:
Our hope is that the requestor will eventually respond, and we can move the ticket towards resolution. If not, though, we can automatically close the ticket.
The second part of this automation can handle tickets that fall into this category. Following the same steps as before, the next automation will begin like this:
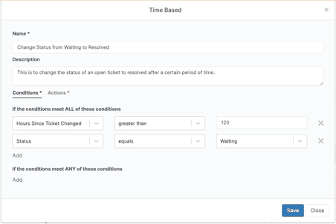
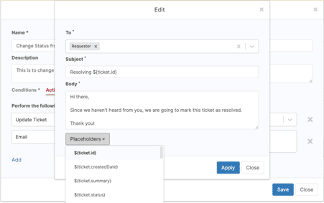
Next, we want to set up the action that will take any tickets with a status of “Waiting” that hasn’t been changed in 120 hours to update to Resolved. An added benefit here is also to have the requestor of the ticket receive an email informing them that the ticket has been “Resolved” on our end:
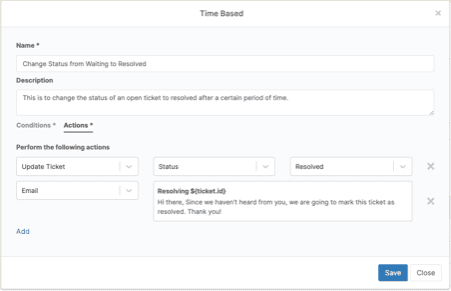
One final step is needed to set up the subject line that contains the ticket ID and the body. Click into the text field next to the added “Email” action and insert the subject line, placeholder, and body that is most relevant to you:
3) Automatically route specific tickets to a technician
In this example, we will walk through how to set up automations that will deliver tickets about specific problems, tasks, products, etc., to a particular technician that may have a specialty in that area.
Use Case: These types of automations can help with ticket dispersion and organization to technicians that are subject matter experts or who have a specialty with questions that may be asked. Rather than having the technicians look through more generic boards that are broken out by service-level complexities, they can have all the tickets they need be assigned directly to their boards. This allows them to spend their time more efficiently addressing the request rather than searching for relevant tickets.
What is needed:
- Create a response template automation that will take the following actions: add a specific tag, assign it to a specific technician, and provide that technician with a message
- Create specific tags that are related to common requests that specific technicians specialize in resolving
How to set this up:
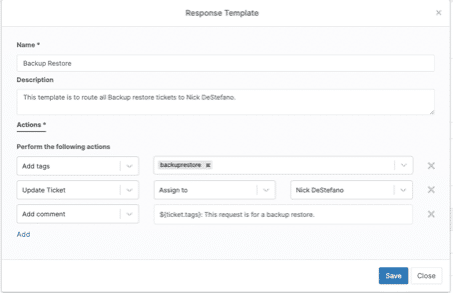
With other pieces already set up (i.e., technician accounts created, ingestion methods set up in the previous automation we reviewed), there are two main pieces left to create this style of automation. The first step is to create the necessary template, which can be found by going to Configurations ➡️ Integrations ➡️ Ticketing ➡️ Automation ➡️ Create ➡️ Response Template:
Next, we have to set up the response template with the actions necessary to route any tickets that have to do with backup restore to a specific technician (myself in the example below):
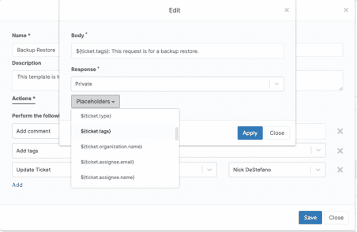
Finally, you can click within the text field next to “Add Comment.” Once you click that field, you will be given three options: Fill out the body of the comment, decide if the comment is Private or Public, and insert a Placeholder. For this example, we inserted the “${ticket.tags}” placeholder, however. There are several options to choose from that might be more relevant to your organization:
4) Create an alert for “Out of SLA” urgent tickets
In this example, we will walk through how to create alerts for urgent tickets that are out of their SLA times. We will begin with automations around ingesting urgent tickets and end with an automation that alerts the necessary parties.
Use case: Urgent ticket visibility is essential to ensure that problems are quickly addressed and minimize business impacts. Automations are essential for making sure that any urgent ticket that comes in is automatically routed to the technicians equipped to handle these quickly and effectively. A drop-off at any step in the process can cause significant problems, so reducing human error is imperative in these situations.
What is needed:
- Set up email and Slack integrations to send notifications to the necessary parties if a ticket is out of SLA
- Create specific tags that represent a ticket that can be considered “urgent.”
- Create an event-based automation that will parse the subject line of an email for “urgent” and add an “urgent” tag
- Create a time-based automation that will look for any “urgent” tags and for any tickets that have surpassed a specific amount of time since a technician responded and will send Slack and email notifications to escalate
How to set this up:
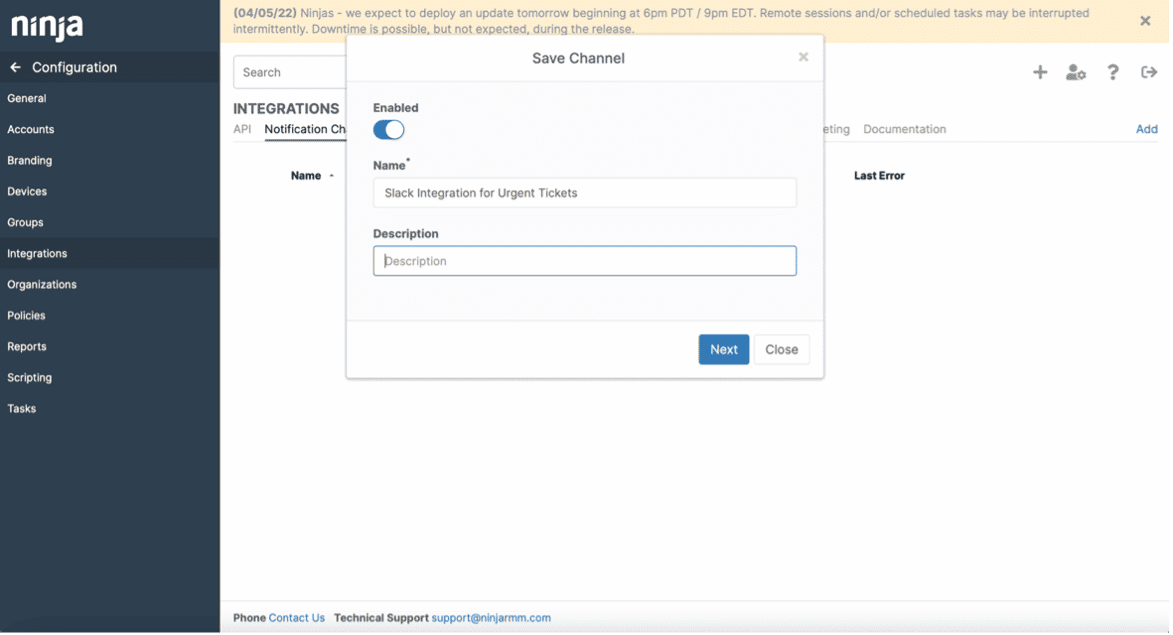
The first step is to set up an email to ingest urgent tickets and set up a Slack integration that will allow us to send notifications to the necessary parties if a ticket is out of SLA. These two integrations can be set up by going to Configurations ➡️ Integrations ➡️ Notification Channels ➡️ Enabled:
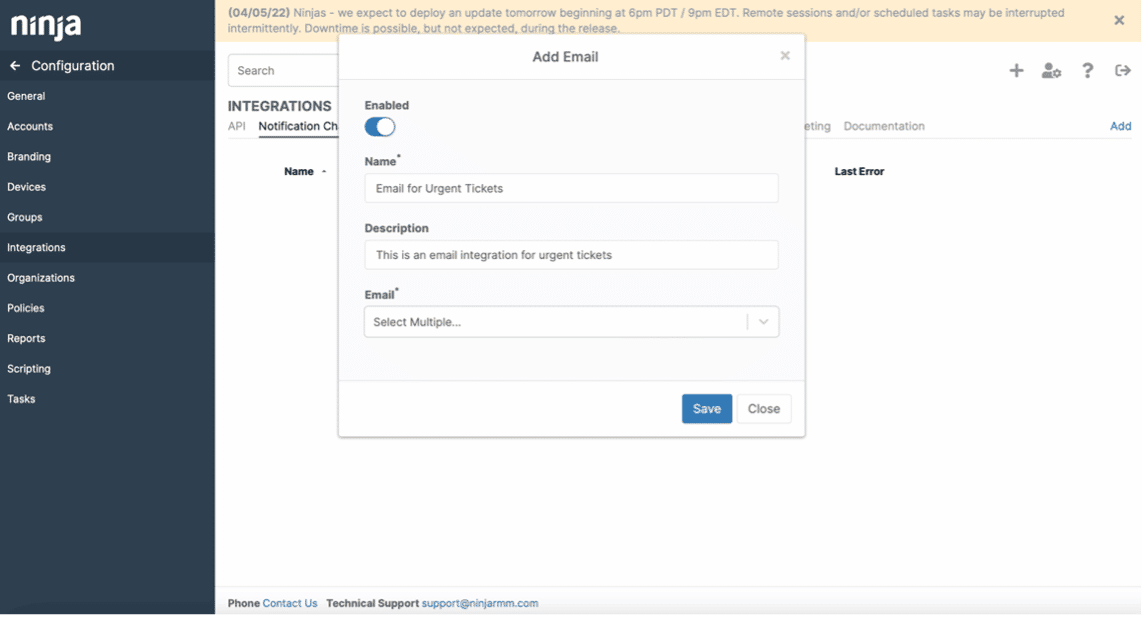
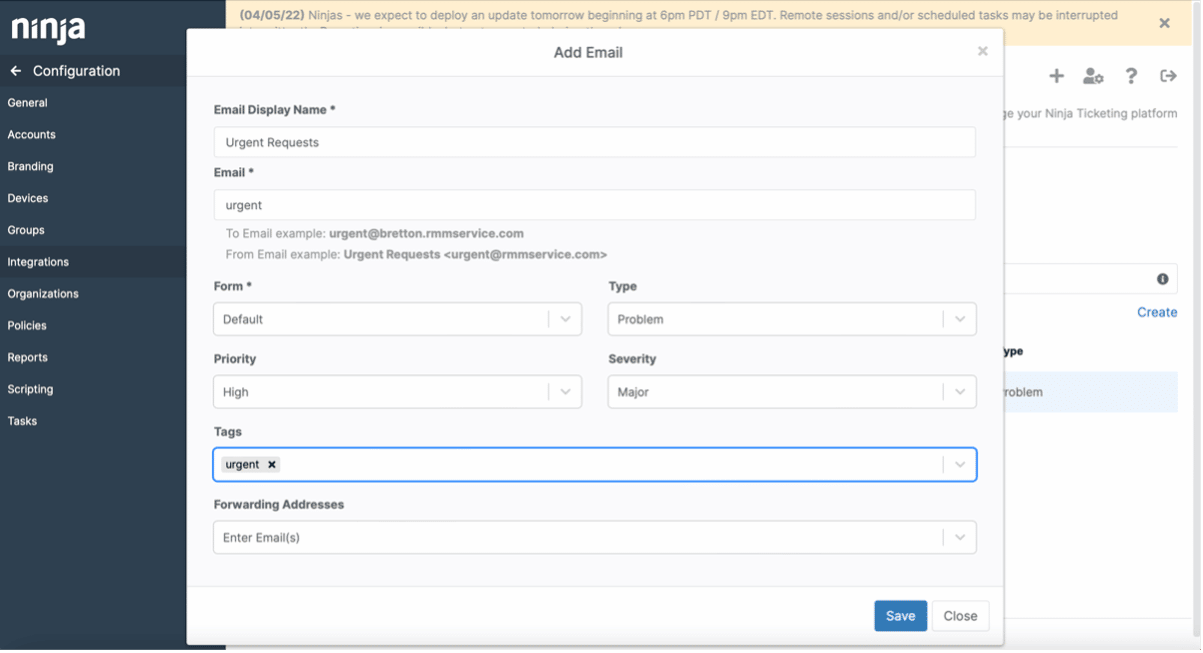
The next step is to set up the ingestion methods for any problem or issue that would be considered “urgent.” In this example, we will use two standard ingestion methods: one via a dedicated urgent issue email address and another for parsing a subject line for the word “urgent.”
We’ll first want to add an email specifically for urgent requests in this step. We’ll also want this email to add the tag “urgent” to any of these requests coming in, which will help with our conditions in the next step. This can be done by going to Configurations ➡️ Integrations ➡️ Ticketing ➡️ Email ➡️ Create:
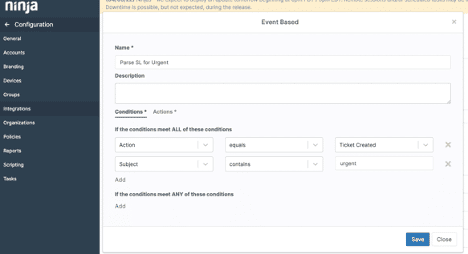
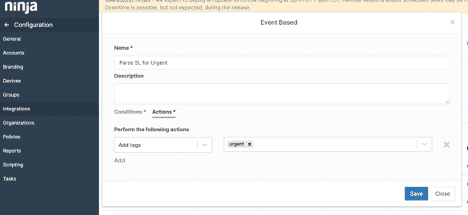
Next, we will set up an event-based automation that will parse the subject lines for the word “urgent” and add the tag “urgent,” allowing the next automation to collect these tickets as well and escalate if needed:
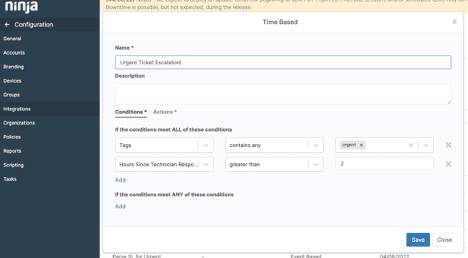
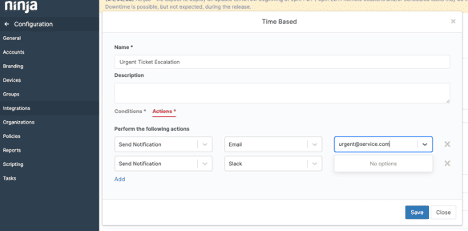
Finally, we’ll create an automation that escalates any tickets that have the tag “urgent” and have not had a technician respond in over two hours:
5) Ticket automation to signal system downtimes
In our last example, we will walk through how to set up an automation that will open a ticket if a server is down, close the ticket if the issue is resolved, and escalate that ticket if the same problem happens again.
Use Case: This automation is essential, for example, if a server goes down in an important department. When this issue is detected, several steps can be automated to help your technicians focus on addressing the issue rather than looking for it and gathering information that could delay a fix.
This automation can:
- Use a form that you want,
- Tag the issue (which, coupled with additional automation, can route this ticket to a highly visible ticket board),
- Auto assign a priority and severity (based on your existing policies),
- And handle the following steps if the situation is resolved or arises again in a short period of time.
This use case utilizes several other functionalities within Ninja, allowing for a swift and straightforward process, although it may seem complex at first glance.
What is needed:
- Create a condition ticket automation that will tag a ticket when it is created and assign severity and priority based on your policies, resolve a ticket when the condition is reset, and escalate the ticket if the condition is retriggered
- Edit your server policies to include conditions specifically for when servers are down
- Determine server conditions that will determine when the initial ticket is created, initial severity and priority settings, and initial auto-reset conditions.
How to set this up:
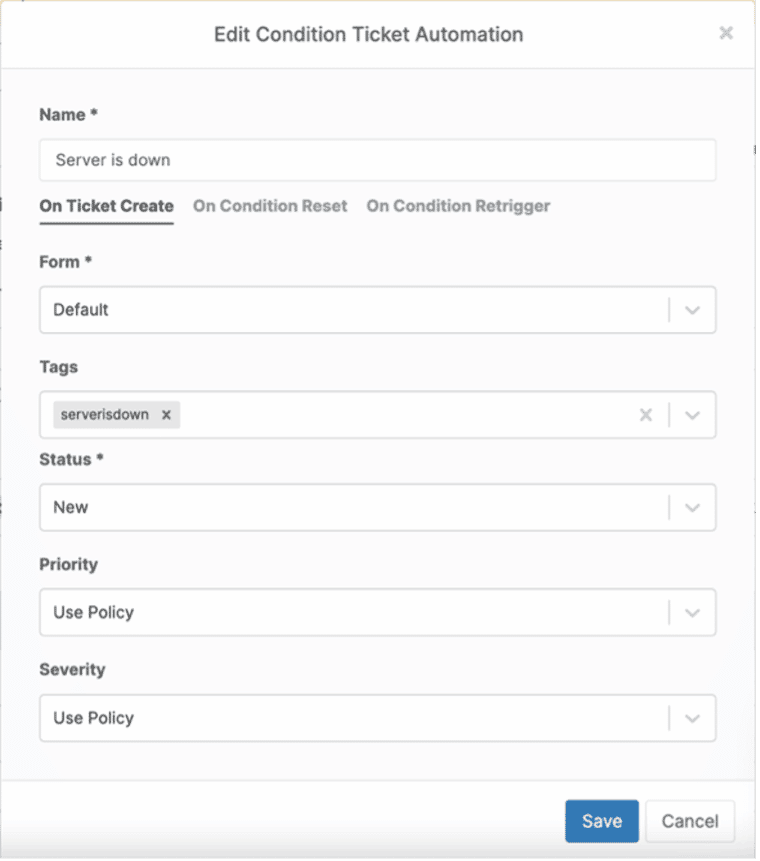
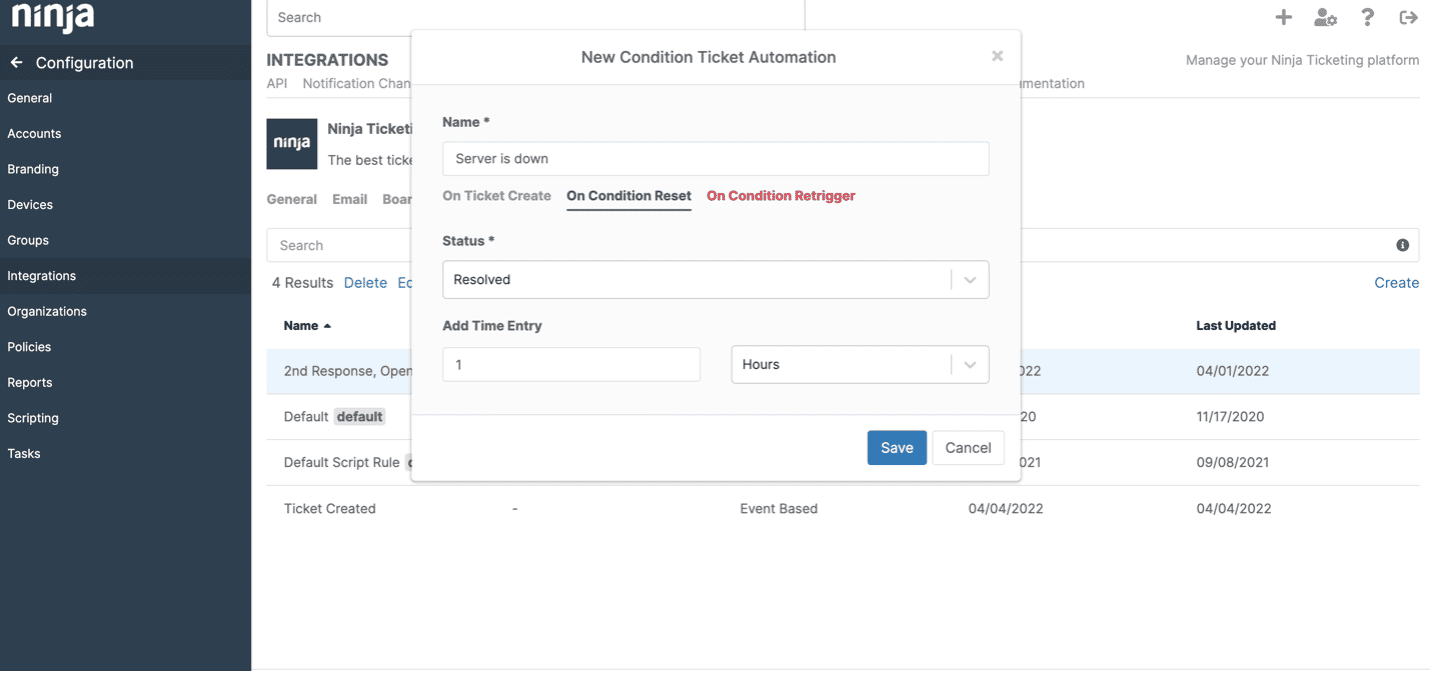
First, we want to create a new condition ticket automation to create a ticket when a server is down. There are three sections to this ticket that we will walk through here. The first section fills out the necessary fields for the initial ticket being created. Here we will select a form to use (we used ‘Default’), then add a tag, status of the ticket, and priority and severity based on your existing policies:
Next, we will fill out the ‘On Condition Reset’ section. This section will handle resolving the ticket automatically if the server is back online within a certain period of time:
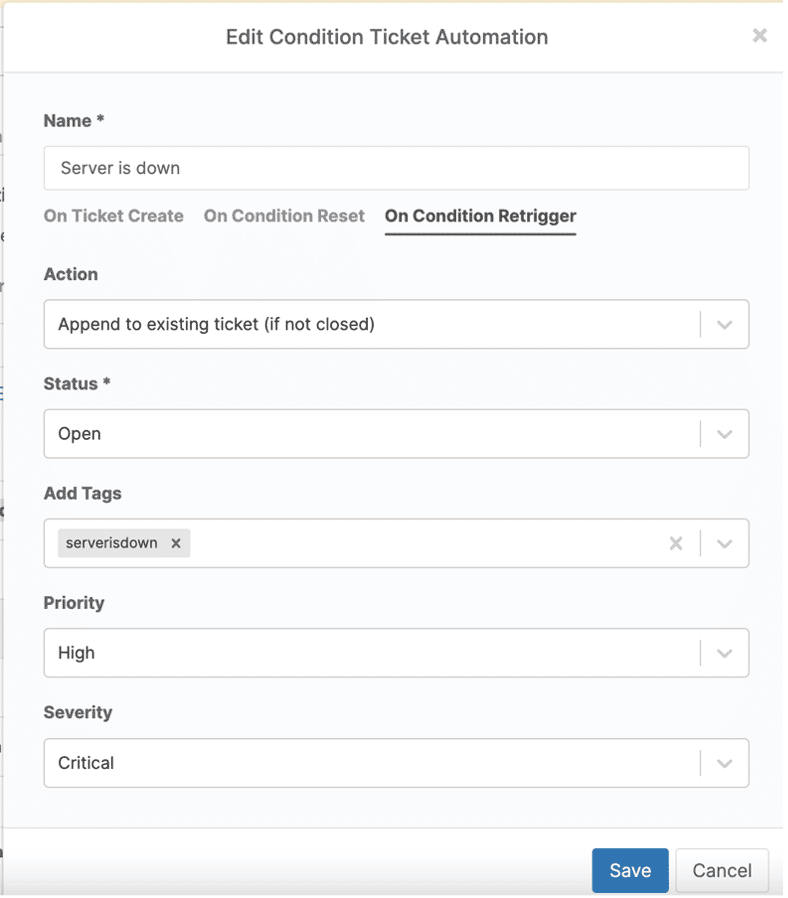
The last step in this automation is filling out the ‘On Condition Retrigger’ section. This section will handle escalation if the server goes back down in a certain period of time (within 48 hours, for example). Based on the fields, it will open the ticket again, make sure the ‘serverisdown’ tag is added, and raise the priority and severity to the highest level:
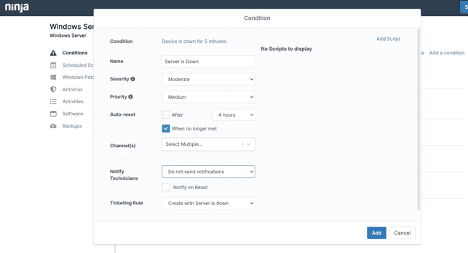
To complete the loop, the last piece that is necessary to ensure this automation is working correctly is Server Policy Conditions. So we went to Policies ➡️ Windows Server ➡️ Conditions ➡️ Add a condition (only if a Device is down conditions isn’t already set up).
We created the condition ‘Device is down for 5 minutes,’ filled out the rest of the fields, and most importantly, selected the Ticketing Rule that we just built above. This is what kick starts the automation that we just built and will create that initial ticket:
Prioritize critical issue resolution and end-user satisfaction with a robust ticketing solution.
Ticketing is a powerful feature within Ninja and adds another layer of versatility to the single-pane view Ninja provides, as automations can initially be daunting if you haven’t had experience with a ticketing platform before. Instead, we wanted to provide a How-To for some of the common executions we see, moving from easy to more complex setups.
We will continue publishing some more posts to help you out with some more common automations so you can efficiently help your technicians solve whatever problem comes their way. Feel free to provide suggestions for the next iteration of this series and reach out if you have any questions about the executions above!
Foundational NinjaOne ticketing automations for MSPs and IT teams
Ticketing is one of the core features that elevate NinjaOne’s single-pane IT management software. On that note, new users can refer to this guide to ease their transition, particularly when setting up IT service desk protocols.
With these baselines, MSPs and IT teams can reduce manual work and improve response times in hybrid environments, while also freeing up crucial resources for building scalable IT support, smarter operations, and enhanced end-user experiences for technicians, endpoint users, and clients alike.
Related topics:


