

Key Points
- Nmap can be quickly installed on Linux (using apt or dnf), Windows (with Npcap), and macOS (via Homebrew or DMG).
- Foundational commands, such as nmap -sn, nmap -sS, nmap -sU, and nmap -0, enable you to identify live hosts, open ports, and operating systems.
- Nmap’s host discovery and ping scanning capabilities allow administrators to map active devices across IP ranges.
- Apply TCP connect, SYN scan, and UDP scans to detect open ports, exposed services, and potential gaps that shape your network’s attack surface.
- Use Lua-based NSE scripts to automate vulnerability detection, streamline security assessments, and strengthen network defense.
In the constantly changing cybersecurity landscape, staying one step ahead of malicious actors is crucial – and understanding the intricacies of your networks is an integral part of that. A tool that can help you do this has earned its reputation as a cybersecurity stalwart – Nmap. Nmap, short for Network Mapper, holds the keys to unlocking valuable insights in your network infrastructure.
Whether you’re a cybersecurity professional hunting down vulnerabilities or a system administrator maintaining the health of your network, understanding how to use Nmap is crucial.
If you prefer a visual guide, watch How to Use Nmap: Complete Guide with Examples.
What is Nmap?
Nmap is an open-source utility used for network scanning and security auditing. Thanks to its capabilities and versatility, this software has become a staple in the arsenals of cybersecurity professionals, system administrators, and ethical hackers. Nmap’s set of features extends beyond the realm of basic network scanning and includes:
- Host discovery: Nmap identifies active hosts on a network, laying the foundation for more in-depth exploration.
- Port scanning: Nmap discovers open ports and services, empowering administrators to understand a network’s attack surface.
- Version detection: Nmap can identify service versions and help pinpoint potential vulnerabilities associated with specific versions.
- Scriptable interaction: Nmap’s NSE (Nmap Scripting Engine) allows users to create tailored scans and automate complex tasks.
- Operating system fingerprint: Nmap’s OS detection capabilities enable administrators to identify the operating systems running on discovered hosts, helping them conduct network inventory and security assessments.
💡Note: As of May 2025, the latest stable version of Nmap is 7.96. This version introduces faster parallel DNS lookups, improved Windows compatibility, and updated library support.
Automate routine tasks and empower your IT team with NinjaOne’s comprehensive endpoint management platform.
Learn more about NinjaOne Endpoint Management.
Understanding Nmap: network scanning and security auditing
Network scanning systematically explores a computer network to identify its components, assess its topology, and uncover potential security weaknesses. When administrators know how a network is configured, they can make informed security decisions and tighten the digital perimeter.
With its diverse array of scanning techniques and customizability, Nmap is the leading tool for network scanning and security auditing. Here are some of the roles that it plays:
- Network inventory: Nmap can build a list of all the software and service assets on a network and create a “map” of a network with details that include IP addresses, ports, software or service versions, operating systems, and MAC addresses.
- Vulnerability detection: Nmap can scan a network for vulnerabilities by comparing the operating systems and versions of services running on a network against known vulnerabilities using the Nmap Scripting Engine (NSE). Its latest version also now supports integration with external vulnerability feeds (e.g., vulners and vulscan) and outputs results in machine-readable formats for easy SIEM integration.
- Network monitoring: Network monitoring can be achieved by automating scanning tasks using the Nmap Scripting Engine.
Getting started with Nmap
The first step in using Nmap is to install it on your machine. Below, we walk through the instructions for the top three operating systems. You can refer to the Nmap download page for each installation process to ensure you get the latest version of the software.
Installing Nmap on Linux
The method for installing Nmap on Linux depends on the distribution you have. For RPM-based distributions like Red Hat, Mandrake, SUSE, and Fedora, run the following command:
dnf install nmap
For Debian Linux and its derivatives like Ubuntu, run this command:
apt-get install nmap
On most Linux distributions, ZenMap, the official GUI for Nmap, must be installed separately.
⚠️Important: ZenMap has not been actively maintained since 2019 and some distros have removed it from their repositories.
Installing Nmap on Windows
To install Nmap on Windows, follow the steps below:
- Go to the Nmap download page and download the latest stable Windows release.
- Run the installer and click ‘Yes’ to allow changes, then agree to the license terms.
- In the component selection screen, keep the default options and select ‘Next’. Include Zenmap, if necessary.
- On the final setup screen, click ‘Install’.
Once the installation is done, the Zenmap shortcut will be available on your desktop and in the Start Menu folder.
💡Note: Npcap version 1.80+ now installs by default with Nmap on Windows.
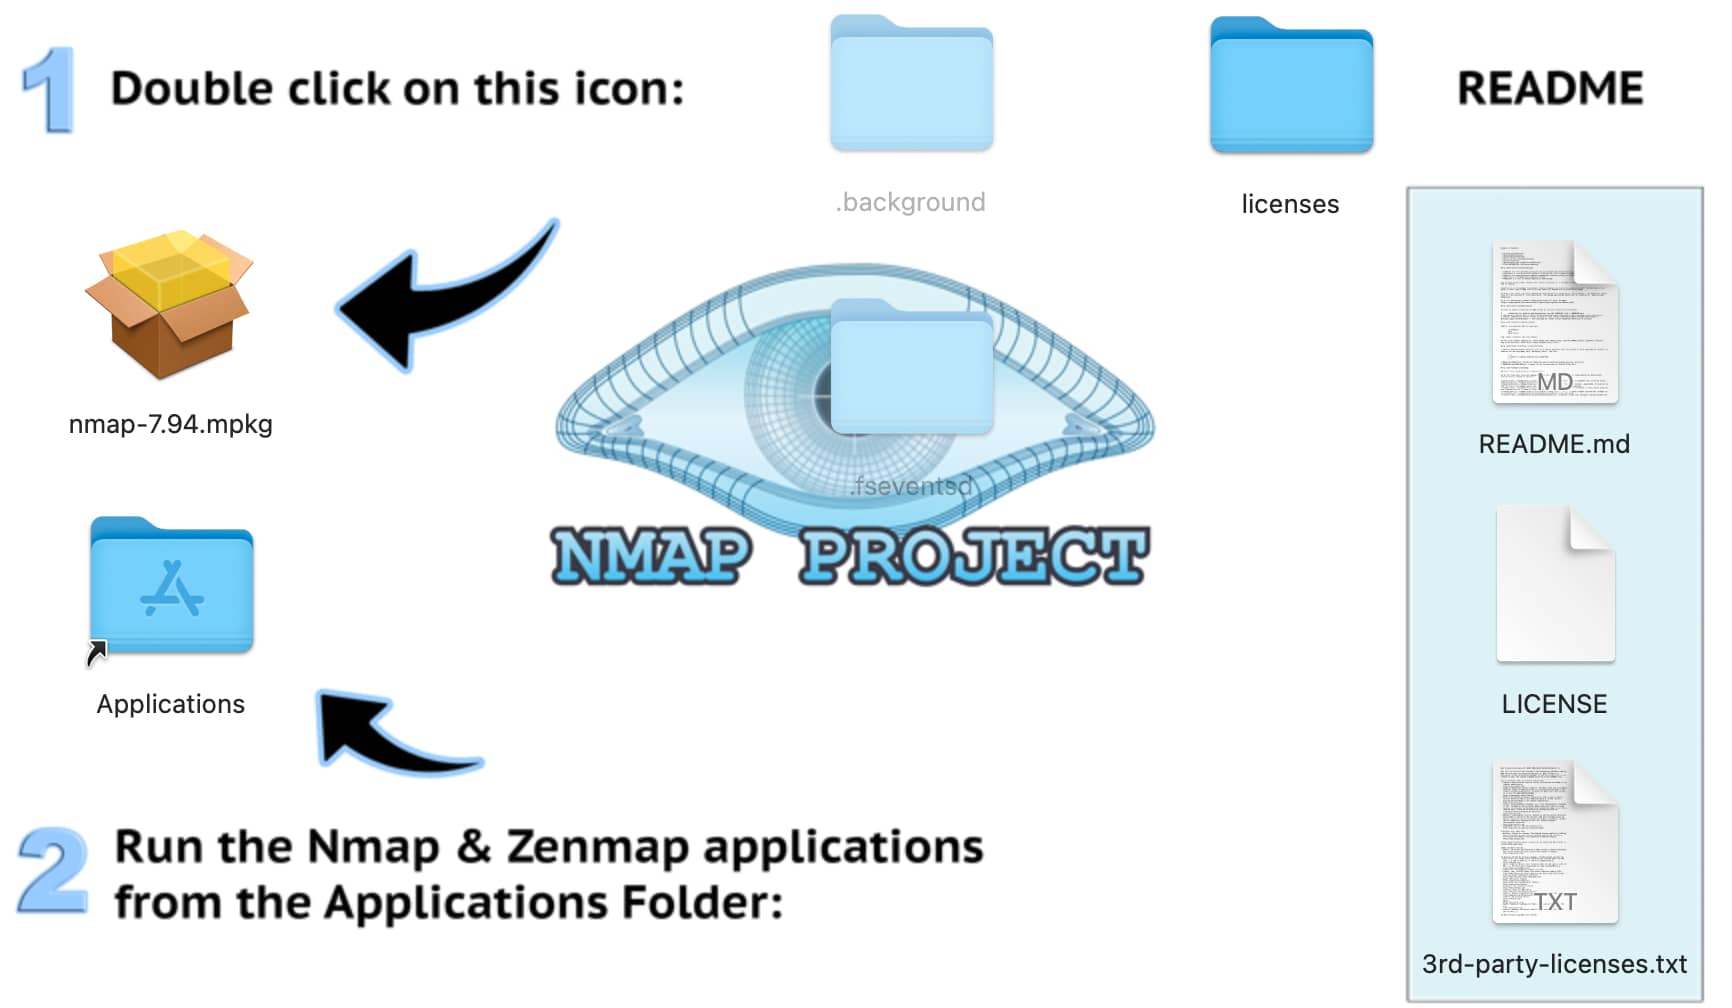
Installing Nmap on Mac
There are a couple of options for installing Nmap on a Mac computer. The first one is simple if you already have Homebrew installed, simply run the following command:
brew install nmap
You can also visit the Nmap download map, scroll down to the Mac OS X Binaries section, and download the latest stable release installer(.dmg). This version also comes with ZenMap. Simply double-click the DMG file to start the installer and follow the on-screen instructions.
Basic Nmap commands and syntax
Now that you have Nmap installed, you can start learning some of the basic commands so you can get started with network scanning:
Help
To get help from Nmap, you don’t even have to use a parameter. Just execute nmap in a terminal.
nmap
You can also use nmap –-help or nmap -h for a more concise usage summary.
Simple host discovery
The first step in network scanning is host discovery, revealing active devices on the network. Here is that command:
nmap <target>
In the command, <target> can be an IP address, hostname, or range of IP addresses. Here are examples of each:
#Single IP
nmap 127.0.0.1
#Hostname
nmap example.com
#Range of IPs
nmap 192.168.10.0/24
💡Tip: When scanning larger subnets, use –min-rate or -T3 to balance speed and stealth.
Ping scan
This command identifies active hosts on your network by sending ICMP echo requests or APR requests with root privileges withouts conducting port scans.
nmap -sn <target>
Here, <target> can also be an IP address, hostname, or range of IP addresses.
Basic port scanning
You can use basic port scanning to probe open ports and services on a target. The command is as follows:
nmap -p <port-range> <target>
Replace <port-range> with a single port number or a range of ports (e.g. 80, 443, or 1-1024) and <target> with the IP address or hostname of the target.
💡Tip: To scan all ports, use -p-; to scan the most common ports, you can use –top-ports 1000.
Version detection
Learning the versions of services running on open ports is essential for vulnerability assessment. To enable version detection on a basic port scan, just modify the last command this way:
nmap -sV -p <port-range> <target>
The -sV flag tells Nmap to perform version detection on the specified ports.
Operating system fingerprinting
Nmap can also determine the operating system of a target host through OS fingerprinting when you use the -O flag. Here is that command:
nmap -O <target>
Here, <target> is an IP address or hostname.
⚠️Important: This command requires root or administrator privileges to work.
Using Nmap for network scanning
Now that you know some of the basic Nmap commands and options, let’s put them to use. To follow along, you will need a range of IPs to scan.
To find a range on your network, first, find the IP address of your device. For this article, we will use 10.0.0.23. As for our IP range, we will be using 10.0.0.0/24, which is CIDR (Classless Inter-Domain Routing) notation representing the 256 addresses 10.0.0.0 – 10.0.0.255.
You can also use scanme.nmap.org as your target for some of these scans, which was designedto help people learn how to use Nmap.
⚠️Warning: You should only scan targets you own or have permission to test. Unauthorized network scanning may violate terms of service or cybersecurity laws (GDPR, CCPA).
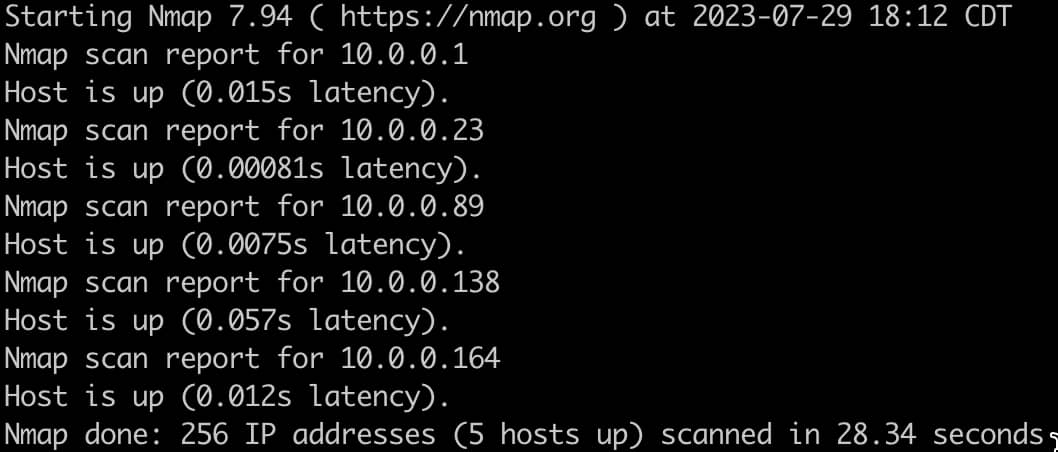
Using a ping scan to identify live hosts
Ping scanning provides the basis of host discovery, allowing you to find active hosts on a network quickly. To ping scan the range of IP addresses on my network, run the following command:
nmap -sn 10.0.0.0/24
And here is the result, which shows five hosts on my network:
Exploring different port scanning techniques
There is more to Nmap than just ping scanning. A ping scan will tell us the IP addresses of the hosts, but that is the only data we gather from the scan. We’ll need to explore additional scanning techniques to gather more information on the hosts.
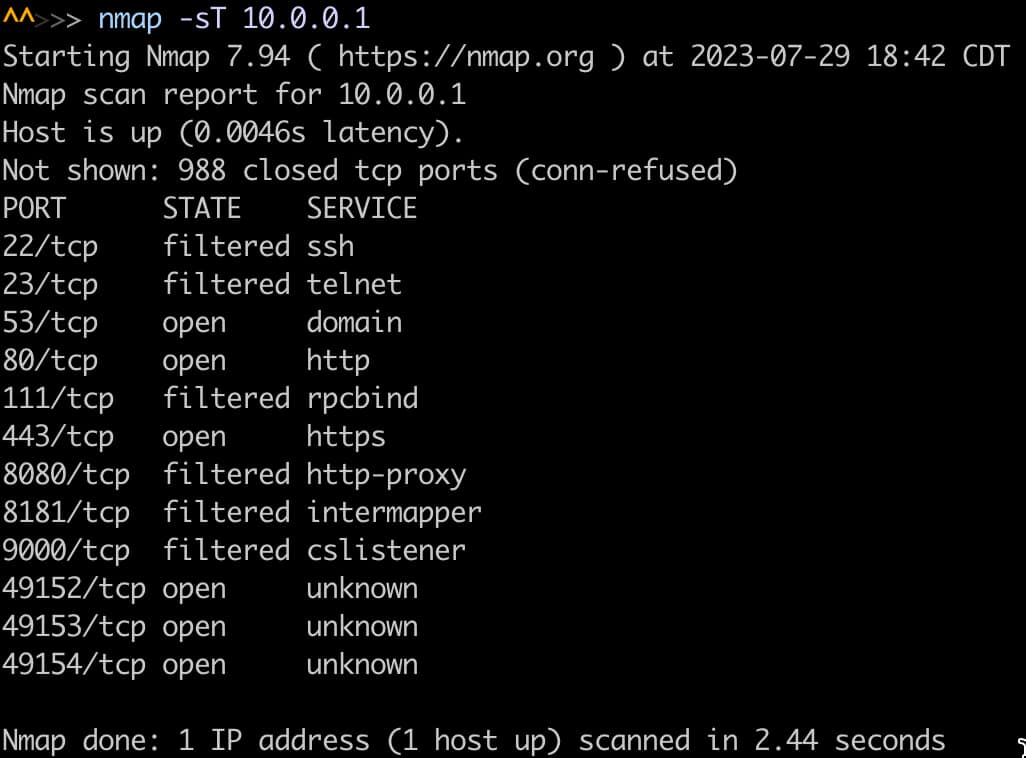
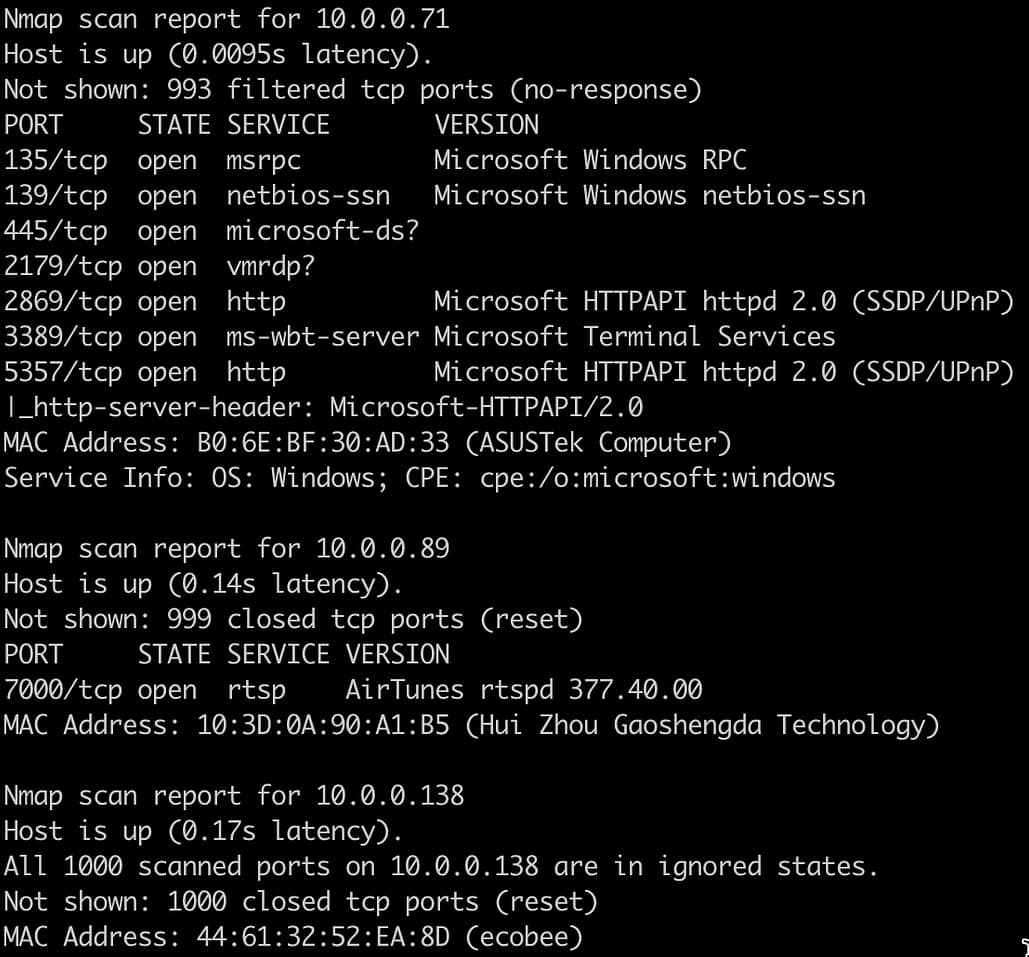
TCP connect scanning
The TCP connect scan is the most straightforward scanning technique. Nmap establishes a full TCP three-way handshake with each target port to determine its status (open, closed, or filtered). Here is an example using an IP found in a ping scan:
nmap -sT 10.0.0.1
This scan gives a list of the ports on this host:
SYN scanning
SYN scan, also known as a half-open or stealth scan, sends SYN packets to the target ports without completing the handshake. It evaluates the responses to determine port openness without a full connection. This technique is faster than the TCP connect scan and less likely to be detected.
Here is an example of a SYN scan on that same IP address:
sudo nmap -sS 10.0.0.1
You will notice that sudo was used with this command. Some Nmap commands require root privileges and will return this message: “You requested a scan type which requires root privileges.” This is because sending and receiving raw packets requires root access on a Unix or Mac system. On Windows, you must use an administrator account for the command to work.
Here are the results of that scan:
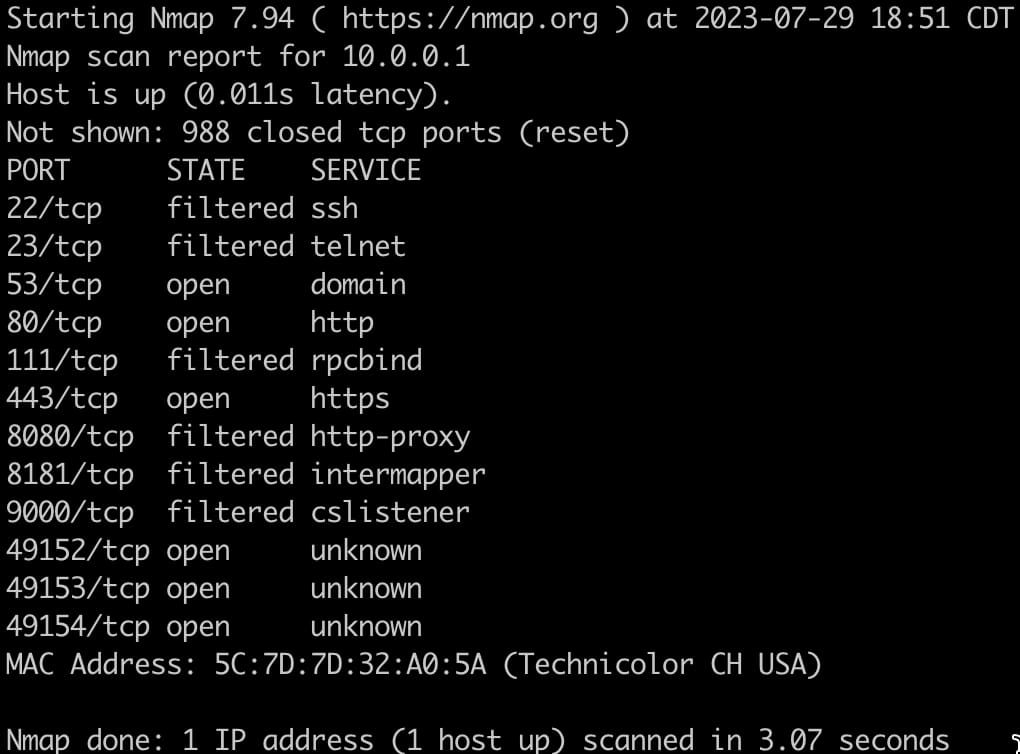
💡Note: On Windows 11, the included Npcap driver (v1.80+) now supports raw packet capture with user consent, which can improve the accuracy of SYN scans.
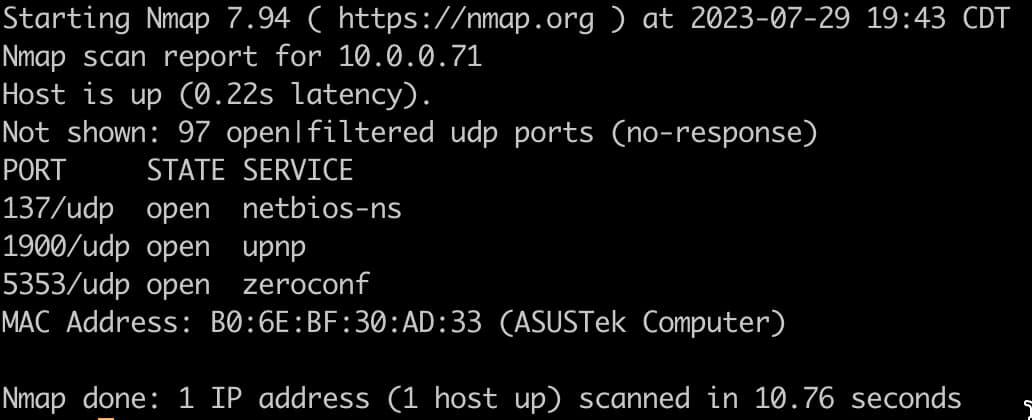
UDP scanning
A UDP scan targets UDP ports on the target host. Since this is a connectionless protocol, determining the state of a UDP port requires interpreting the response or lack thereof.
With this scan, Nmap detects rate limiting and slows down to avoid flooding. When this occurs, the scan can take happens, the scan can take a long time, up to 18 hours, with a limit of one packet per second. For this reason, we used the -F option to scan only the top 100 ports rather than all 65,535.
Here is an example which also requires root privileges or an administrator account:
sudo nmap -sU 10.0.0.1 -F
And here is the result:
OS scanning
Knowing which operating systems are running on target hosts is important in understanding a network’s architecture. Here is an example, which again requires root privileges or an administrator account:
sudo nmap -O 10.0.0.0/24
We used a range of IP addresses again for this scan. Here are a couple of those results:
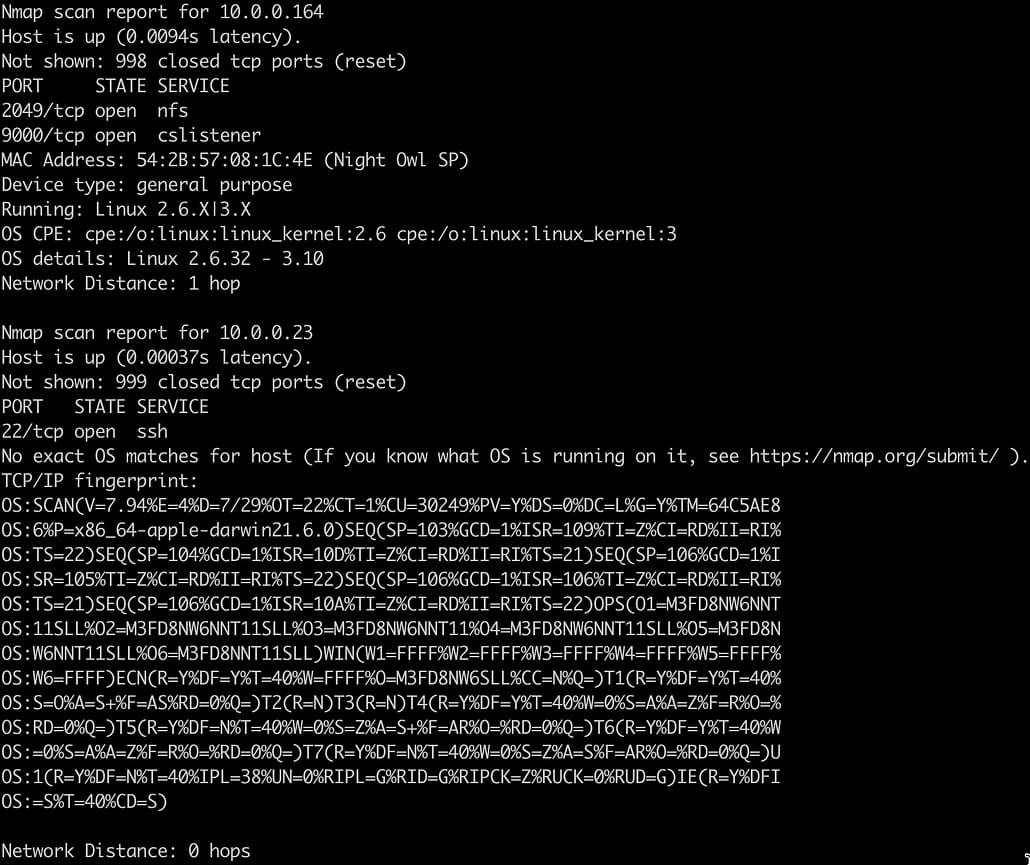
💡Note: The accuracy of OS detection may vary in virtualized or cloud-hosted environments. Add the –osscan-limit and –osscan-guess flags to optimize its performance and increase detection likelihood.
Using Nmap for security audits
The commands that you just learned will get you started with a security audit by listing all the open ports, services, and operating systems in use on your network. This security audit will identify potential entry points for malicious actors. You can find even more security audit information using the Nmap Scripting Engine (NSE).
NSE comes with a suite of scripts that will help you find vulnerabilities in your systems. The scripting engine utilizes the Lua programming language, enabling you to write custom scripts that tailor your scans to your specific needs.
As of Nmap 7.96, there are more than 612 NSE scripts you can use, covering categories from brute-force to vulnerability detection. You can browse these entries here.
For our example, we will use the Vulners script, which uses the Vulners vulnerability database. This script depends on having information on software versions, so you must use the -sV flag with it. Here is an example scan using this script to scan a range of IPs:
nmap -sV --script=vulners 10.0.0.0/24
Fortunately or unfortunately, this network had no vulnerabilities, but here is a partial output:
Nmap for different operating systems
While Nmap commands are generally consistent across different operating systems, some tips and considerations may be more relevant to specific operating systems.
Linux
- Running Nmap: To run Nmap on Linux, open the terminal and enter the desired Nmap command
- Updating Nmap:
- For Debian and Ubuntu, use sudo apt update && sudo apt install nmap
- For Fedora/RHEL, the command is sudo dnf upgrade nmap
- Uninstalling Nmap:
- sudo apt remove nmap # Debian/Ubuntu
- sudo dnf remove nmap # Fedora/RHEL
Windows
- Running Nmap: On Windows, run Nmap by opening the Command Prompt or PowerShell and entering the desired Nmap command.
- Updating Nmap: Visit the Nmap download page for the latest releases.
- Uninstalling Nmap: Open the folder where Nmap is installed and double-click the uninstallation script to start the uninstallation process.
- Performance: Although Windows is slightly less efficient for raw packet scans than Linux or Unix, Nmap 7.96 and Npcap 1.80+ now support Ethernet and Wi-Fi interfaces and include loopback traffic capture.
Mac
- Running Nmap: Open the terminal application and enter the desired Nmap command.
- Updating Nmap
- If installed via Homebrew, run brew upgrade nmap
- If installed via DMG, compare your installed version using nmap -V with the latest stable version and update it accordingly.
- Uninstalling Nmap: If you installed Nmap using Homebrew, run brew uninstall nmap to uninstall it. If you installed Nmap from the official website, run sudo rm -rf /usr/local/bin/nmap /usr/local/share/man/man1/nmap.1.
Nmap is great for network discovery, but NinjaOne does that and more. Manage everything in your network, from patching to ticketing, in a single platform.
Start your free trial today.
Want to learn how to keep your networks secure and efficient? Watch our video on How to Use Nmap: A Complete Guide with Examples.
Unleashing Nmap for enhanced network security
Nmap can be your invaluable ally when your goal is to keep your network secure. Using various scanning techniques, Nmap uncovers live hosts, probes open ports, and identifies potential vulnerabilities. The Nmap Scripting Engine (NSE) helps automate these assessments and address specific security concerns.
To leverage Nmap effectively:
- Tailor scans to specific objectives and scope.
- Regularly patch systems to guard against known vulnerabilities.
- Conduct regular security audits to stay ahead of threats.
With Nmap as your trusted security copilot, you can navigate the complex landscape of network security, secure your digital assets, and safeguard against cyber threats.


