

Tailored experiences in Windows 11 use optional information about how you use your device to show personalized tips, ads, and suggestions. Some find this helpful, but many companies and privacy-focused users turn it off to better control their data. In this guide, you’ll learn easy ways to turn tailored experiences on or off, whether you’re setting up one computer or managing many devices.
Step-by-step methods to turn on or off tailored experiences
Controlling tailored experiences is straightforward, whether you’re an IT admin managing enterprise devices or a privacy-focused user.
📌 Use case: Many users enable tailored experiences to get personalized tips, like storage-saving suggestions, using diagnostic data. Meanwhile, organizations often disable it to follow strict data rules or reduce ad distractions.
📌 Prerequisites: You can configure tailored experiences on any Windows 11 edition. Just remember: the Group Policy Editor method only works on Pro, Enterprise, or Education versions. For all methods below, you’ll need administrator rights to make changes.
We recommend checking ⚠️ Things to look out for before proceeding.
📌 Recommended deployment strategies:
|
Click to Choose a Method |
💻 Best for Individual Users |
💻💻💻 Best for Enterprises |
| Method 1: Settings (GUI) | ✓ | |
| Method 2: Group Policy Editor | ✓ | |
| Method 3: Registry Editor | ✓ | ✓ |
| Method 4: .reg file | ✓ |
Method 1: Enable or disable via Settings
Windows Settings provides quick and direct control over Microsoft’s tailored experiences, including whether it can use your diagnostic data for personalization.
📌 Use case: This approach is ideal for individual users or small setups that need instant configuration without requiring technical skills. However, changes will only apply to the current device.
- Open Settings:
- Press Win + I to open Settings.
- Navigate to Privacy:
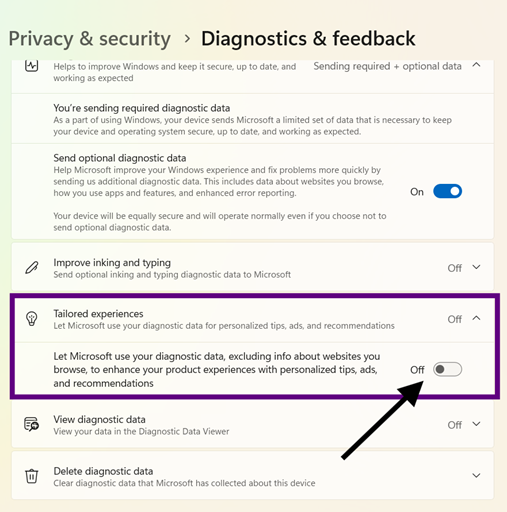
- Go to Privacy & security, then select Diagnostics & feedback.

- Go to Privacy & security, then select Diagnostics & feedback.
- Toggle Tailored experiences:
- Scroll to Tailored experiences, then switch the toggle:
- On: to get tailored experiences with diagnostic data (personalized tips and ads).
- Off: To disable the feature.
- Scroll to Tailored experiences, then switch the toggle:
- Close Settings:
- Changes apply immediately.
Method 2: Enable or disable via Group Policy Editor (GPO)
Group Policy offers centralized control over every Windows device in a domain network, allowing the ability to configure tailored experiences.
📌 Use case: This approach is ideal for system administrators deploying settings or policies network-wide, since it allows them to override user-level configurations like Settings.
- Open Group Policy Editor:
- Press Win + R to open Run.
- Type gpedit.msc, then hit Enter to open the Group Policy Editor.

- Navigate to the policy:
- Go to User Configuration > Administrative Templates > Windows Components > Cloud Content.
- Configure the policy:
- Double-click Do not use diagnostic data for tailored experiences, then choose:
- Enabled: This will disable tailored experiences.
- Disabled/Not Configured: Allows Windows to get tailored experiences with diagnostic data (personalized content blocks).
- Double-click Do not use diagnostic data for tailored experiences, then choose:
- Apply changes:
- Click Apply, then OK.
- You can also reboot your device;
- OR, run gpupdate /force in Command Prompt to update policies immediately.
Method 3: Enable or disable via Registry Editor
The Registry Editor gives you targeted control over tailored experiences. This modifies the core Windows configuration that manages personalized features.
⚠️ Warning: Making editing mistakes in the Registry can lead to system instability. Make sure to back up first before making changes. See the ⚠️Things to look out for to learn more.
📌Use case: This approach is ideal for Windows 11 Home users where Group Policy is not available. IT admins can also use this when they prefer to use scripts for policy deployment or advanced users who are more comfortable with registry editing.
- Open Registry Editor:
- Press Win + R to open Run.
- Type regedit, then hit Enter to open the Registry Editor.
- Confirm any User Account Control (UAC) prompt if needed.
- Navigate to privacy settings:
- Go to or paste this on the address bar:
HKEY_CURRENT_USER\Software\Microsoft\Windows\CurrentVersion\Privacy
- Go to or paste this on the address bar:
- Create/Modify the DWORD value:
- Double-click the TailoredExperiencesWithDiagnosticDataEnabled DWORD to modify.
- If it doesn’t exist, right-click a space, then select New > DWORD (32-bit) Value.
- Name it TailoredExperiencesWithDiagnosticDataEnabled.

- Set the value to:
- 1: Enable tailored experiences.
- 0: Disable the feature.
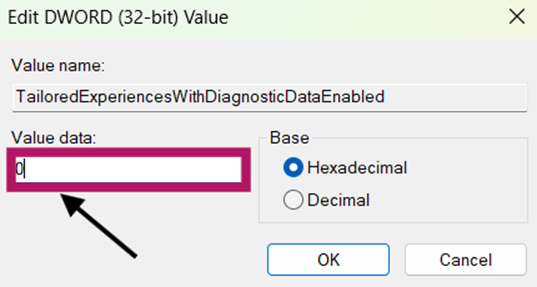
- Double-click the TailoredExperiencesWithDiagnosticDataEnabled DWORD to modify.
- Apply changes:
- Close the Registry Editor and restart your device.
Method 4: Deploy via .reg file
These files automate registry edits from Method 3. This applies settings in seconds without manual registry navigation.
📌Use case: This approach is ideal for IT admins deploying configurations via scripts or Intune.
- Create the .reg file:
- Press Win + S, search for Notepad, then open the application.

- Press Win + S, search for Notepad, then open the application.
- Paste/write the relevant code:
- To enable tailored experiences:
Windows Registry Editor Version 5.00
[HKEY_CURRENT_USER\Software\Microsoft\Windows\CurrentVersion\Privacy]
“TailoredExperiencesWithDiagnosticDataEnabled”=dword:00000001 - To disable tailored experiences:
Windows Registry Editor Version 5.00
[HKEY_CURRENT_USER\Software\Microsoft\Windows\CurrentVersion\Privacy]
“TailoredExperiencesWithDiagnosticDataEnabled”=dword:00000000
- To enable tailored experiences:
- Save the file:
- Save the file as:
- Enabled_Tailored_Experiences.reg
- Disabled_Tailored_Experiences.reg.
- Ensure that All files are selected when saving.
- Save the file as:
- Apply the .reg file:
- Double-click the saved file.
- Confirm security prompts (Yes > OK).
- Restart your computer to apply the changes.
⚠️ Things to look out for
This section highlights potential challenges to keep in mind while following this guide.
|
Risks |
Potential Consequences |
Reversals |
| Registry Corruption | The system becomes unstable or crashes. |
|
| GPO Misconfiguration | Network-wide policy fails to deploy. |
|
| Malicious .reg Files | Malware infection or data theft due to a corrupted .reg file. |
|
| Delayed Application | The changes are not taking effect |
|
Key considerations when configuring tailored experiences
Before adjusting tailored experiences, keep these essential points in mind:
What are the changes when you disable tailored experiences
All personalized content that relies on optional diagnostic data, including tips, ads, and recommendations, ceases to run. This means Microsoft will no longer use your usage patterns to personalize your Windows experience.
What doesn’t change when you configure it?
Crucially, this change won’t affect core system functionality or required diagnostics like security updates and crash reports. Your device will keep operating normally, just without personalized suggestions.
This setting is particularly valuable in privacy-sensitive environments (like healthcare or finance) or compliance-focused organizations needing to meet regulations such as GDPR or CCPA.
Personalize your workflow with Windows 11’s tailored experiences
Controlling tailored experiences empowers organizations and individuals to align Windows 11 with privacy policies while managing personalized content. Use methods like Settings, Group Policy, and Registry to manage this setting. Take control of your data for a more personalized experience or better data security.
Related topics:
