

In Windows 11’s Notification Center, alerts stack up chronologically by default, meaning critical server alerts could get buried under casual Slack messages. But did you know you can customize the priority of notifications in the Action Center to put urgent alerts first? In this guide, you’ll learn practical methods to ensure that critical warnings and priority apps command attention at the top of your feed.
Methods for prioritizing notifications in the Action Center
Ensuring critical alerts like server downtime or security warnings appear above less important ones is key to managing your Windows 11 Notification Center effectively.
📌 Use cases: Changing the priority of notifications allows you to monitor alerts from tools, backup systems, and security software. This can prevent urgent emails, reminders, or communication tools from getting buried under non-essential alerts.
The available priority levels are:
- Top: Notifications always appear at the very top, regardless of when they arrived.
- High: Notifications appear above “Normal” priority ones, but below “Top”.
- Normal: The default level. Notifications appear chronologically, below “High” and “Top” alerts.
📌 Prerequisites: The methods in this guide can be done for all editions of Windows 11. All you need is some basic familiarity with the tools used, such as Settings and the Registry Editor. However, ensure that you have administrative privileges when using the Registry method.
We recommend checking ⚠️ Things to look out for before proceeding.
📌 Recommended deployment strategies:
| Click to Choose a Method | 💻 Best for Individual Users | 💻💻💻 Best for Enterprises |
| Method 1: Using the Settings | ✓ | |
| Method 2: Using the Notification Center | ✓ | |
| Method 3: Using the Registry Editor | ✓ | ✓ |
Method 1: Using the Settings
The simplest way to manage your notification priority is through Windows 11’s Settings app, making it perfect for most users who need quick adjustments without technical complexity.
📌 Use case: Ideal for everyday users, IT staff configuring individual workstations, or anyone who prefers a graphical interface over registry edits.
Step-by-step procedure:
- Press Win + I to open Windows Settings, or you can search for it in the Start menu.
- In the Settings window, go to System, then Notifications.

- Under Notifications from apps and other senders, find and click the app you want to configure.
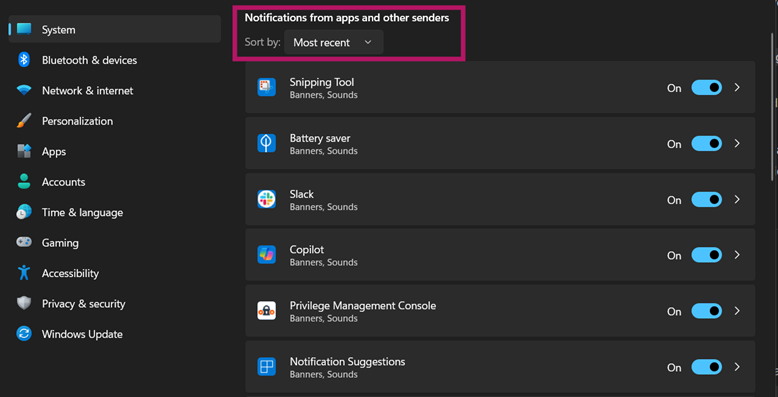
- After selecting an app, locate the Priority of notifications in notification center and choose its priority level:
- Top: Always appears first
- High: Above normal alerts but below Top-level notifications
- Normal: Listing it in the default chronological notifications order

- If you selected Top priority for the app, click Allow when Windows prompted: Let this app show high-priority toasts?
This method directly modifies user-specific notification profiles stored in Windows’ database. Notifications for your selected apps should now appear, depending on their priority level.
Method 2: Using the Notification Center
Adjust notification priority instantly while reviewing alerts without needing to dig through Settings menus.
📌 Use case: It’s ideal for making quick adjustments when you’re actively receiving notifications during critical incidents, when urgent alerts need immediate attention, testing new apps and deciding their priority level on the fly, or for temporary priority boosts during time-sensitive tasks.
Step-by-step procedure:
- Press Win + N or click the notification icon on your taskbar to open the Notification Center.
- Look for any active notification from the app you want to prioritize (e.g., Slack message or email alert).
- Hover over the notification, then click the ··· (three-dot menu) on the right side of the notification.
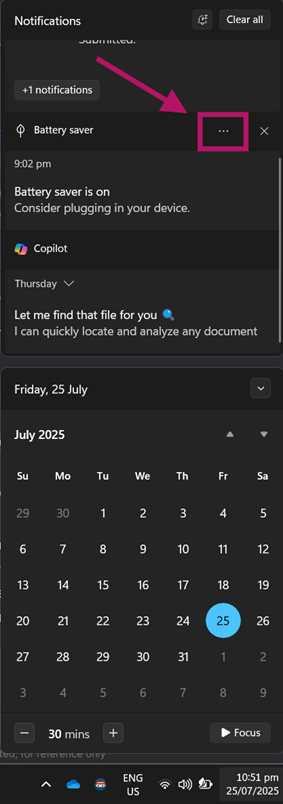
- Choose from these options:
- Make [App Name] top priority = Highest position
- Make [App Name] high priority = Elevated position
- Remove priority for [App Name] = Reverts to normal

💡 Note: The options in this last step depend on the notification’s current priority level.
The Action Center notifications system should refresh priority sorting in real-time after your selection.
Method 3: Using the Registry Editor
For IT professionals needing to enforce notification priority settings across multiple systems or configure apps without GUI access, the Registry Editor offers granular control.
📌 Use case: Ideal for system administrators deploying standard configurations across multiple devices. You can also use this to configure legacy apps that lack the built-in priority settings.
⚠️ Warning: Editing the Registry incorrectly can lead to serious system instability. Always back up your Registry or create a system restore point before proceeding. Review the ⚠️ Things to look out for section to learn more.
Step-by-step procedure:
- Open the Run dialog (Win + R), then type regedit to open the Registry Editor.
- Confirm the UAC prompt if it pops up.
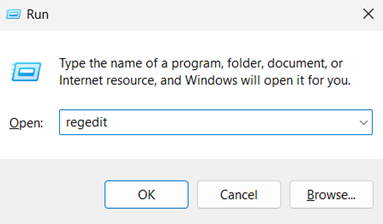
- Go to or paste this path in the address bar: HKEY_CURRENT_USER\Software\Microsoft\Windows\CurrentVersion\Notifications\Settings

- Open the folder matching your app’s internal name (e.g., Microsoft.OutlookforWindows_8wekyb3d8bbwe!Microsoft.Outlook).
💡Tip: Match the apps using their Package Family Name (PFN).
- Double-click the Priority DWORD in the right pane of the app’s Registry folder.
- If it does not exist, right-click the apps subkey, then select New > DWORD (32-bit) Value.
- Name the DWORD Value as Priority or Rank.
- Set the DWORD’s Value data to:
- 99 = Top priority
- 1 = High priority
- To set the app to Normal priority, Delete the DWORD.
- After choosing the priority level, you may close the Registry Editor.
The Windows 11 Notification Center should start checking these Registry configurations before sorting current and upcoming alerts on your device.
💡Note: Changes made in the Registry will only apply to the current user account.
⚠️ Things to look out for
This section highlights potential challenges to keep in mind while following this guide.
| Risks | Potential Consequences | Reversals |
| 1. Incorrect Registry edits | The operating system becomes unstable, and booting up fails. | Back up the registry (regedit > File > Export) or create a System Restore Point. Watch How to Back Up and Restore Windows Registry for more details. |
| 2. Granting “Top” priority without app permissions | Critical alerts won’t appear at the top. | Enable: Settings > Apps > [App] > Notifications > Allow high-priority toasts |
| 3. Forgetting temporary priority boosts | Non-critical apps retain high priority indefinitely. | Check app status via notification’s ⋯ (three-dot menu) > “Remove priority” |
| 4. Priority conflicts | Competing “Top” apps use FIFO (first-in, first-out). | Strategically assign “Top” to only mission-critical apps |
Key considerations when prioritizing notifications in Windows 11
Before finalizing your notification priority setup in Windows 11, keep these critical constraints in mind to avoid surprises.
Top priority is exclusive
Only one app can hold the “Top” spot in your Action Center notifications at any time. If you assign “Top” to a new app, it automatically demotes the previous holder to “High”.
Apps need to “introduce” themselves
Some applications won’t appear in Settings > System > Notifications until they’ve sent at least one notification. If an app is missing, trigger a test alert from it or restart the app to force notification registration.
Prioritize notifications in the Action Center for improved real-time updates
Customizing your Windows 11 notification priorities ensures critical alerts always cut through the noise, preventing costly oversights. With this guide, you are now equipped with the knowledge to command your alert hierarchy. Implementing these strategies can turn your Action Center from a chronological log into a prioritized mission-control dashboard.
Related topics


