")
NinjaOne released custom field functionality in 2021, adding a new level of flexibility, customization, and automation power to our platform. Custom fields are an advanced feature that requires setup to use, but once you start, the power and flexibility of this feature is almost limitless.
In part one of this guide, we’ll walk you through two powerful use cases for our NinjaOne custom fields, including:
A quick overview of Custom Fields in NinjaOne
Custom field roles
NinjaOne custom fields come in two categories – global custom fields, which apply to all devices regardless of their type, and role-based custom fields, which apply only to specific device types.
A global custom field may use some form of universal asset ID number that you apply to all devices. For example, you may use role-based custom fields to assign a device owner for workstations and laptops but not servers.
Custom field types
NinjaOne offers over twenty custom field types – from text to integers to drop-downs to device mapping fields. We also provide UI elements to make custom fields more user-friendly.
Access
Each custom field can be customized for technician and script access, allowing you to control who has access to what data.
Use Case #1: Monitor almost anything
As soon as you install the NinjaOne agent, we provide hundreds of data points on each monitored endpoint – from hardware specifications to installed software to CPU utilization. Even so, each business’s specific data points and monitoring needs are unique.
NinjaOne custom fields allow you to collect, store, and monitor almost any data point from an endpoint, ensuring you have the information you need to make decisions. A few examples we’ve seen from our partners:
- Identify and store the current power plan
- Document existing local administrator accounts
- Get a list of scheduled tasks on a device
- Monitor CPU temperature
- Monitor battery state
How to do it
Let’s walk through an example of setting up a custom field and script to monitor battery state.
To create a custom monitor using custom fields, you’ll need:
- A custom field
- A script to collect and store the data
- A custom condition to create an alert
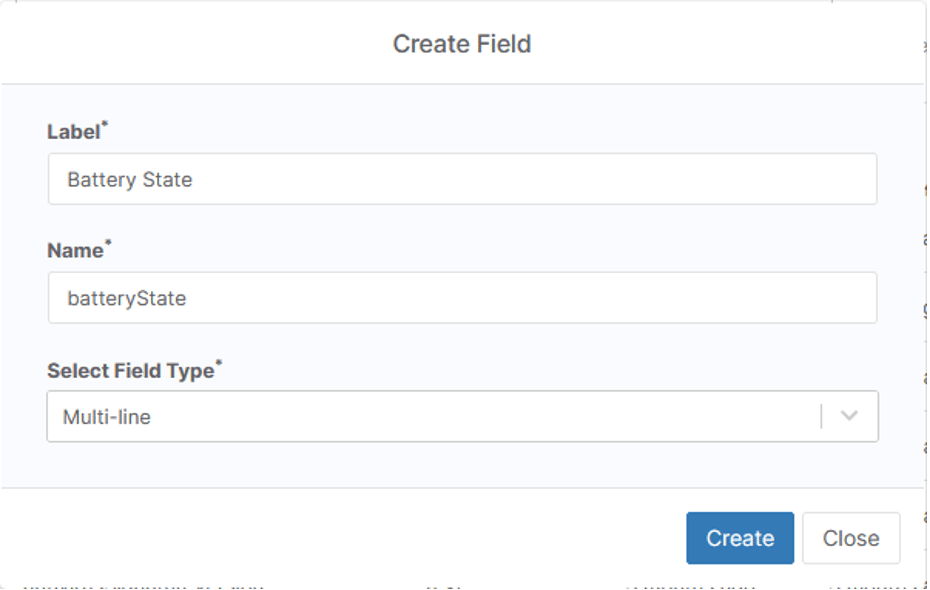
Setting up the custom field
The custom field will be used to store data returned by a script.
1) Add a new custom field. Since we’ll be monitoring the battery state on laptops, we’ll create a role custom field.

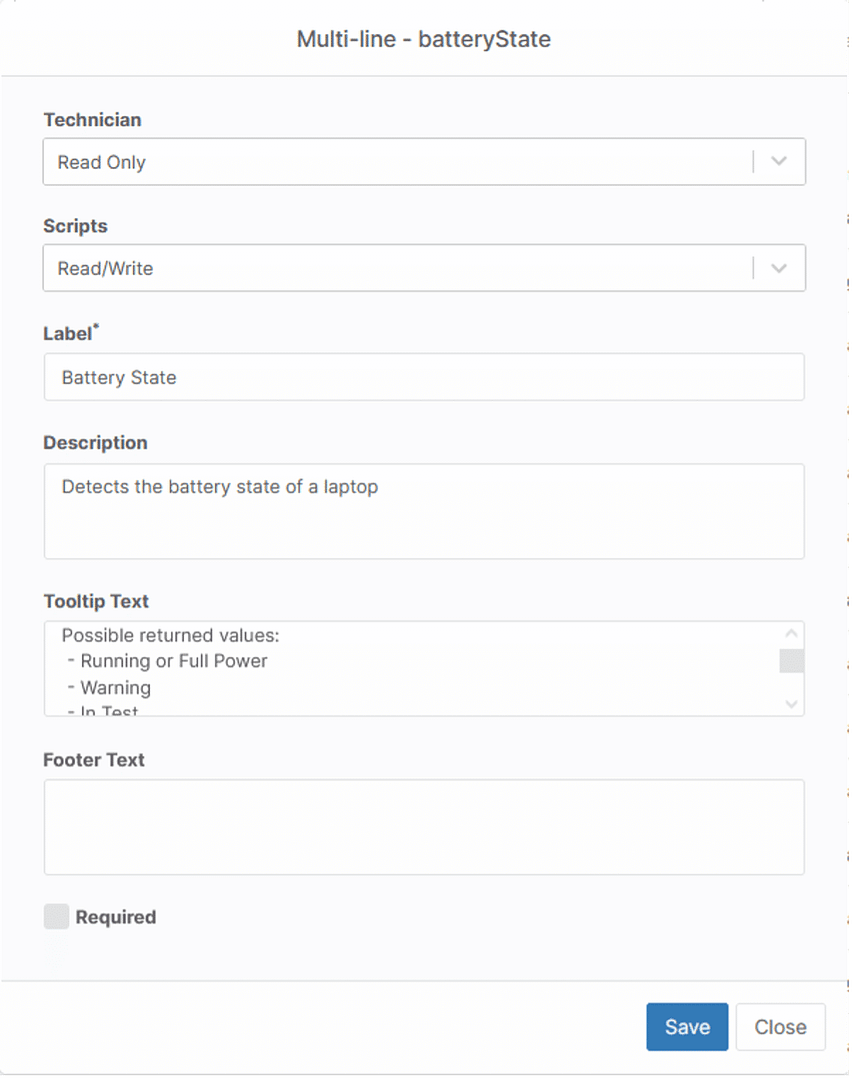
2) Next step is to configure the custom field. As we want this field to be written via a script, we will set technician access to ‘Read Only’ and set script access to ‘Read / Write’.
Note: if script access is not set to ‘Write’ or ‘Read / Write’, you will not be able to write to this field from a script.
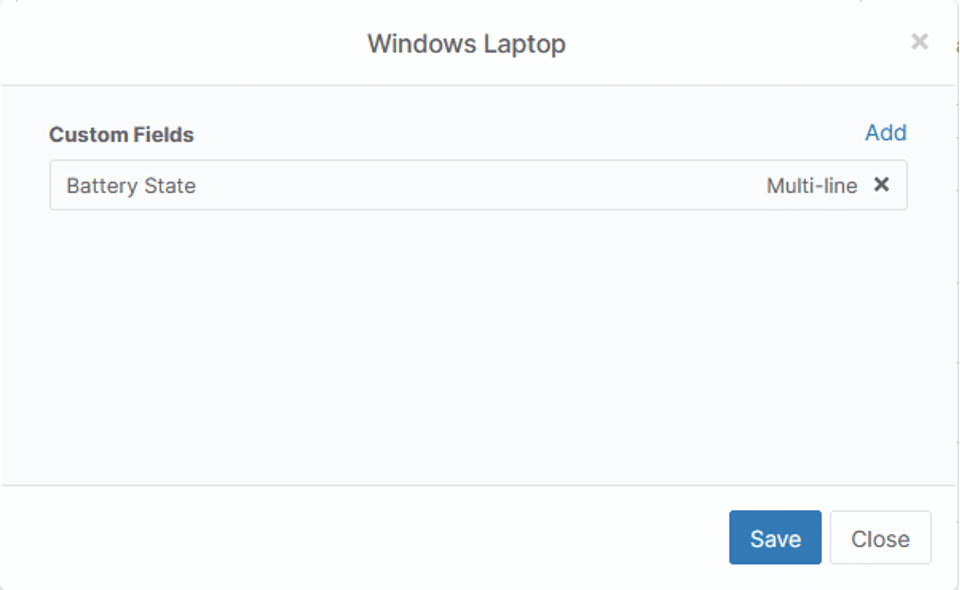
3) We now need to assign the Role Custom Field to a Device Role. Then, navigate to “Roles” and select the role type(s) you want this field applied. In this case, we’ll assign this Role Custom Field to the Windows Laptop role.
Setting up the monitor
Conditions in NinjaOne are used to monitor for state changes in an endpoint. NinjaOne includes the ability to monitor custom fields. We’ll setup a monitor to check for warning or degraded battery states.
- In your policy of choice, navigate to conditions, and click ‘Add a condition’
- Select condition type ‘Custom Fields’
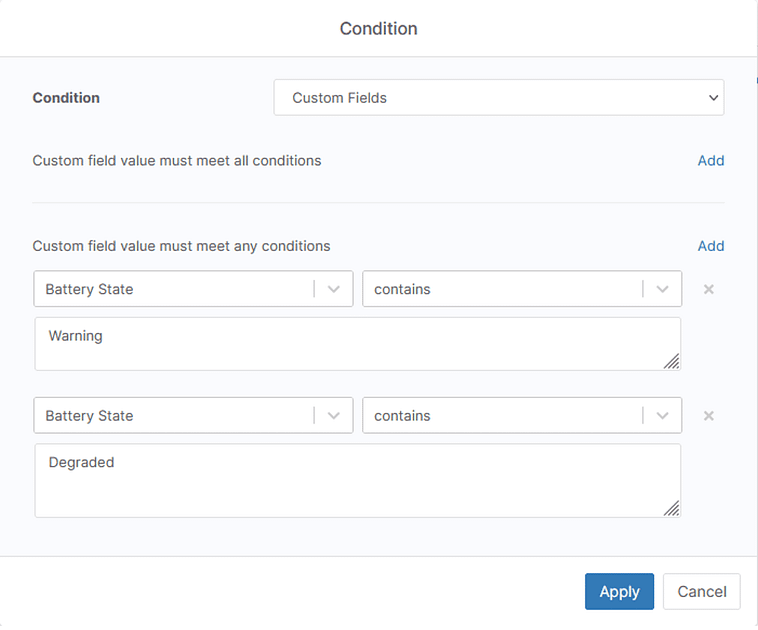
- Under ‘Custom field value must meet any conditions’ select ‘Add’ and search for ‘Battery State’
- Set selector to ‘Contains’ and add ‘Degraded’
- Repeat steps 3 and 4, but change ‘Degraded’ to ‘Warning’
- Set any severity, priority, notification channel, and ticketing settings to your preferences, and click ‘Add’.
If the condition is triggered, it will look something like this:

Creating a script to pull data
We need write a script that pulls data from the endpoint and stores the data in our custom field. We’ll be modifying the script found here (you’ll need to be logged into Ninja to see).
You might also be interested in our blog post with a script, How to Find Failed Login Attempts in Windows Using PowerShell.
$Battery = Get-CimInstance -ClassName win32_battery

Switch ($Battery.Availability) {
   1  { $Availability = "Other" ;break}
   2  { $Availability =  "Not using battery" ;break}
   3  { $Availability = "Running or Full Power";break}
   4  {$Availability =  "Warning" ;break}
   5  { $Availability = "In Test";break}
   6  { $Availability = "Not Applicable";break}
   7  { $Availability = "Power Off";break}
   8  { $Availability = "Off Line";break}
   9  { $Availability = "Off Duty";break}
   10  {$Availability =  "Degraded";break}
   11  {$Availability =  "Not Installed";break}
   12  {$Availability =  "Install Error";break}
   13  { $Availability = "Power Save - Unknown";break}
   14  { $Availability = "Power Save - Low Power Mode" ;break}
   15  { $Availability = "Power Save - Standby";break}
   16  { $Availability = "Power Cycle";break}
   17  { $Availability = "Power Save - Warning";break}
  }

$BatteryOutString = "Status: $($Battery.Status)",
                    "Battery Name: $($Battery.name)",
                    "Charge Remaining: $($Battery.EstimatedChargeRemaining)",
                    "Estimated runtime: $($Battery.EstimatedRunTime)",
                    "Availability: $Availability"
                    Format-Table | Out-String

Ninja-Property-Set batteryState $BatteryOutString
This script pulls battery information and formats it, then writes to the ‘batteryStatus’ custom field.
The only Ninja-specific bit of this Powershell script is the final line:
Ninja-Property-Set batteryState $BatteryOutString
Ninja-Property-Set is NinjaOne’s Powershell command to set a custom field to a specific value. The syntax is:
Ninja-Property-Set fieldName Value
In this case, we are setting the batteryState field to the value stored in the variable $BatteryOutString.
Adding this script to NinjaOne is easy.
- Navigate to ‘Configuration’ -> ‘Scripting’
- click ‘Add a new script’
- Copy the code above into the IDE
- If your custom field is not named ‘batteryState’ update the field name next to Ninja-Property-Set
- Set the script’s parameters to
- Name: Set Battery Status
- Language: PowerShell
- Operating System: Windows
- Architecture: All
- Save the script
Putting it all together
Now that you have your custom field, condition, and script, we need to put it all together so that we can automate this monitor.
Open the policy you added your condition to earlier in this guide and navigate to ‘Scheduled Scripts’.
Click ‘Add a scheduled script’.
Click ‘Add Script’
Select the ‘Set Battery Status’ script we created above.
You can run this script as frequently as you think necessary. To run hourly, select ‘Every’ from the ‘Schedule’ dropdown and set ‘Occurs Every’ to one hour. Then hit save.
The set battery status script will now pull data from all endpoints managed by this policy every hour and write to our custom field. If the return value on any of those endpoints contains ‘warning’ or ‘degraded’ we’ll get an alert so we can remediate.
This same process can be used to monitor almost any data point which can be pulled from an endpoint.
Use Case #2: Advanced Script Automation
NinjaOne gives you several ways to automate tasks across all your managed endpoints ranging from simple to complex.
The four core methods of kicking off automations in NinjaOne are:
- Scheduled scripts: Automations that run on a regular schedule across all endpoints in a policy
- Triggered conditions: Automations that are triggered by events, state changes, or performance behavior on an endpoint
- Scheduled tasks: Automations that run on a regular schedule across all selected endpoints
- Ad-hoc scripts: Automations that are run manually against a single or multiple endpoints
All of these methods allow you to deploy a set of scripts based on a single time or event-based trigger. Standing alone, these automation methods can be really powerful and provide a lot of value but are not incredibly dynamic.
For more dynamic automations, we need to add in two concepts:
- Script result conditions
- Custom fields
Both of these features in NinjaOne allow for dynamic chained automations based on the results of an initial script deployment. The core difference is that script result conditions don’t store values for later analysis and can only respond to a single script result.
Count and alert on failed login frequency
NinjaOne’s built-in Windows Event ID condition allows you to trigger an alert, create a ticket, or trigger a script execution whenever a specific event ID is detected. This is incredibly useful to detect events like an admin account being created, changes being made to the Windows firewall, or identifying something like a Windows Server Backup failure where singular events are actionable.
Where we need a large number of events for a warning to be actionable, we need custom fields. For example, a single failed login is unlikely to be actionable. Ten failed login attempts in the past hour, on the other hand, maybe a sign that something is wrong. So let’s create an automation that counts failed logins over the last one-hour period and alerts if above the threshold of 10 failed logins.
Setup the custom field
We’ll start by creating a custom field to store our failed login attempts. For this exercise, we are creating a global custom field as we will be detected failed logins across device types.
- Field Label: Failed Login Attempts
- Field Name: failedLoginAttempts
- Field Type: Integer
- Scripts: Read / Write
We’ll setup a second custom field to get the Security ID of the most recent login attempt.
- Field Label: Failed Account Login User Name
- Field Name: failedAccountLoginUserName
- Field Type: Text
- Scripts: Read / Write
Write the monitoring script
Next, we’ll write a script to detect failed logins. This is fairly simple to do – we’ll just query the event log and count the number of failed login attempts. We’ll then write the returned value to the failedLoginAttempts field. We’ll also return the user name to the failedAccountLoginUserName field.
$failedLogins = ((Get-EventLog -LogName Security -After (Get-Date).AddDays(-7) -InstanceID 4625) | Select @{Name="UserName";Expression={$_.ReplacementStrings[5]}} | Group-Object -Propert UserName).count

$Login = ((Get-EventLog -LogName Security -After (Get-Date).AddDays(-7) -InstanceID 4625) | Select @{Name="UserName";Expression={$_.ReplacementStrings[5]}} | Group-Object -Propert UserName).name

Ninja-Property-Set failedLoginAttempts $failedLogins
Ninja-Property-Set failedAccountLoginUserName $Login
Adding this script to NinjaOne is simple and easy.
- Navigate to ‘Configuration’ -> ‘Scripting’
- click ‘Add a new script’
- Copy the code above into the IDE
- If your custom field is not named ‘failedLoginAttempts’ update the field name next to Ninja-Property-Set
- Set the script’s parameters to
- Name: Count Failed Login Attempts
- Language: PowerShell
- Operating System: Windows
- Architecture: All
- Save the script
Next, we’ll need to setup this script to run periodically.
- In your policy of choice, navigate to Scheduled Scripts and click Add a Scheduled Script
- Click Add Script and select the Count Failed Login Attempts script
- Give the script a name and description
- Set the schedule to run every hour
Write the remediation script
If we can detect a high volume of failed login attempts, we may want to remediate this issue by temporarily locking that account. We’ll pull the user name from the failedAccountLoginUserName field and disable that user with Powershell.
$User = Ninja-Property-Get failedAccountLoginUserName

Disable-LocalUser -Name $User
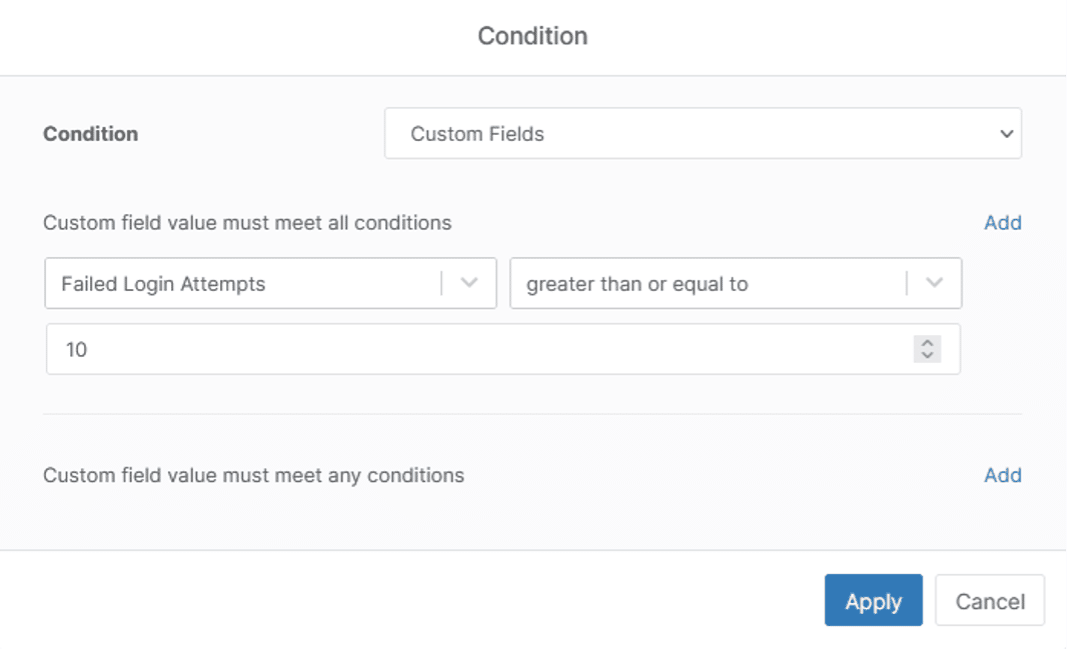
Setup the condition
- In your policy of choice, navigate to conditions, and click ‘Add a condition’
- Select condition type ‘Custom Fields’
- Under ‘Custom field value must meet any conditions’ select ‘Add’ and search for ‘Failed Login Attempts’ for an operator use ‘greater than or equal to’ and set the value to 10.
- Click ‘Apply’
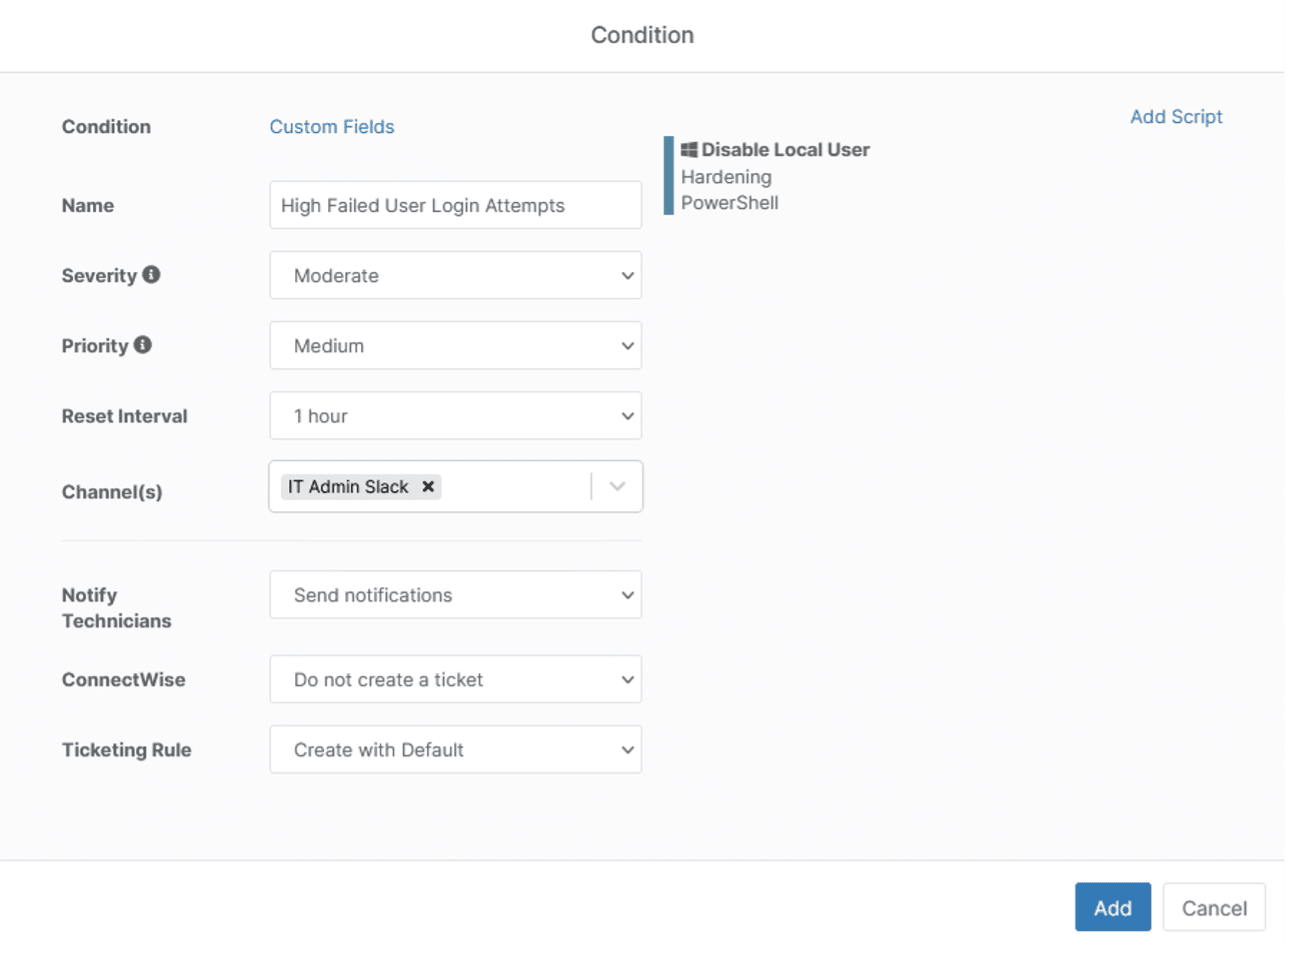
- We’ll give the condition a name ‘High Failed Login Attempts’
- Set the severity, priority, and reset intervals
- Set whether you want notifications and tickets created
- Click ‘Add’
- If we want to automate disabling the local account user, we can add the Disable Local User script as an automation to this condition
Continue on to parts two and three of the series below:
- https://www.ninjaone.com/blog/how-to-provide-end-user-self-service-tools-with-ninjaone/
- https://www.ninjaone.com/blog/what-professionals-need-to-know-about-it-asset-lifecycle-management/https://www.ninjaone.com/blog/asset-lifecycle-management-using-ninjaone/
Why NinjaOne?
Tired of cycling through RMMs and being disappointed? Try out custom fields in Ninja for yourself and see why NinjaOne is different. Start your free trial.